**If you are unfamiliar with this project, check out my first post introducing my pilot project with LearnPads and comparing them to iPads. We have been learning about the vowel digraph "oo" as in the word cook. We practiced with this vowel digraph as a whole group frequently throughout the week. In addition, students had the chance to demonstrate their understanding of this new digraph by creating a picture quiz for their classmates to complete. 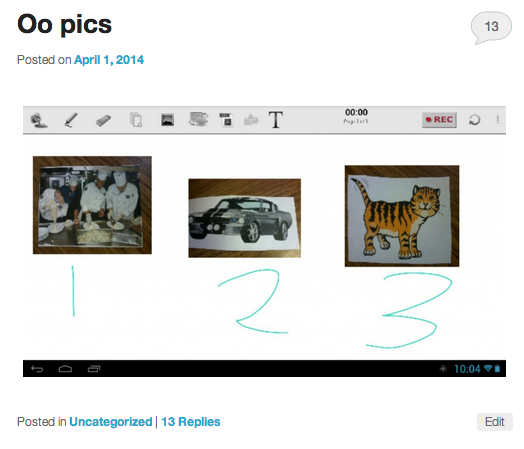 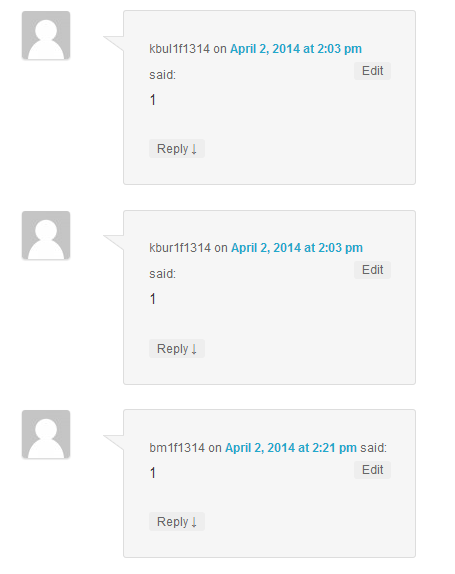 Above is an example of a completed product made by a student. There were pictures posted around the classroom. Students had to snap a total of three pictures. One of the pictures had to be an example of the "oo" digraph while the remaining two pictures did not. When they were done snapping pictures, they had to label each picture with a number. Their final picture collage was added to their blogs. The next day, students spent time looking at all their peers' posts about the "oo" digraph. They left comments with their guess as to which picture was an example of the "oo" digraph. By completing this activity, students had to apply their understanding of the digraph as they sorted through pictures. In addition, by posting it to the blog, students had to differentiate between the images as they made their guess as to which number/picture combination represented the "oo" digraph. So how did my students accomplish this activity. I needed a way for them to snap the pictures, put all the pictures on the same page as well as be able to write a number under each image (1, 2, 3). Check out the methods below that could be used on both the iPad and LearnPad. Pic collage--LearnPad or iPad PicCollage is both an IOS and Android app. It allows you to snap pictures or add them from your library/gallery. You can then add text to your collage. Below are the steps for creating the collage that my students would have followed.  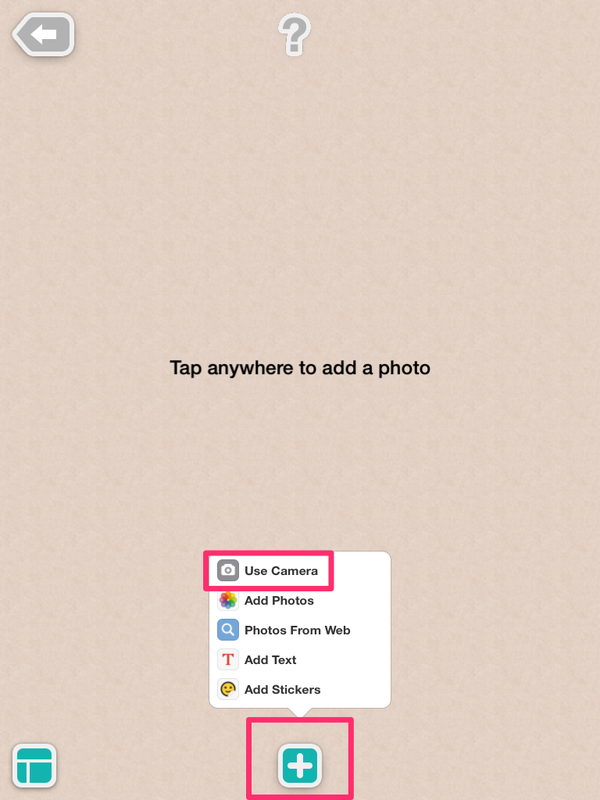 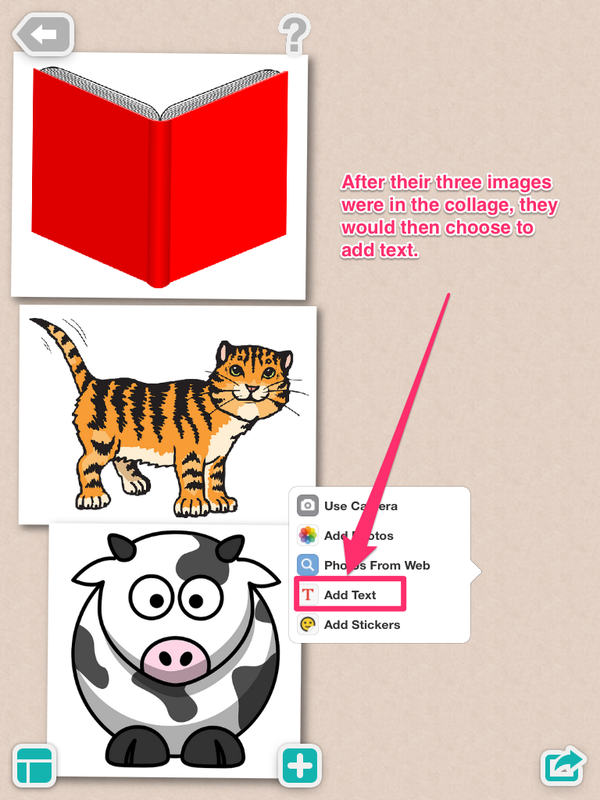 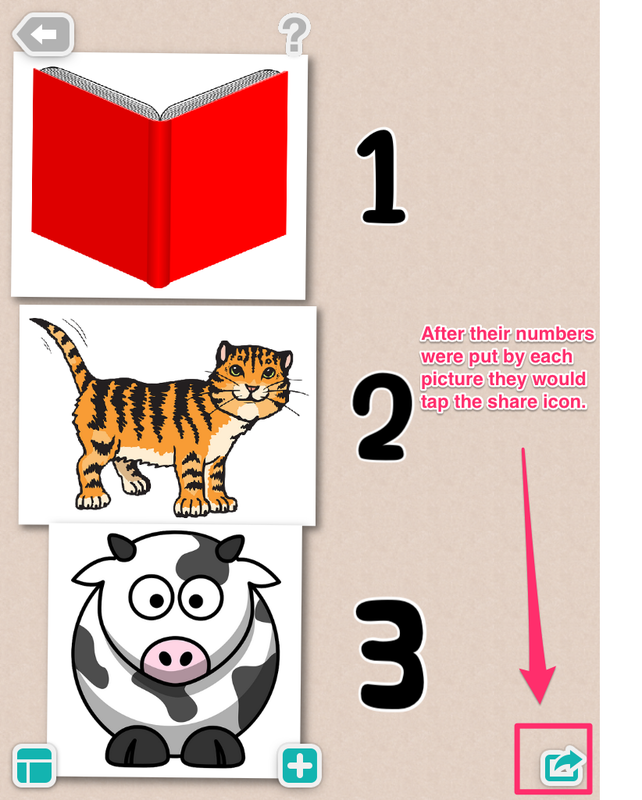 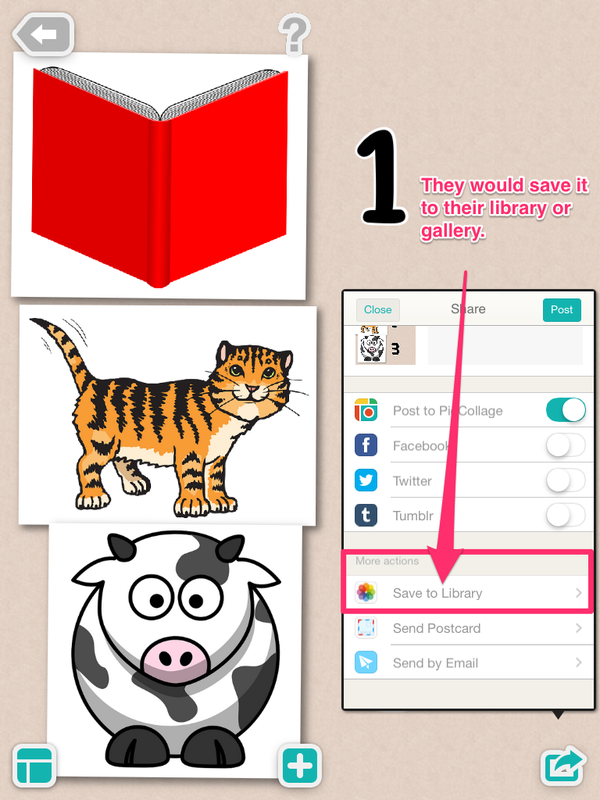 When students had the image saved to their camera roll, they would then open up their blogging app (Edublogs on the LearnPad and Kidblog on the iPad). They would then publish a new post with their newly created collage. LearnPad: Lensoo Create App Below is an example of using the Lensoo Create app to create a pic collage. You are not recording with this screen casting app but using it as a blank canvas. You can see the directions below for completing the "oo" assignment with Lensoo Create instead of the Pic Collage app. 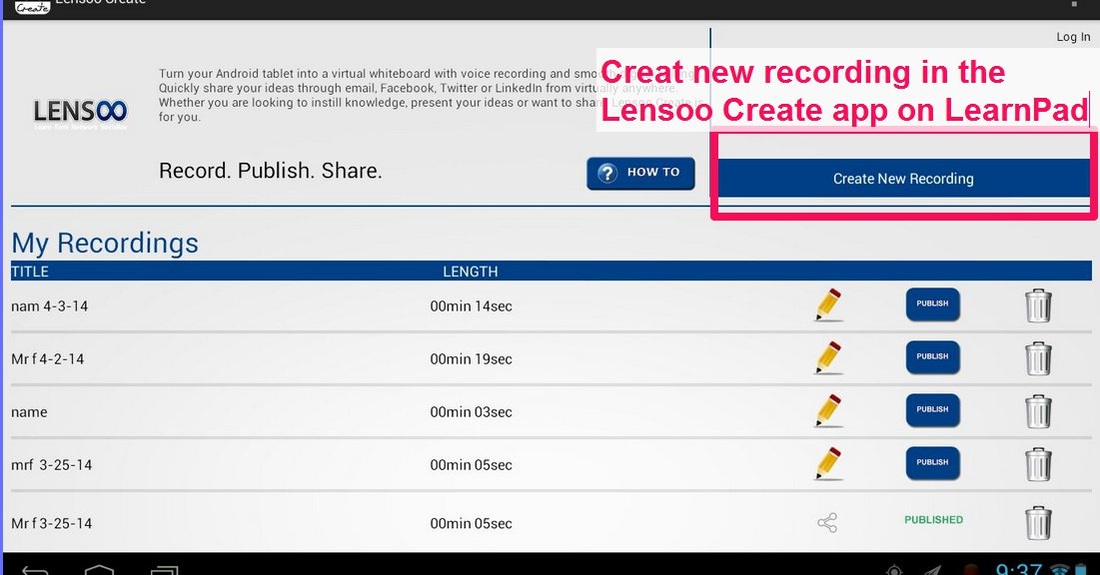 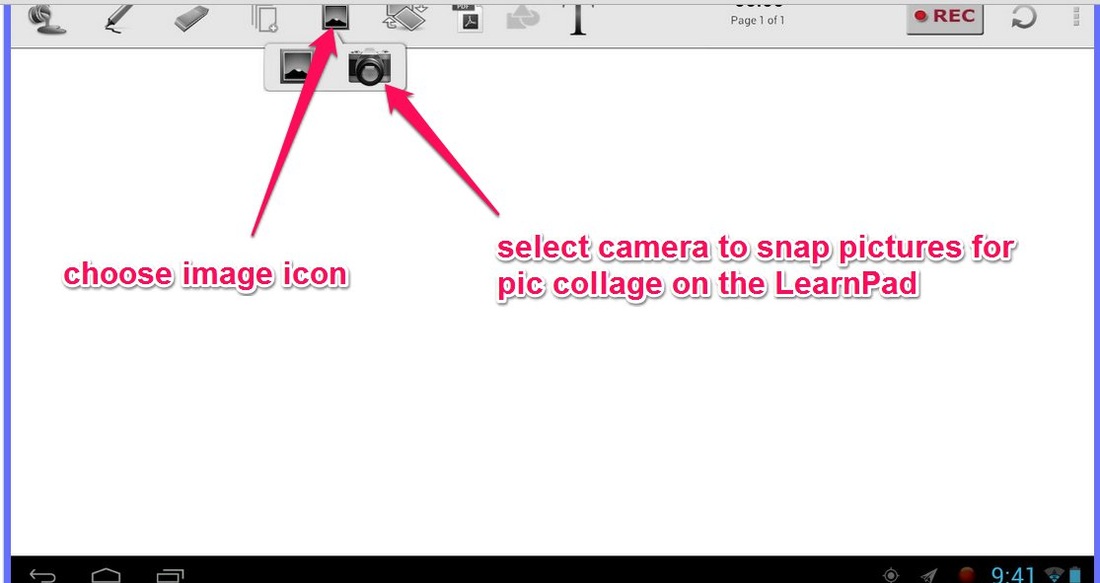 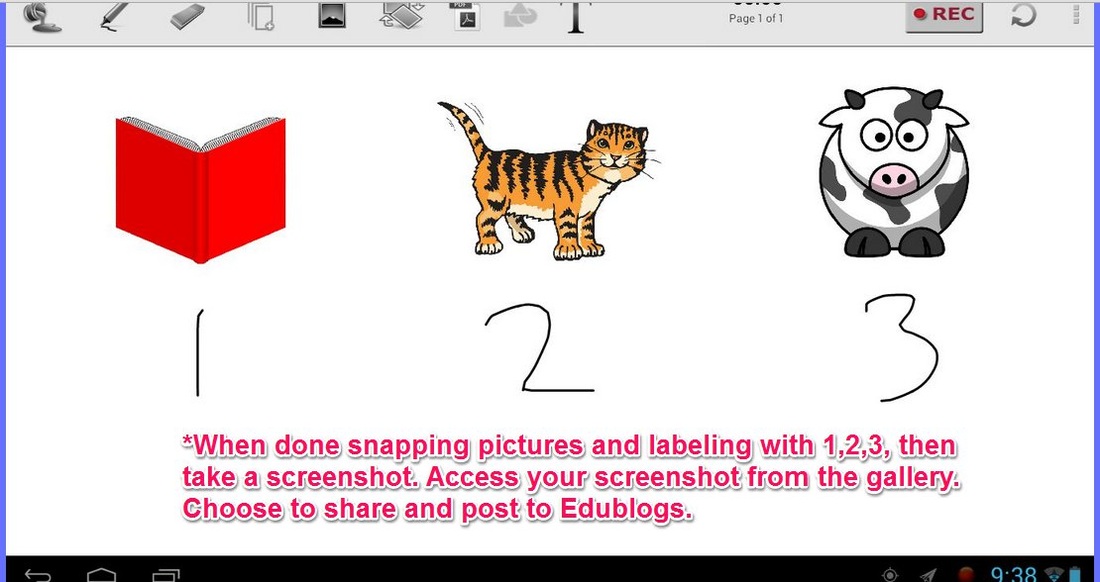 iPad: Educreations App Below is an example of using the Educreations app to create a pic collage. You are not recording with this screen casting app, but using it as a blank canvas. You can see the directions below for completing the "oo" assignment with Educreations instead of the Pic Collage app. 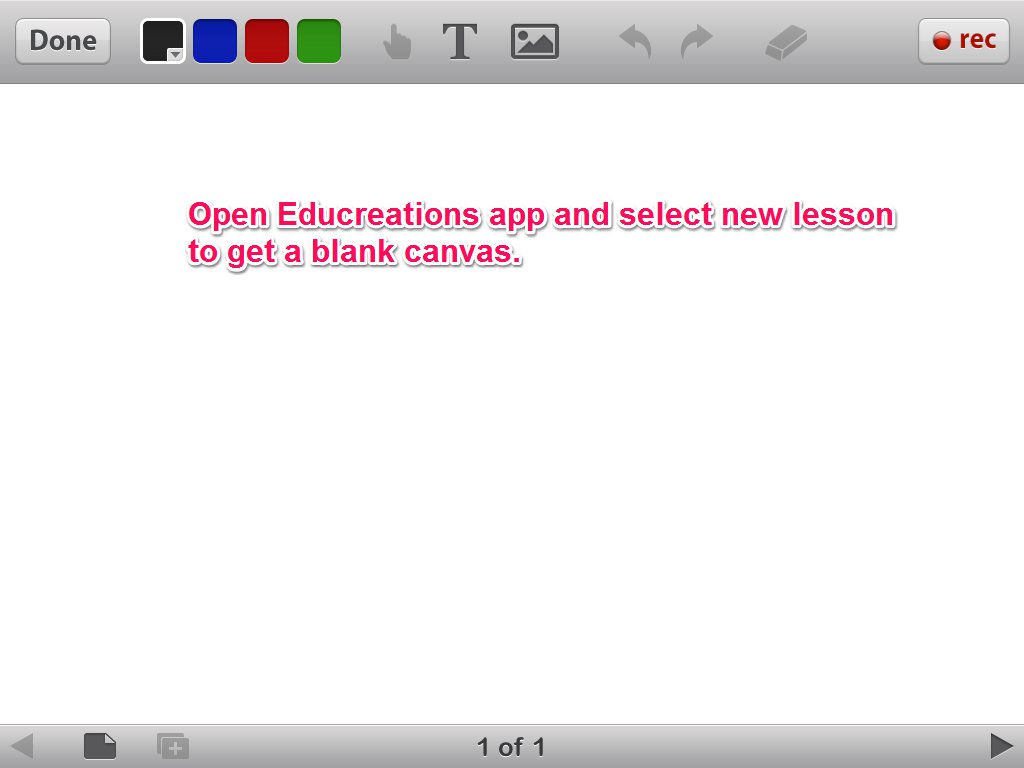 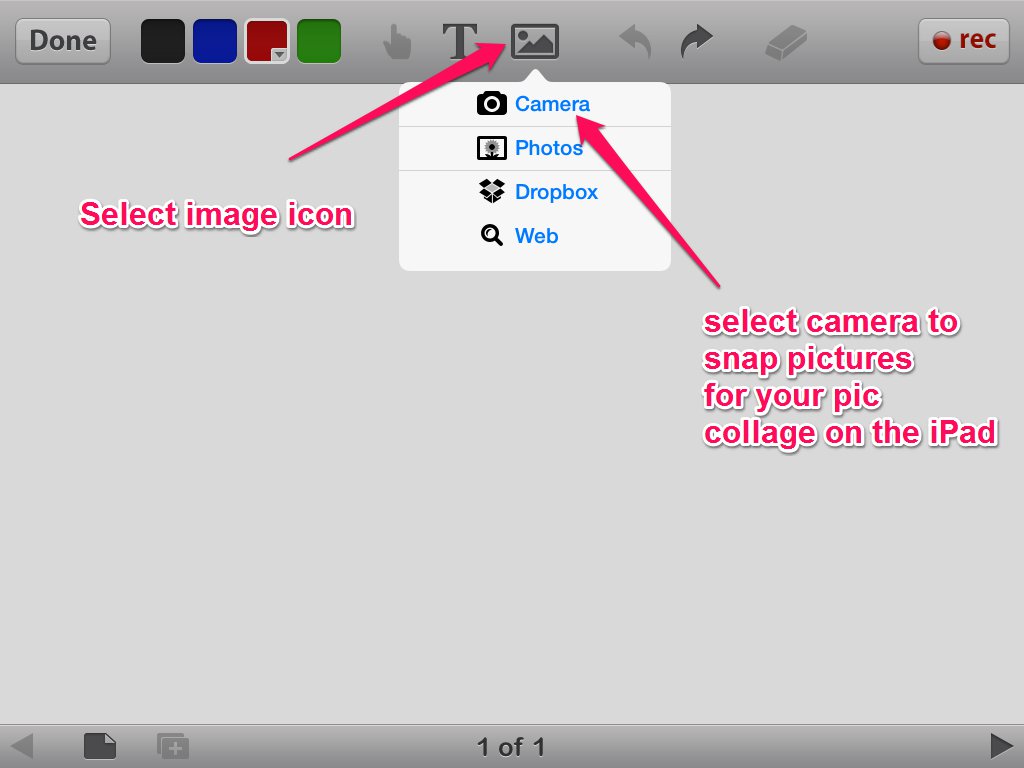 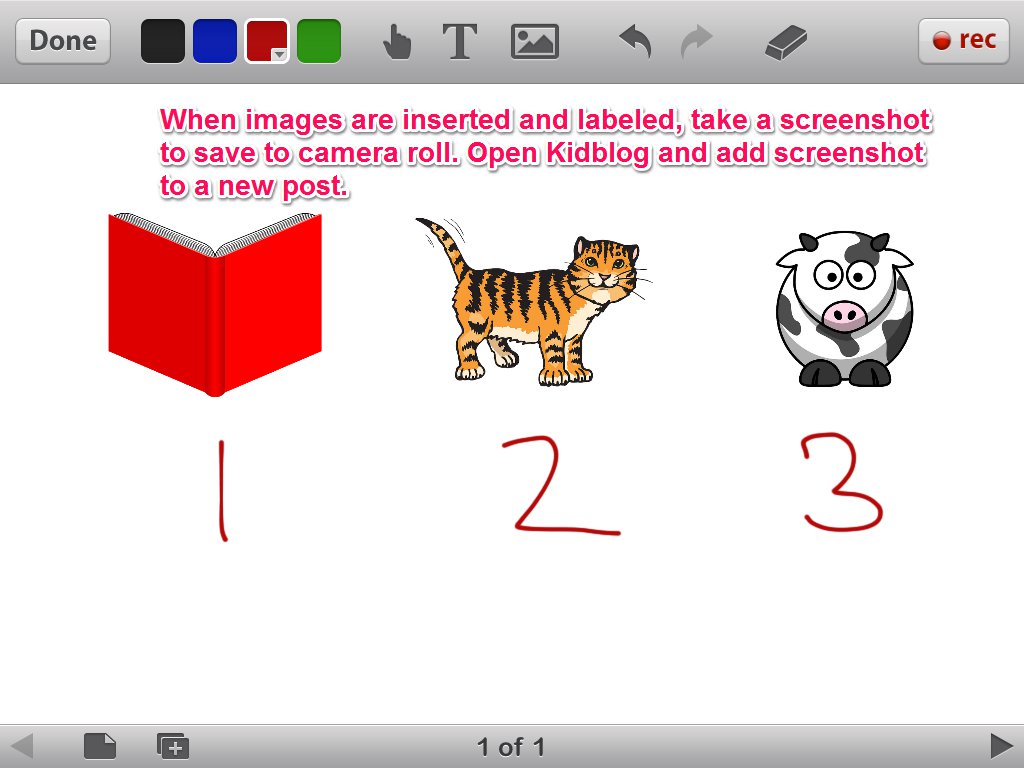 Share This:
0 Comments
**If you are unfamiliar with this project, check out my first post introducing my pilot project with LearnPads and comparing them to iPads. My first graders have been working with bossy "r" combinations. Recently we spent some time sorting images based on having the bossy "r" vowel sound or not. Check out my previous post about Bossy "R" sorting. To continue integrating the LearnPads into our daily instruction, students created Pic Collages of images representing bossy "r" combinations. The images we used are accessible below. These images were posted around the classroom. Before starting, students had to determine which bossy "r" combination they would be "hunting" for during this activity (ar-images, or-images, ir, er, ur-images). After they decided on a bossy "r" combination, they used the Pic Collage app to snap pictures of only those images that represented their chosen bossy "r" combination. Once their Pic Collage was created, it was then posted to their blog. The following day, students spent time accessing their peers' blog posts with their Pic Collages. It was then their job to comment with their guess as to which bossy "r" combination was represented in the Pic Collage. LearnPad: Bossy "R" Pic COllages Steps for Bossy "R" pic collages Below are the apps we used on the LearnPad.  1) Open the Pic Collage app to get started. 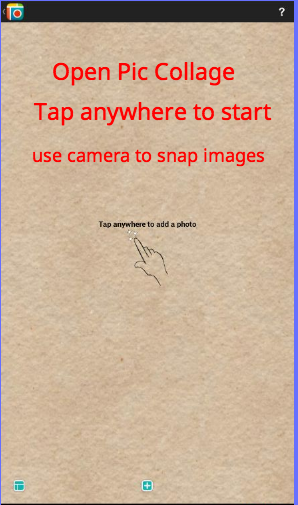 2) Snap pictures using the built in camera. Click share icon when done with collage. 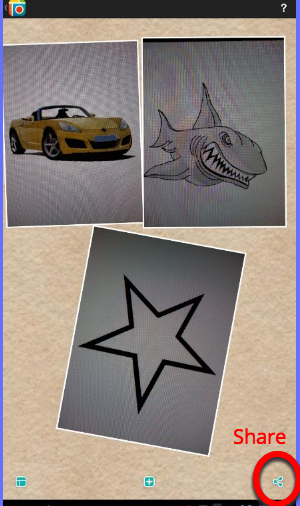 3) Share to Edublogs. 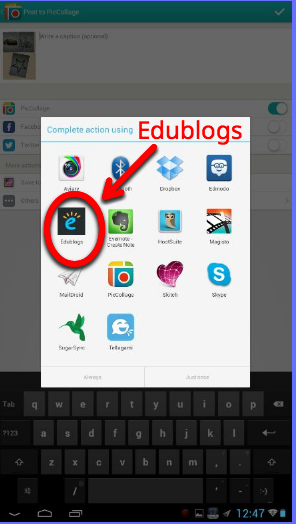 4) Give it a title and tap the airplane to publish live. 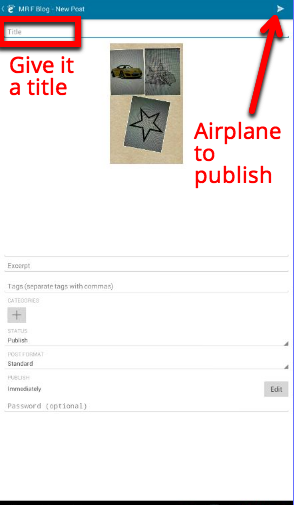 iPad: Bossy "R" Pic Collages Steps for Bossy "R" Pic Collages Below are the apps we would use on the iPad. 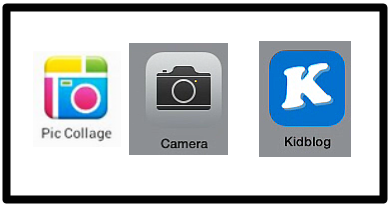 *The steps for creating the collage would be identical to the LearnPad until you got to the blog post step. One big difference would be saving your completed Pic Collage to the camera roll before being able to post it to Kidblog. Once the image was saved to your camera roll, you would then be able to open up the Kidblog app and create a new post. Insert the collage from the camera roll, give the post a title and click Publish to make it live. Share This:
**If you are unfamiliar with this project, check out my first post introducing my pilot project with LearnPads and comparing them to iPads. When learning to read in first grade, we spend time learning about the bossy "r" or "r" controlled vowels. To utilize our tablets and provide practice, we completed a sorting activity with bossy "r" combinations. The goal of this activity was for students to demonstrate their understanding of bossy "ar" combinations by sorting pictures based on having the bossy "ar" sound or not. Students would insert a background image into a sceencasting app. After the background image was inserted, students then inserted some pre-selected images. Once these images were inserted, students spent time sorting the pictures into a bossy "r" or "other" category. When all images were sorted, a screen shot was captured and in turn posted to their blog. The process is highlighted below for both the LearnPad and iPad. LearnPad: Bossy "R" Sorting I had to do some backend work prior to this activity so that the images were all accessible for students. You can download the images that I used by clicking here. We used the apps below to complete this sorting activity on the LearnPad.  Steps on the LearnPad 1) Open the Lensoo app and click create new recording. 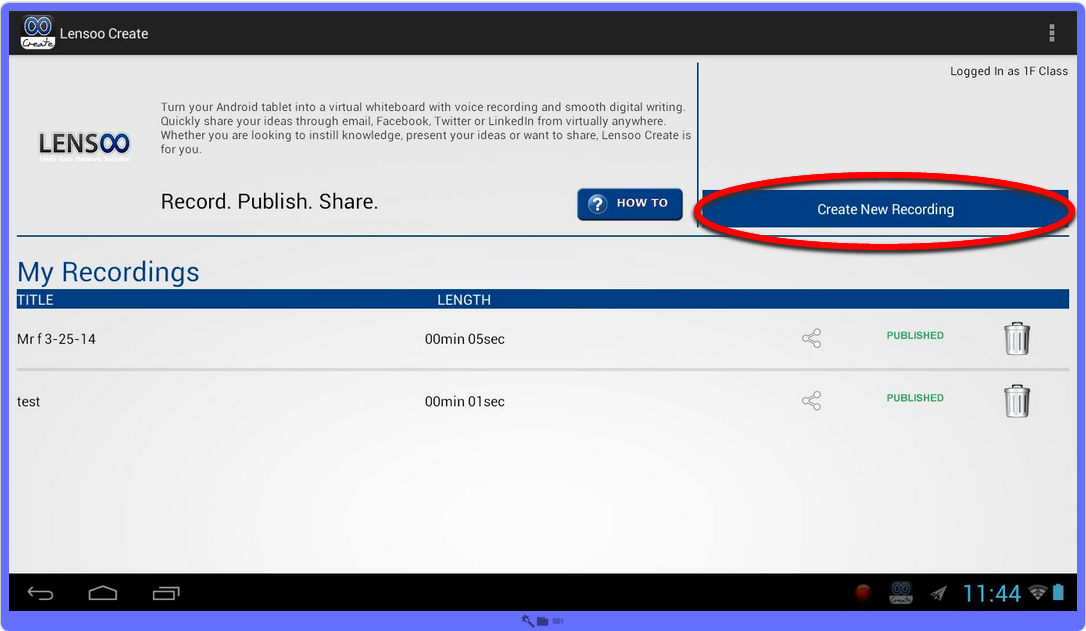 2) Click on the landscape icon to insert images from Dropbox. 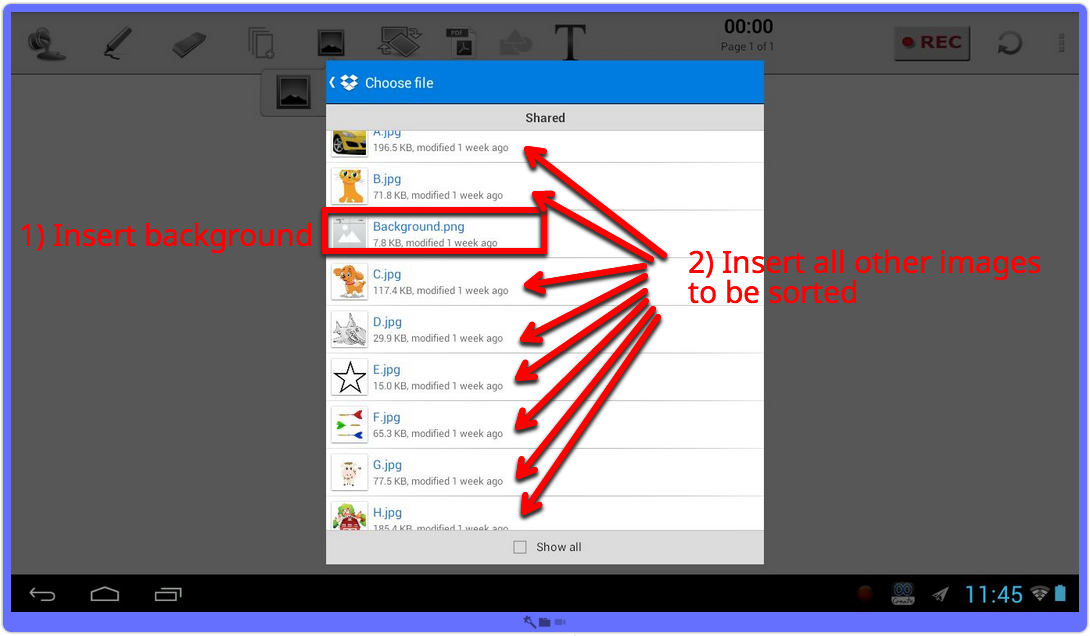 3) Sort pictures and then take a screenshot. 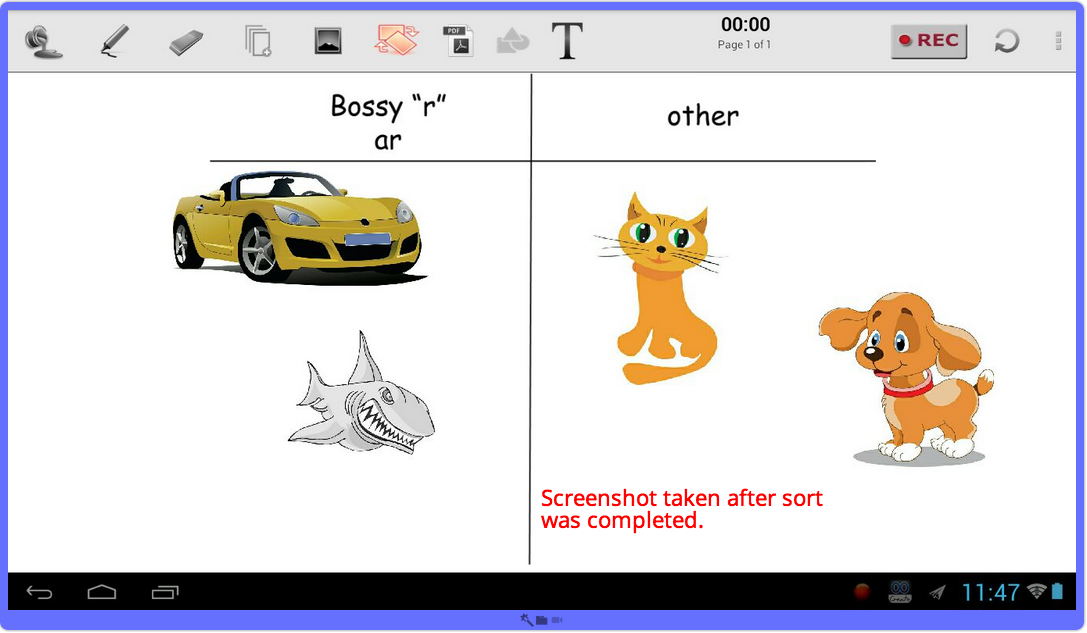 4) Access your screenshot from the Gallery. 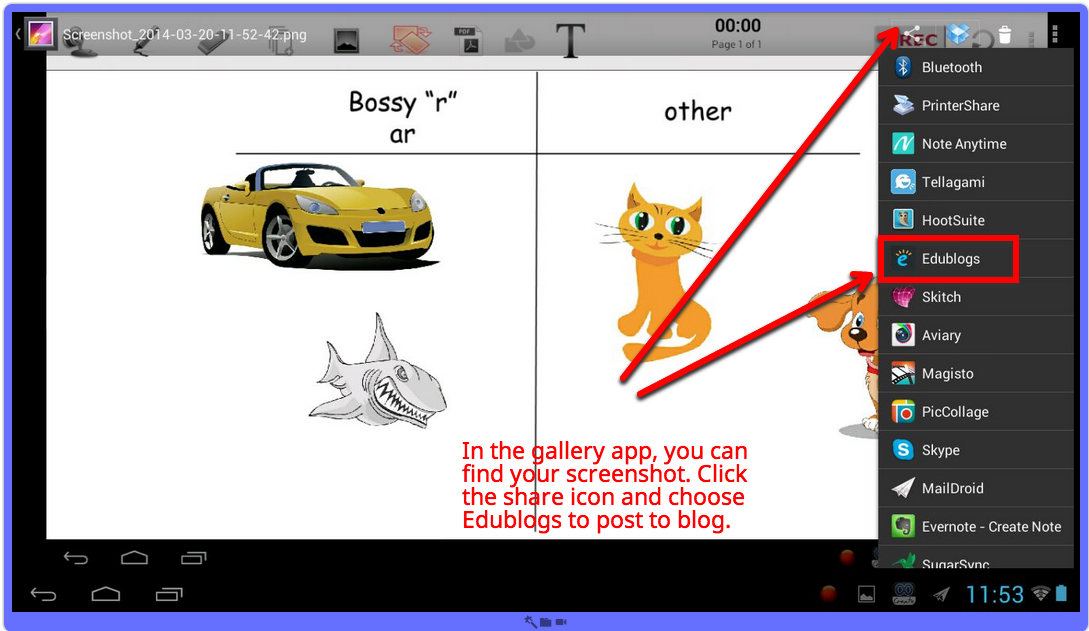 5) Share image to Edublog. 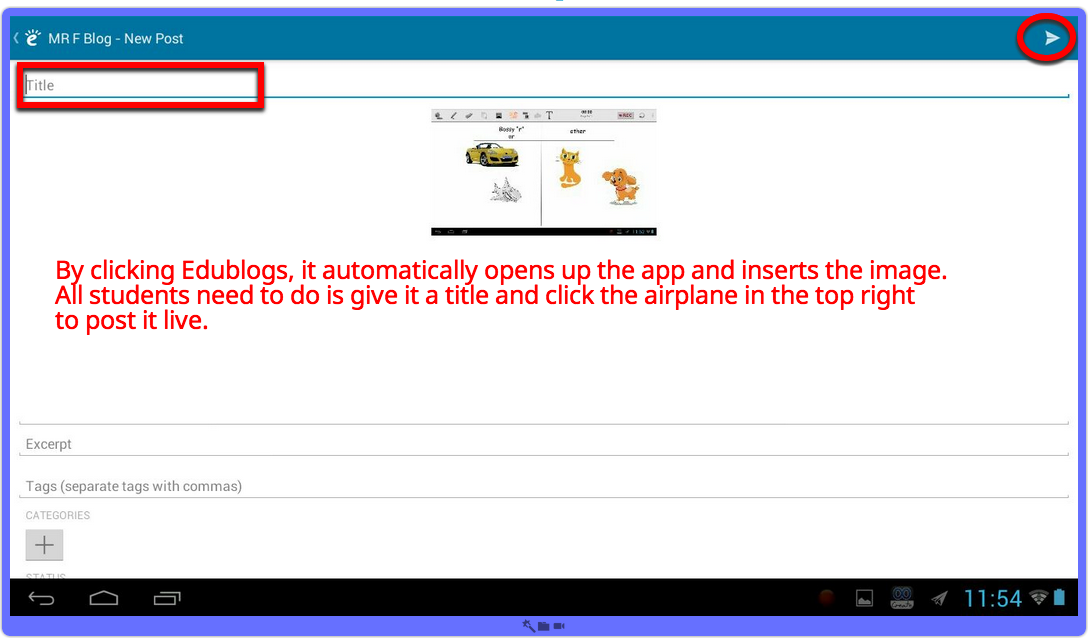 Student Sample of completed sort 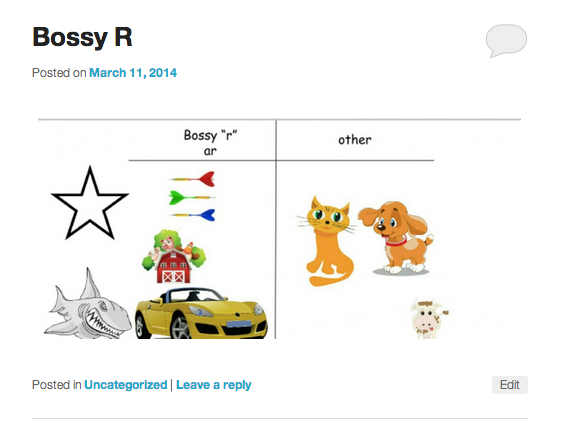 iPad: Bossy "R" Sorting The backend work for setting up images would be identical on the iPad. The big differences would be the apps used for this activity. Below are the apps that would be used on the iPad. *You could use Edublogs as the blog platform as well. My students are familiar with Kidblog on the iPad so we would have used Kidblog to post.  Steps on the iPad 1) Open up the Educreations app and click New Lesson. 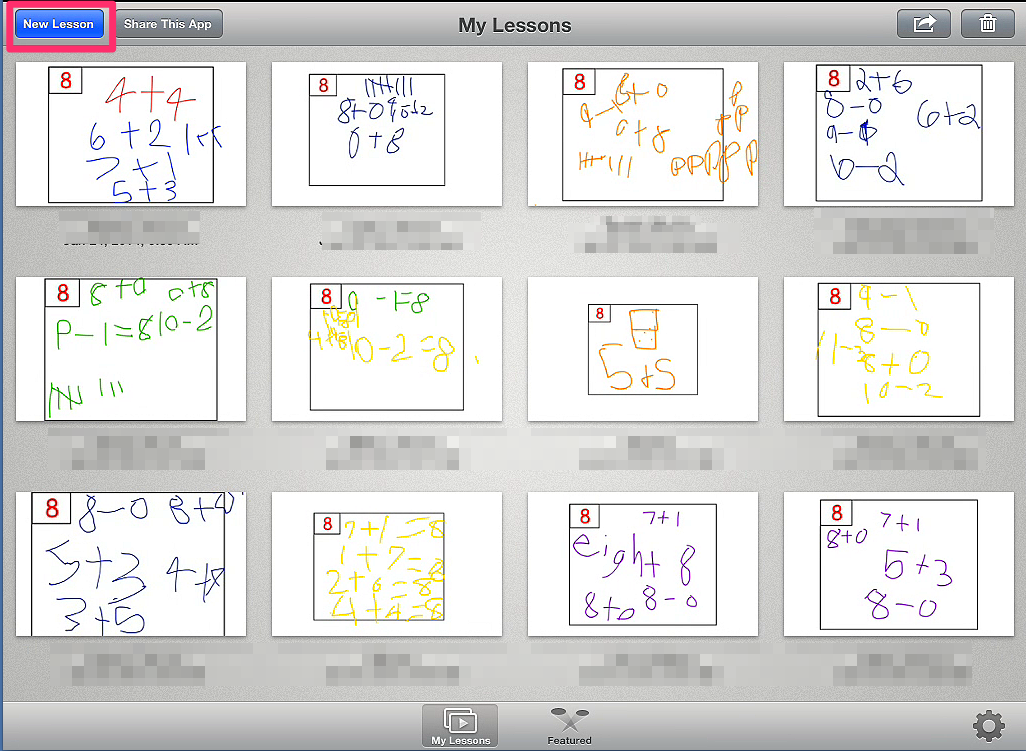 2) Click the landscape icon to access Dropbox. Insert background first then all other images. 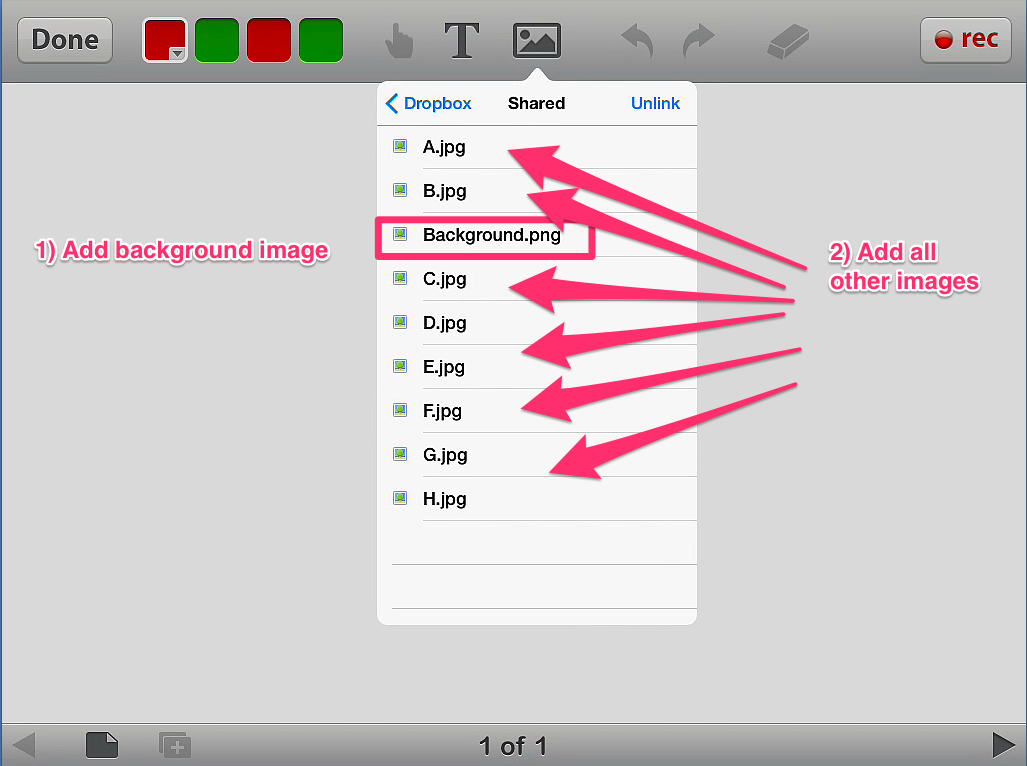 3) After images are sorted capture a screen shot. 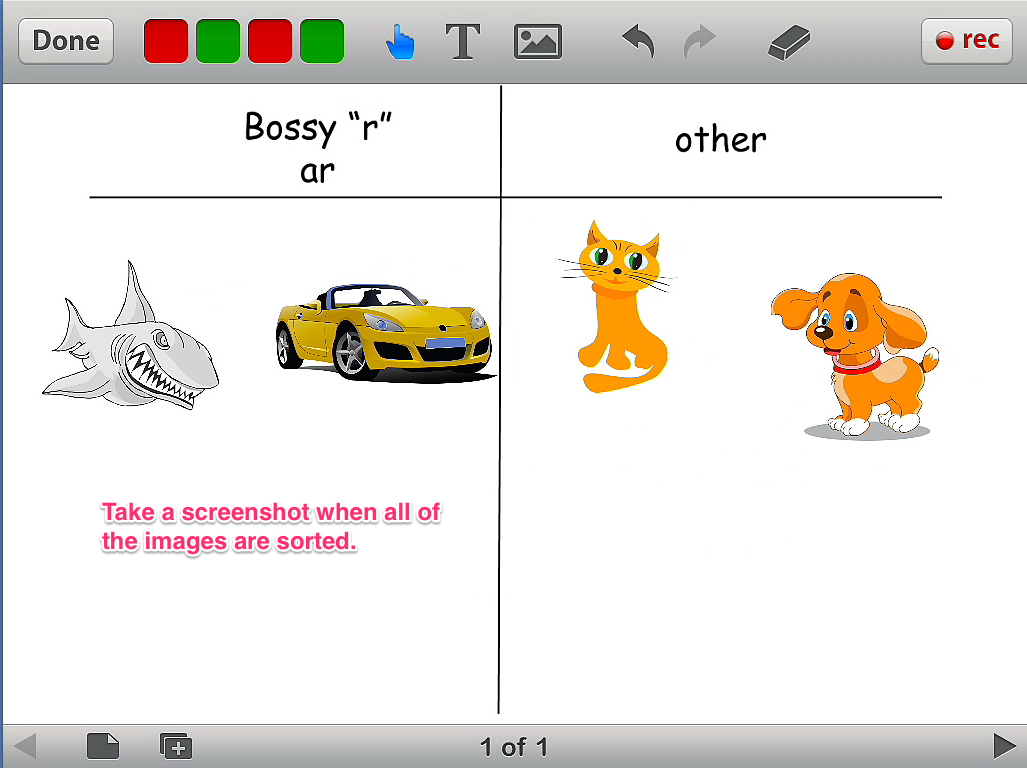 4) Open the Kidblog app, New Post, add photo from Library. 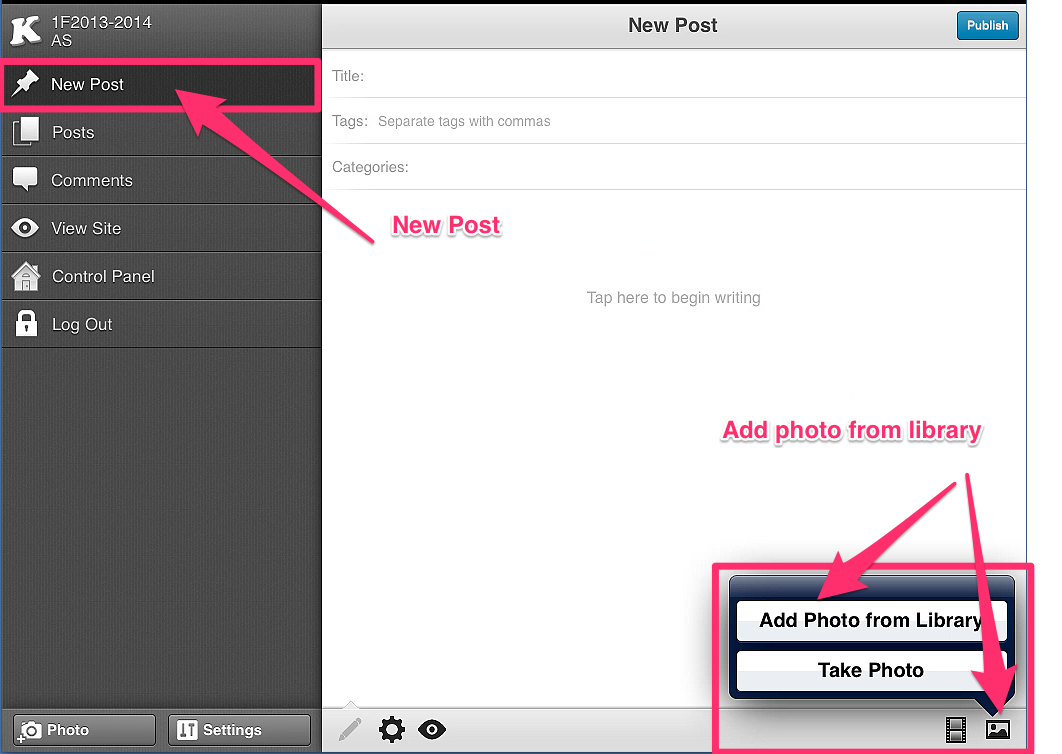 5) Add a title and click Publish to make it live. 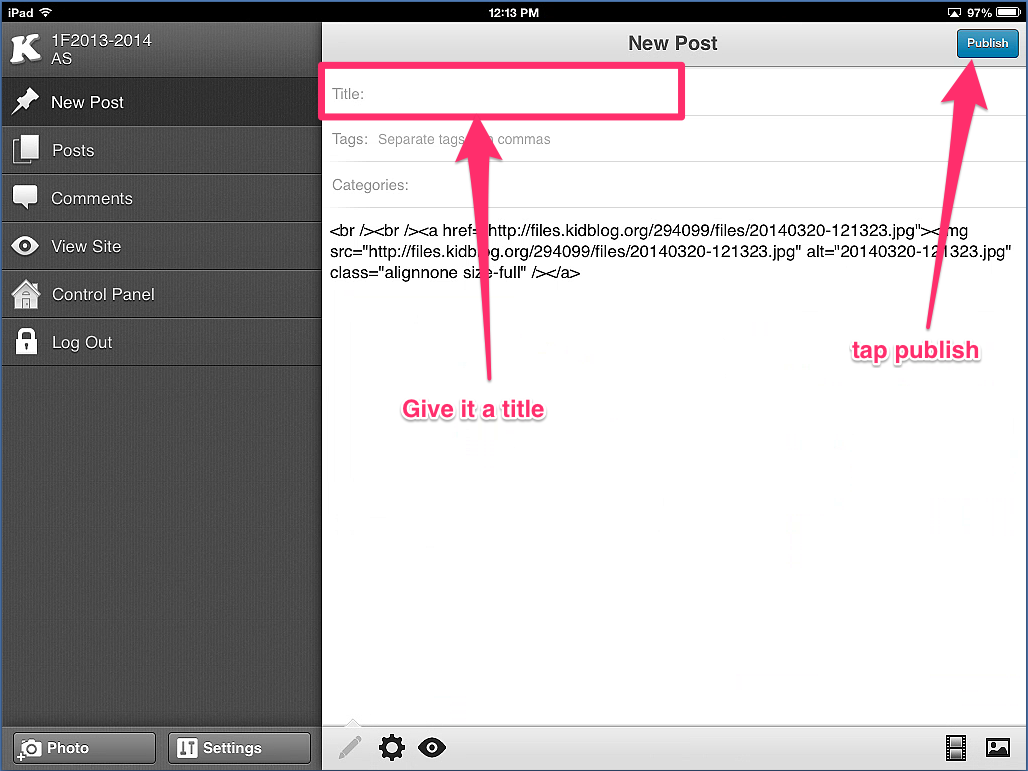 Share This:
**If you are unfamiliar with this project, check out my first post introducing my pilot project with LearnPads and comparing them to iPads. I had previously posted about using QR Codes with the LearnPad for my students to collaboratively build compound words. While we continued to work on our understanding of compound words, my students used the LearnPads to show their understanding of building compound words independently. To do this, students used the following three apps: 1) Lensoo Create 2) Dropbox 3) Edublogs Lensoo Create This app was used as a white board for students to manipulate pictures and annotate the names of each picture. Dropbox This app allowed us a simple method of sharing images to the devices which in turn made it possible for students to insert images into the Lensoo Create app. Once images were inserted, they were able to manipulate and write to create their compound words. Edublogs When students had finished moving their images around and labeling them to show compound words, they would take a screen shot, open up their Edublogs app and create a new post. They would insert their screenshot and publish their post. Video Tutorial of process on LearnPad & IPAdStudent Samples of final product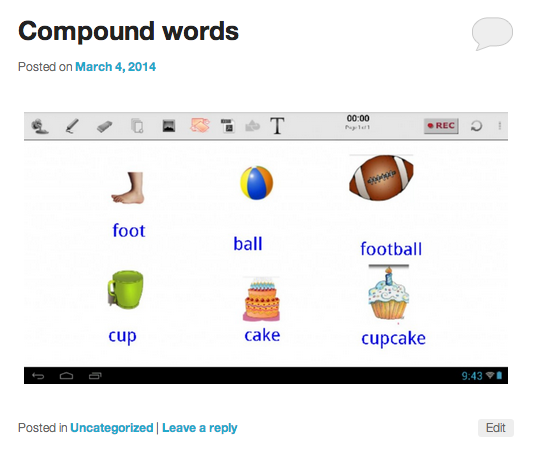 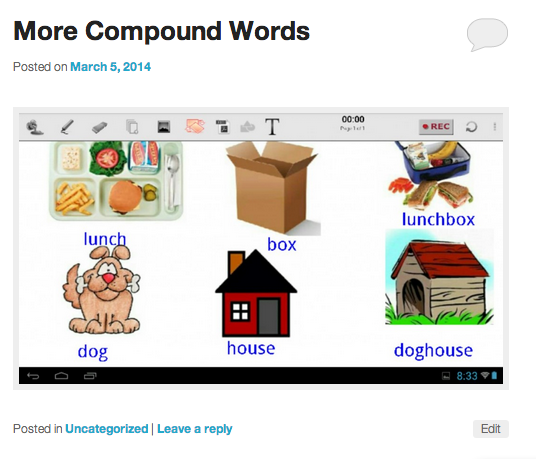 Share This:
**If you are unfamiliar with this project, check out my first post introducing my pilot project with LearnPads and comparing them to iPads. 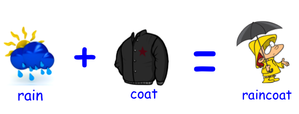 My first graders are spending this week learning about compound words. We began by watching the Compound Word Boogie. After this short video and gaining a better understanding of combining two words together to make one, we moved onto collaboratively practicing compound words. To summarize this activity, we used QR codes to practice building compound words. Students would scan a QR code. Upon scanning, a word would be revealed. After having the word displayed on their tablet, they had to search around the room for other classmates that had the other parts to their compound words. For example, if student one had rain, student two had coat and student three had raincoat, they had to find each other to build their compound word. Check out some of the steps below for this process. QR Codes
I began by creating a new blog post for each of the words as well as their compound word. You can see the sample above. After creating a post for each word, I then took that URL and created a QR Code using QR Code Generator. These QR Codes were then saved into a Google Doc for future reference. See examples below for turning URL into QR Code and saving to Google Doc. 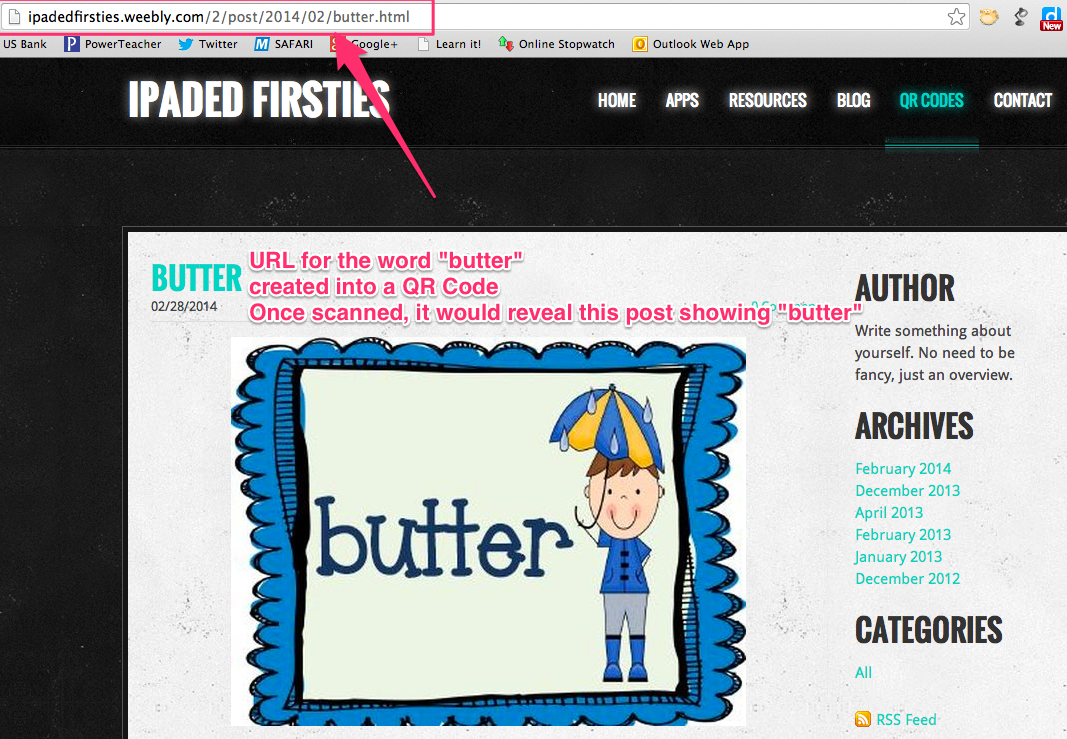 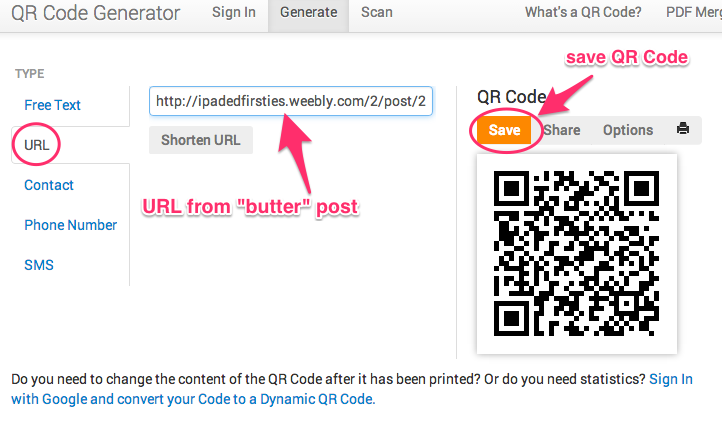 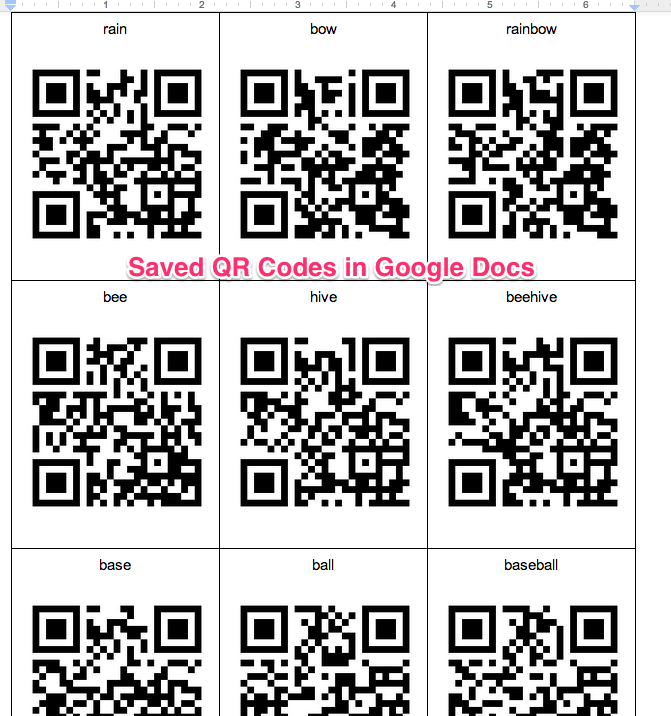 Building Compound Words After I had created a QR code for all the words that I wanted to use, I then printed them out and gave one to each student. Students scanned their QR Code to reveal their word. When everyone had a picture on their LearnPad, I said, "Go!" and the collaboration began to build compound words. Once everyone had found their group, we read through them as a class. Students returned to their seats, passed their QR Code to their neighbor and the process was repeated again. While we did this activity on the LearnPad, the same thing could be done on the iPad as well. For the iPad, we would have used the app called Qrafter to scan the codes. Regardless of using the LearnPad or iPad, both devices would allow you to complete this activity the exact same. With this being said, I would give a tie to building compound words on the LearnPad and iPad. Check out the video below to see our activity in action Share This: My school uses HMH Journey's for our reading curriculum. It is divided into 30 weeks. with each week, there is an assessment that allows teachers to gain insight into what students have mastered and/or what needs more practice. One challenge is that these assessments tend to be multiple pages long. That is a lot of paper to use and a lot of time to score all of these assessments. I have only been using pieces of the assessment that I want extra data to inform my instruction. While this cuts down on the paper being used, it is still more than I would like and takes a while to score. This is where the Assist and Quick Key apps come into play. Both apps have websites that allow you to print out bubble sheets. Using these custom sheets, you are able to create an answer key. Students will use the same custom sheet to take their quiz/test. After students have finished, you simply scan your answer key and then start scanning your students' bubble sheets. The tests are instantly scored for you. This greatly reduces the amount of paper I have to use. One score sheet for each student is all I need. I display the assessment via the projector for my students to bubble in their answers. While the assessment for my reading curriculum doesn't match with bubbles that say "A," "B," "C," I am able to write those letters on the board next to the bubbles. Below is a sample of what students would see on the board. 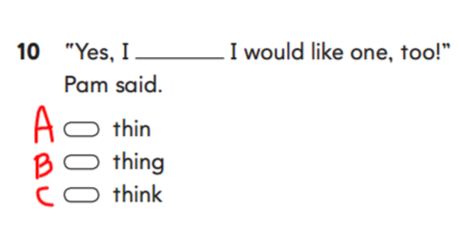 Using the displayed question above, students would color in the correct letter on the bubble sheet. Below is an example of the Assist App bubble sheet. 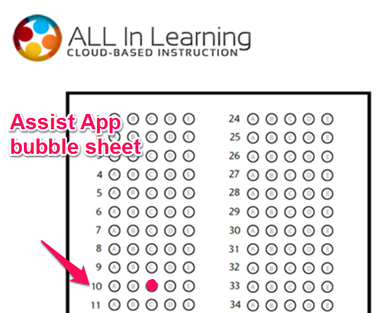 Using the displayed question above, students would color in the correct letter on the bubble sheet. Below is an example of the Quick Key app bubble sheet.  Bubble SheetsShare This: I have been using Kidblog the last three years. Their iPad app makes posting and commenting seamless for my first graders. Each one of my first graders has his/her very own blog to share and document learning throughout the school year. It has been my goal to use the iPad as a creative tool. We have been talking about using "is" or "are" in sentences. Students have made the connection that "is" goes with a singular subject while "are" belongs with plural subjects. To create a short assessment and add some fun, we used our iPads and Kidblog to practice our understanding of using "is" and "are" in sentences. Below I explain how we went about this process. It was actually pretty simple and I was very pleased with the results. During our next week of school, students will be commenting on the "is or are" posts with their guesses. is or are assessment 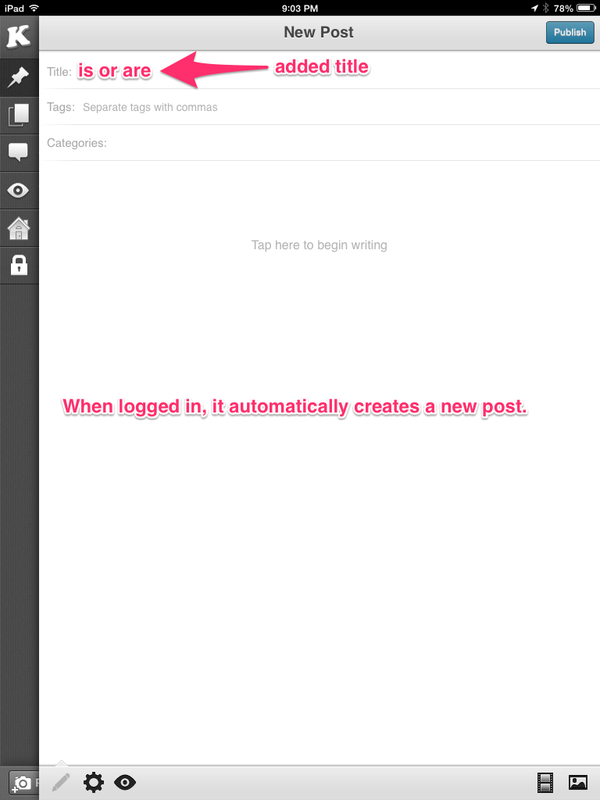 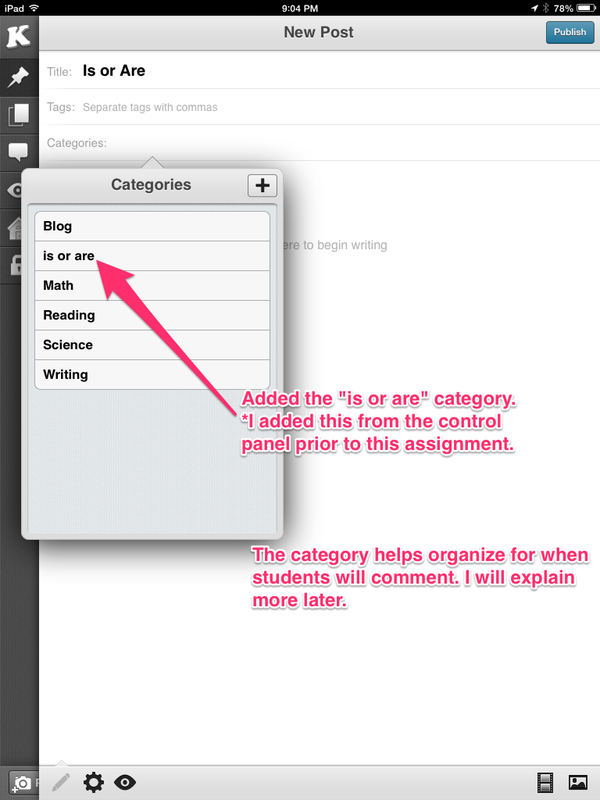 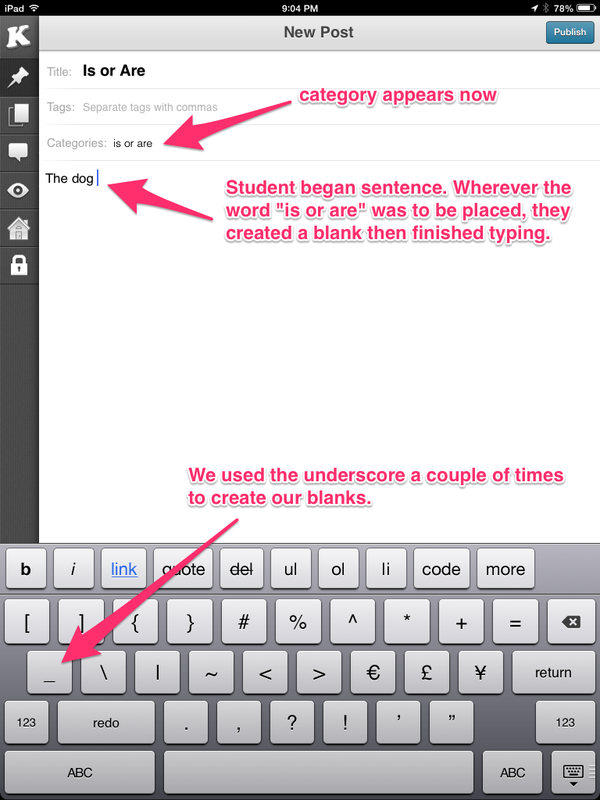 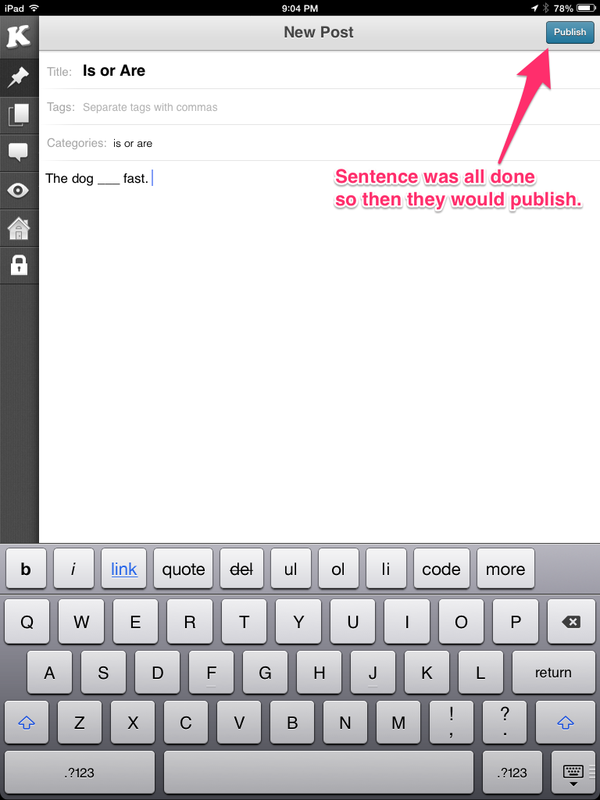 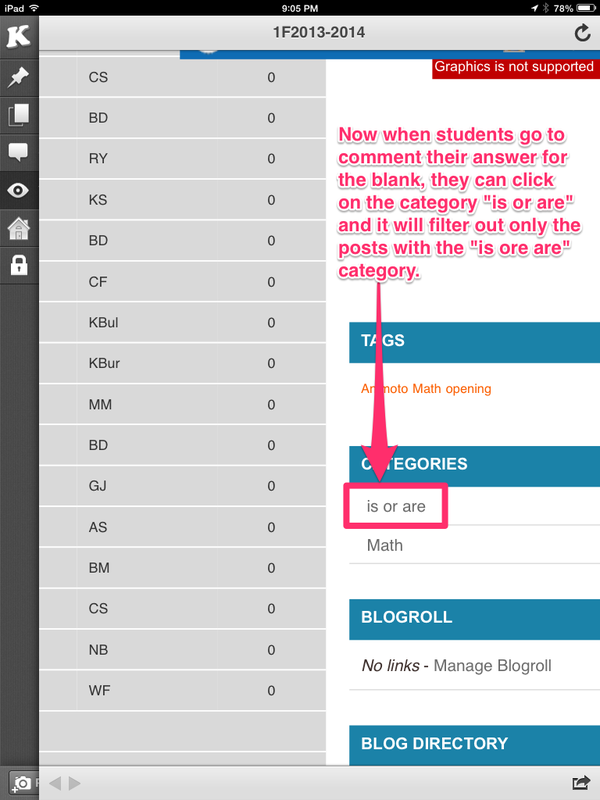 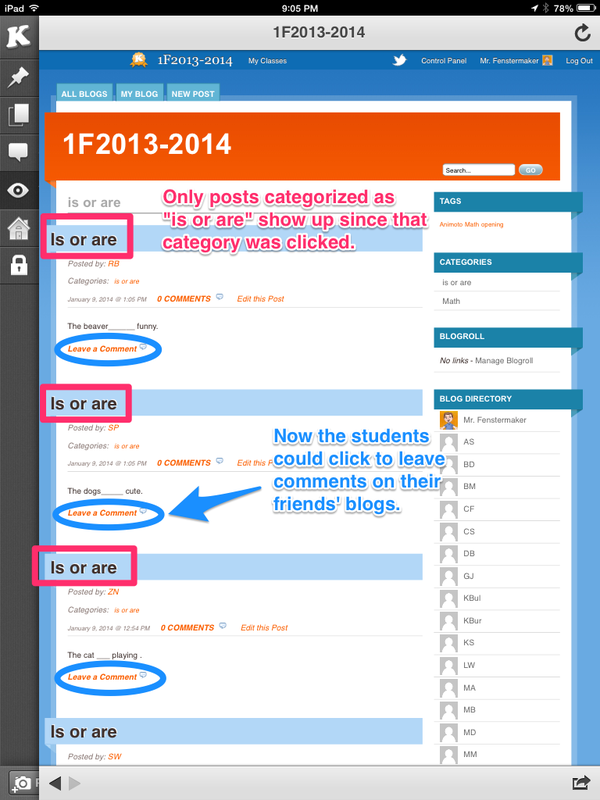 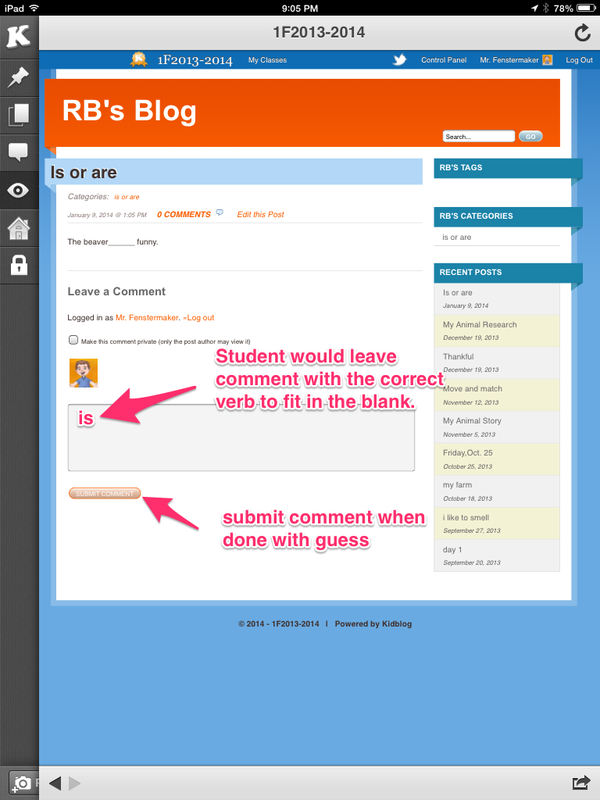 I was very pleased with the quality of sentences that my students submitted. This provided a quick assessment for who understands and who does not. The next phase will be students commenting their guesses. This will provide another layer of assessment. The best part is that the students had fun with this. They got to create their own sentences and will get to comment on their friends' posts. One Note I have my blog set up so that any new post and/or comment needs moderated before appearing. When my students begin commenting their guesses, none will show up until I approve them. This is nice because students will not be able to see what others guessed. They will have to decode the sentences on their own and apply what they have been taught. Share This:
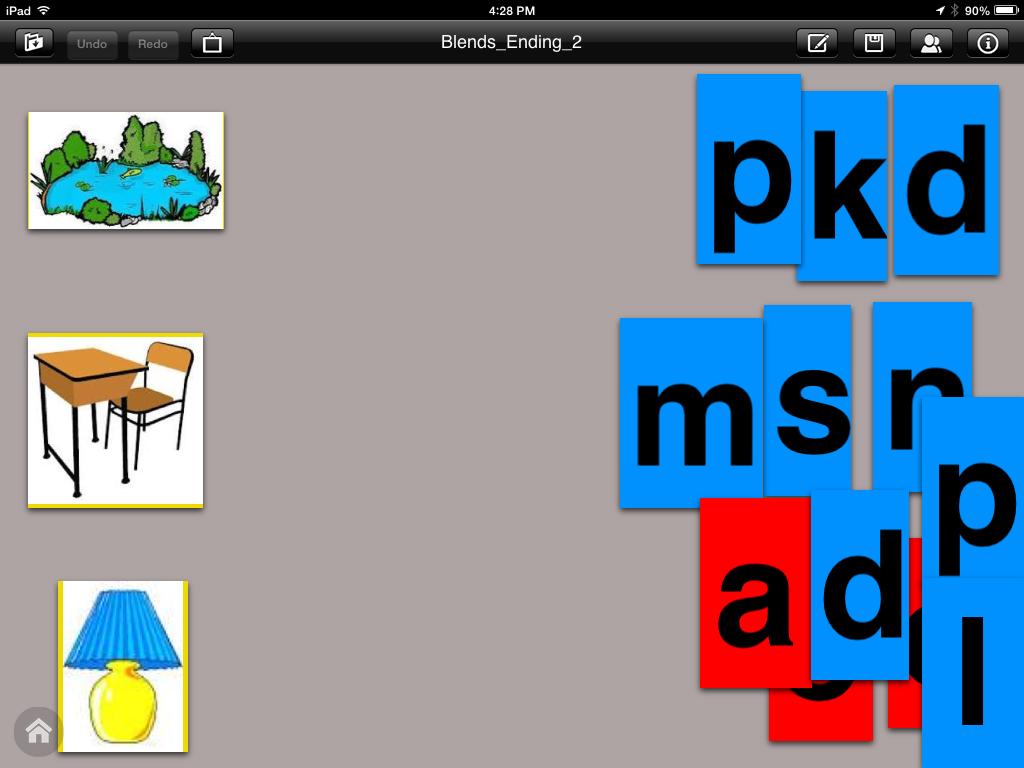
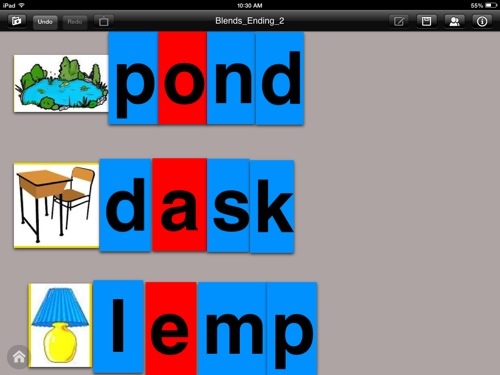
This week in 1st grade we are reviewing our understanding of subject and verbs. So far we have been talking about complete sentences. We discussed having a naming part and a telling part in a sentence. While we have talked about subjects and verbs in the past, we had not explicitly practiced differentiating between words that were subjects or verbs. To provide some practice during small group rotations, students used the iPads along with the Qrafter and Educreations apps. To set up this activity, I recorded a word using the website Record MP3. Below is an example of how I worded it when recording. "Throw" I can throw a baseball. "Throw" After recording, I can choose to save at which time a URL is provided. This URL was then pasted into the QR Code Generator Chrome App. These QR codes were then saved into a Word document for future use. The students would scan the code using the Qrafter app. After scanning, the word would be read to them. Next, students would open the Educreations app and put the letter that was associated with the QR Code into the correct column. For a better example and explanation, check out the video below. Below is an example of a final product that a student created.  I was scrolling through the daily list of Apps Gone Free and found the Move and Match app that was free for the day (regularly $1.99). This app is very simple to use. Just like the name implies, you can create activities for your students to move and match images and/or text. My students used this app to practice building words. Below is a sample of what I did to complete this activity.
The Set up.....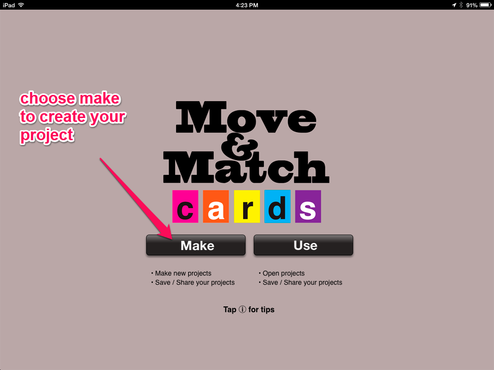  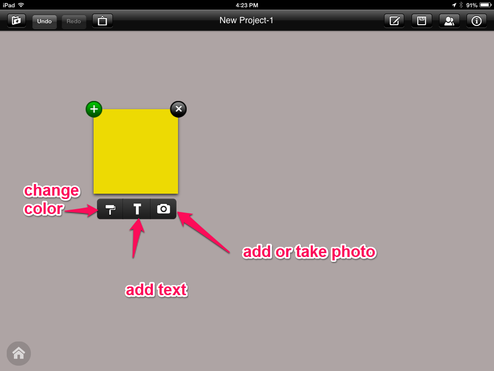 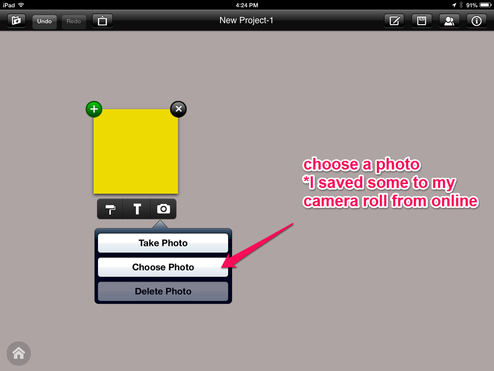 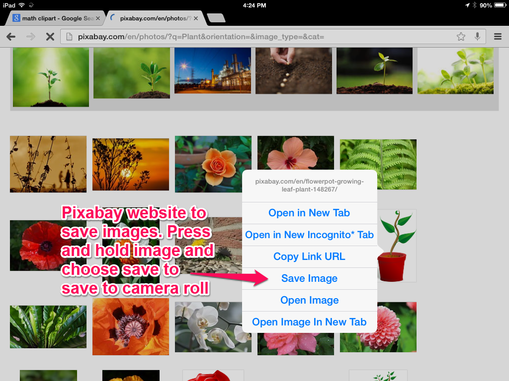 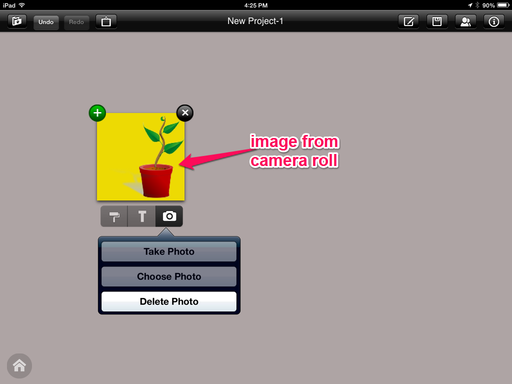  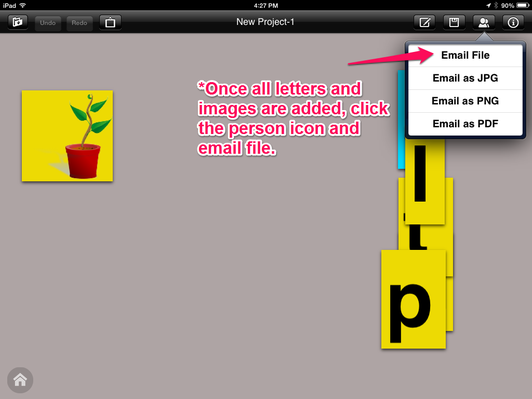 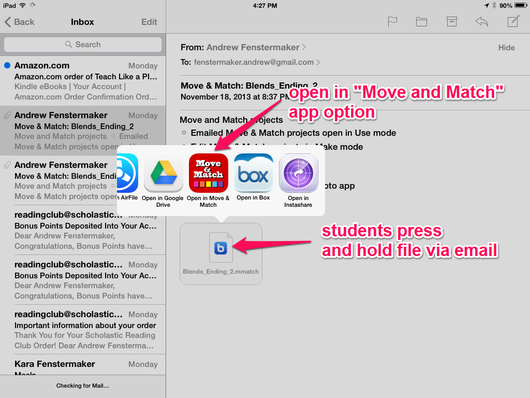 I found this process to be very simple to create some activities. Students enjoyed sorting letters and their sounds. They had to isolate each phoneme and blend the individual sounds back together creating the word that matched the picture. Both phonological and phonemic awareness were being practiced by students.
When students were completed with their pictures, they would take a screenshot by pressing the home and power on/off button simultaneously. After they had captured their image, they would use the Kidblog app to sign into their blog account. This image was then embedded into each students' individual blog account. The next step is to have students create their own activities for others to complete. I will be posting more about that soon. Make sure to check out the Move and Match website for more ideas and information. 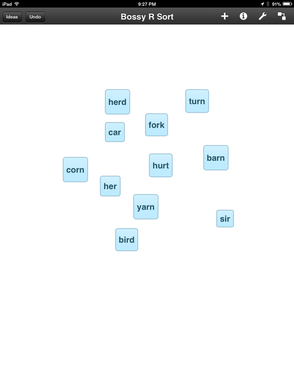 We learn about bossy "r" words during 1st grade. After we have talked about all of the bossy "r" combinations, we use the Idea Sketch app to practice sorting words based on their bossy "r" sound. Below are some visual steps for this process. 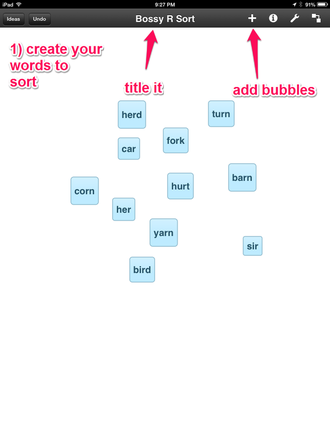 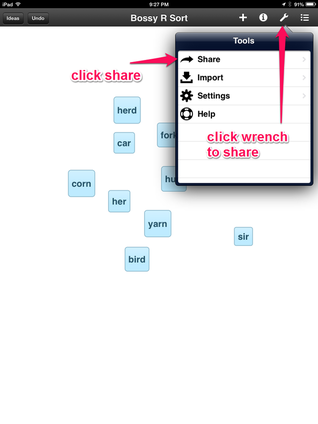  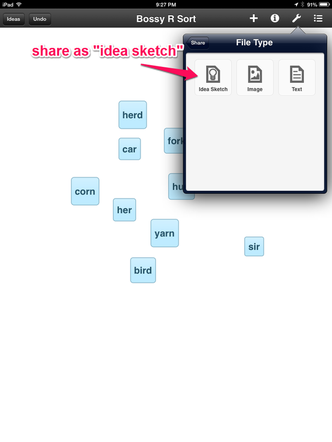 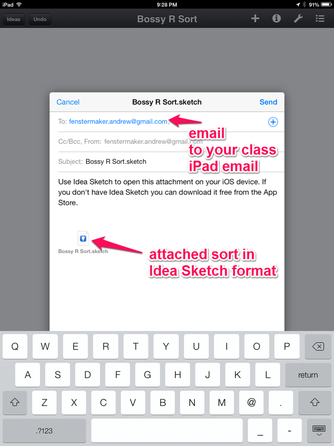 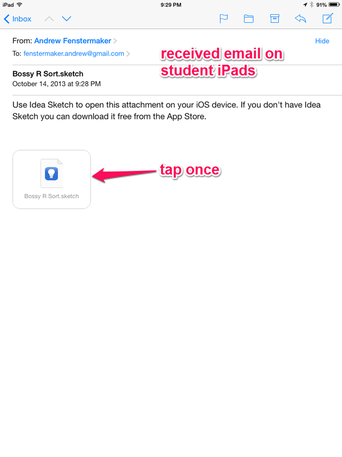 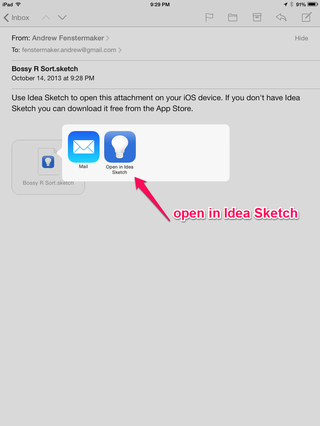 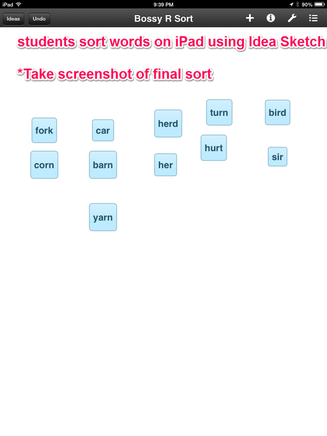 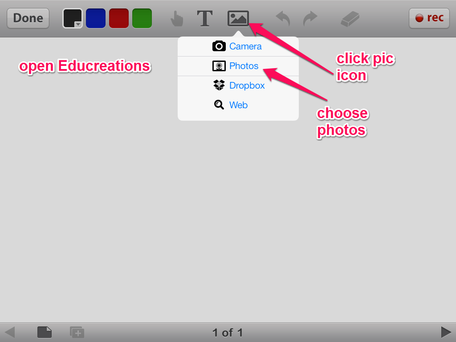 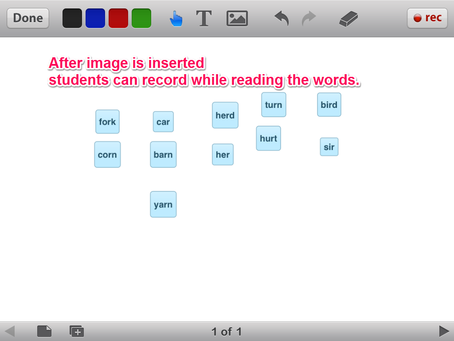 Below is an example of a final product created by a student. |
Andrew FenstermakerInstructional Technology Coordinator | Innovation Coach | Google Certified Innovator | Presenter | Blogger | Adjunct @UiowaEducation | Owner @kids_f_i_r_s_t 


|


 RSS Feed
