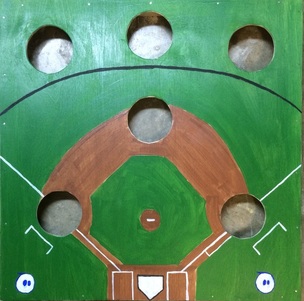
 I got this idea from Brad Lowell who is a 5th grade teacher in Indiana. He shared this idea on the Lightning Lab Sphero Site. If you haven't checked out the site, you definitely need to do so. It is free to register and gives you access to many great lessons and ideas for using the Sphero in your classroom. I have been using Sphero robots with my 5th grade students. I also have been using them in some STEM summer camps that I run. I am always looking for new and fun ways to use the Sphero robots. I decided to try my hand at crafting a baseball game board to use with the Spheros. How to Build Below is a video of how I went about building the baseball game board. I tried my best to explain the measurements I used to space out the bases and how to create the holes. How to PlayThere is not really a right or wrong way to play. I have had students divide into teams with anywhere from one to five kids on a team. The baseball game board lays flat on the ground. You can use the green ramps that come with the Sphero 2.0 or use the ramps that come with the terrain park kits. The ramps go in front of the game board. I leave about a two inch gap or so between the ramp and the game board. I then measure anywhere from five to eight feet away from the board and put a piece of tape to mark the starting line. Free Drive vs. Program You can choose to let your students free drive the robot onto the game board if you like. However, they can essentially spin the Sphero around on top of the game board until they get it into a hole. I would recommend using Macrolab, Tickle or SPRK to have students program the Sphero. This eliminates them being able to free drive around until they get the robot to drop in a hole. By having kids create the program to control the Sphero, once they hit play, it is up to their program to get Sphero into a hole. Runs, Outs, Innings, Hits You will use three outs just like a real game. The students will have a batting order just like in baseball. The first "batter" will place Sphero on the starting line, play their program and wait for the results. When the program is over and Sphero stops moving, students determine their outcome. Out: If the Sphero stops on top of the board, but fails to end up in a hole, they get an out. If Sphero fails to get on top of the board, or ends up rolling off of the board without going in a hole, they get an out. Once they get three outs, the other team is up to bat. Runs: Runs are scored just like the real game of baseball. Students will need to keep track of there their "baserunners" are at as they play. Hits: The holes on the game board represent a hit. If the ball lands in the first base hole, they receive a single. They will remove their Sphero and make not that they have a baserunner at first. The next batter will be up. If the Sphero stops in second, they have hit a double. If they Sphero stops in third, they hit a triple. If the ball stops in any of the three holes past the fence, it is a home run. Innings: You can play as many innings as you want. Each team gets three outs per half inning just like baseball. ExamplesThe video below represents an out. When the Sphero program ended, the Sphero did not manage to stop in any of the holes. It also fell off the game board. So an out is recorded. The video below represents a double. When the Sphero program ends, the Sphero successfully stopped in the hole which represents second base. By landing in second base, the batter hit a double. Small ramps are used in this example. The video below represents a homerun. When the program ended the Sphero stopped in a hole that is past the outfield fence. This results in a homerun. This example is also showing how the big ramps can be used for the game.
1 Comment
Summary
This blog post is long overdue. To end the my first year as a 5th grade teacher after transitioning from 1st grade, we decided to have a little fun with Sphero Robots. Students were checked out the last week of school and I wanted a fun way to wrap up our year and do some learning at the same time. During the #hourofcode my students had used the Sphero robots to practice coding. I wanted to provide one last opportunity for them to practice their coding and play with the Sphero robots.
Slideshow
Below is the Google Slideshow we used to facilitate this Sphero Chariot Challenge.
Pre-Assessment
I wanted a way to gauge their learning that took place during this lesson. I gave them a pre-assessment that I had created using Google Docs. After the pre-assessment, I wanted them to spend some time researching about chariots before we began fabricating.
Engineering Design Process
I wanted to introduce them to the engineering design process before they had the chance to build. I put them into partners and we discussed the different phases of the engineering design process. Students began with the "ask" phase of the process. We discussed the challenge and any constraints.
After identifying the problem and constraints, we moved onto the imagine and plan phase. At this time I shared what materials they would be able to use during the build. Using the knowledge of the material, students had to create three collaborative designs. They had to label what materials they used in their design. After creating their three designs, they had to decide which one they would use first. Create
Once they showed me their chosen design, they were set loose to build. This phase of the engineering design process was so fun to watch. Some groups were able to plow ahead with their designs while others quickly realized some of their chosen designs were not going to work.
Improve
We spent the most time in the improve phase. They were able to test their design periodically with the Sphero. Many began observing what others had figured out to work. Some started to abandon their designs and fabricate their chariots similar to their classmates that were having success. I did have some students stick with their original design.
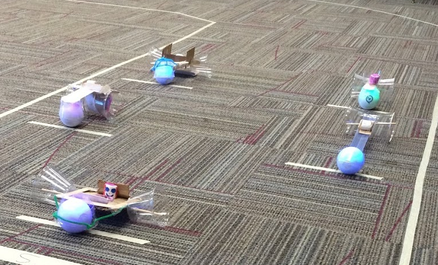
Race Time
Our final test was having a race around a track on our classroom carpet. You can see some images and videos here. The amazing part of this challenge was the winner of our racing challenge. The partnership that won was a pair that I had written off early on due to the numerous failures and flaws with their design. However, they continued to improve and modify their design. After multiple failures, they successfully created a reliable chariot that won all the races.
Reflection
This was definitely a fun way to end the school year. The students really enjoyed this challenge. There were a lot of bumps along the way. I loved how determined all of the students were regardless of how many times they failed. We were able to incorporate reading, writing, history, social studies and science into this activity. In addition, students got to employ their creativity into decorating their chariots. It was a great time and great way for my first year in 5th grade to end.
I previously posted about creating a rubber band gun using an Arduino Uno. I had set out to build the rubber band gun for a STEM summer camp that I will be conducting this summer. I am doing some work with Arduino micro controllers and wanted something for students to do that was more than making an LED blink on and off.
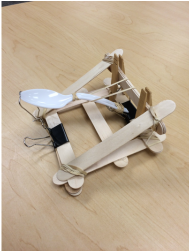
After completing the rubber band gun, I thought about making a catapult. Rather than using two servo motors like the rubber band gun, I planned to use just one servo motor for the catapult. While the catapult was more difficult to build than the rubber band gun, both projects were equally enjoyable and I am excited to see how students do with these projects this summer. Materials
If you watch the how-to video, I left out some of the materials. Below is a list of materials I used during the construction of the catapult.
1. Arduino Uno 2. Potentiometer 3. Breadboard 4. jumper wires 5. jumbo craft sticks 6. rubber bands 7. binder clips 8. plastic spoon 9. paperclip 10. clothespins 11. hot glue gun 12. needle nose pliers Breadboard layout and codeStep-by-step directionsShare This: |
Andrew FenstermakerInstructional Technology Coordinator | Innovation Coach | Google Certified Innovator | Presenter | Blogger | Adjunct @UiowaEducation | Owner @kids_f_i_r_s_t 


|
 RSS Feed
