**If you are unfamiliar with this project, check out my first post introducing my pilot project with LearnPads and comparing them to iPads. In first grade we have been learning about attribute rules with 2-D shapes. We began our lesson exploring and reviewing different 2-D shapes. We practiced identifying the different attributes of each shape. After a quick review, we began working together to sort shapes based on an attribute rule (all red shapes, all squares, only triangles, etc.). This led to having shapes already sorted and working to identify the "mystery" attribute rule. This is where the LearnPad/iPad got integrated into the lesson. In an attempt to have my students apply their learning while creating and collaborating, we sorted shapes on our tablets. After sorting these shapes into two categories, students wrote "rule" above the side with their "mystery" rule. This final product was posted to their blog. After posting to the blog, students were able to leave comments with their guesses about the attribute rule being represented by the posted image. This was helping us work towards CCSS 1.G.A "Reason with shapes and their attributes." Below is a video that highlights how this activity was done in my class as well as how it can be done on both LearnPads and iPads. Below are some screenshots of a final product that was posted online. You can see the rest of the post by clicking here. 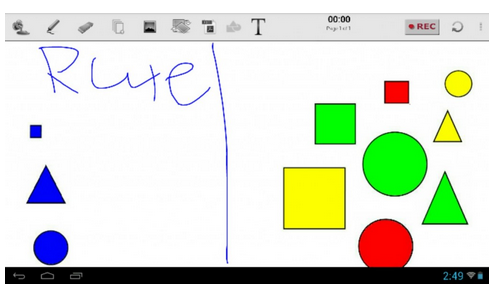  Share This:
0 Comments
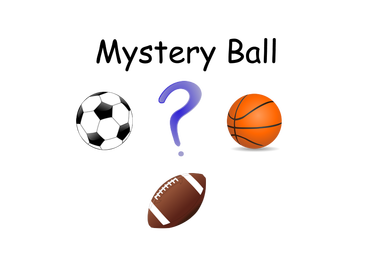 Part 1--QR Code Riddle Hunt We recently started our new unit in science called Balls and Ramps. To begin this science unit, we worked in small groups to solve riddles about a mystery ball. I had created a "scavenger hunt" for students to sort clues based on the ball being described. Below is the example that I put together. Feel free to download and use by clicking here. The above file shows the layout of this project. Let me describe it so it makes more sense. The first page has a soccer ball, football and golf ball. There are also a total of 10 clue numbers listed underneath (The numbers could be crossed out so kids knew which clues had been listened to already). The next couple pages are the actual QR Codes that I cut out and glued around the classroom. The last page is the answer key for which clues described which ball(s). Kids would use the Qrafter app to scan the codes. The codes played an audio clue. The student would then put the "clue number" under the ball they though it described. I created the audio clues using the website Record MP3. This website lets you record audio and once saved, generates a URL for your audio recording. This URL was then pasted into the Chrome app QR Code Generator. These QR codes were then saved into my document. Part 2-STudent Created riddles with Educreations After students had finished their QR code riddle hunt, we then gathered to talk about creating our own riddles. Students were put into small groups of five. Each group was given a picture of a ball (The file can be downloaded here). Each group was given a template to record their clues (Download here). Each student had to come up with a clue that described his/her group's ball. Once these clues were written down, we used the Educreations app to insert a "Mystery Ball" picture and have students record while reading their clues. After students had recorded their clues for their group's "Mystery Ball," we embedded them onto our class Kidblog. This allowed students to go on and guess each group's ball based on the clues. Below is an example of an Educreations final product.
This week in 1st grade we are reviewing our understanding of subject and verbs. So far we have been talking about complete sentences. We discussed having a naming part and a telling part in a sentence. While we have talked about subjects and verbs in the past, we had not explicitly practiced differentiating between words that were subjects or verbs. To provide some practice during small group rotations, students used the iPads along with the Qrafter and Educreations apps. To set up this activity, I recorded a word using the website Record MP3. Below is an example of how I worded it when recording. "Throw" I can throw a baseball. "Throw" After recording, I can choose to save at which time a URL is provided. This URL was then pasted into the QR Code Generator Chrome App. These QR codes were then saved into a Word document for future use. The students would scan the code using the Qrafter app. After scanning, the word would be read to them. Next, students would open the Educreations app and put the letter that was associated with the QR Code into the correct column. For a better example and explanation, check out the video below. Below is an example of a final product that a student created. 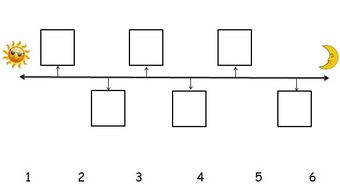
My 1st graders used the iPads to check their understanding of timelines. We had been exploring timelines in a recent math lesson and I wanted my students to practice arranging events on a timeline. In order for my students to relate to the events, we practiced placing events from a typical day at school in the correct sequence. There were a total of six events that needed to be placed into the correct box on our makeshift timeline. There was a sun placed a the beginning to represent morning and a moon at the end to represent night. It was up to the students to place the number in the correct box. Below are the steps I used to create this activity. Timeline
I used Microsoft Word to create my timeline worksheet. I added a sun at the beginning and a moon to the end. The numbers at the bottom were for students to cross out as they began writing numbers in the boxes. This was to help alleviate scanning the same QR code over and over. QR Codes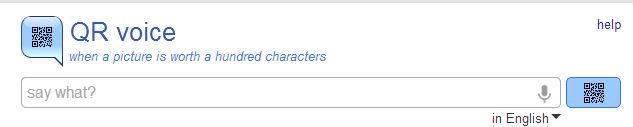
I used the website QR Voice to create my QR Codes. This is a site that you type the text into the box. QR Voice automatically generates a QR code. When this QR Code is scanned, the text that you typed is read aloud to the person who scanned it. While I could have used a QR code that would simply display text only, I chose QR Voice to help with my students that are transitioning to independent readers. 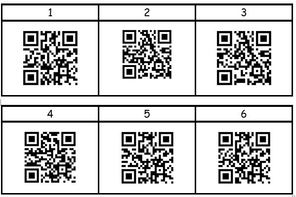
Above are the QR codes that I created using QR Voice. I put them into a table in the same file that I created my timeline worksheet. I was able to print these, cut them out and tape them up around the classroom. *Make sure to leave the number with the QR code so the students know which "event" is associated with each number. Events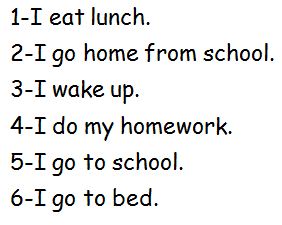
Above are the events from our typical school day. You can see that the numbers next to each event are not in the correct order. I told students when putting numbers in the boxes on the timeline that they would not just put 1,2,3,4,5,6. ActivityStudents would use the Qrafter app on the iPad to scan a QR code. Once scanned, the "event" would be read aloud to the student. For example, if QR code with the number one above it was scanned, the student would hear, "I eat lunch." It was the students' job to place the numbers in the correct box on the timeline. ReflectionThe students really did a good job with this activity. It required them to keep track of the events that they heard and place them in the correct order. Some students even wrote the "event" sentence next to each number on their worksheet before starting to place numbers into the timeline boxes. Problem solving in action. Love it.
TWEAK Students could use the Educreations app to snap a picture of the timeline worksheet. They could then annotate over the picture writing the numbers in the boxes with digital ink. When they completed the timeline worksheet via Educreations, they could embed the video onto their blog or send the link to the teacher to check their work. 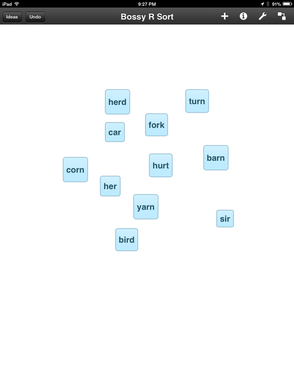 We learn about bossy "r" words during 1st grade. After we have talked about all of the bossy "r" combinations, we use the Idea Sketch app to practice sorting words based on their bossy "r" sound. Below are some visual steps for this process. 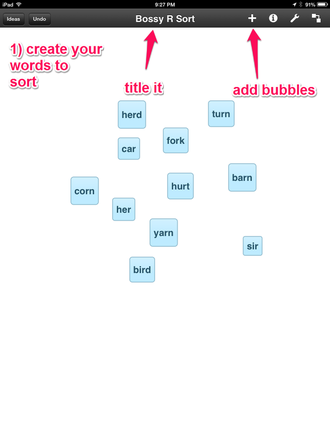 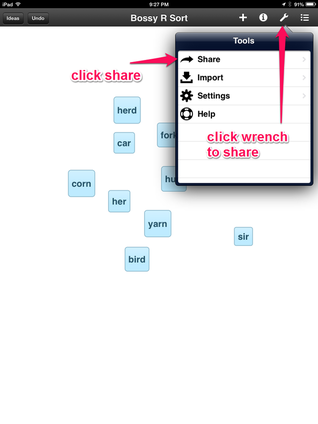  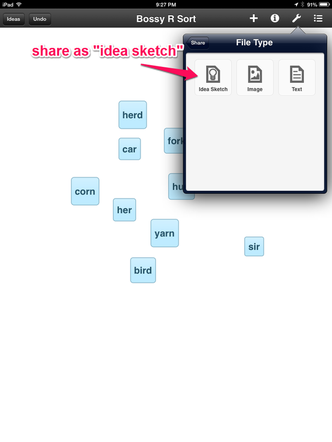 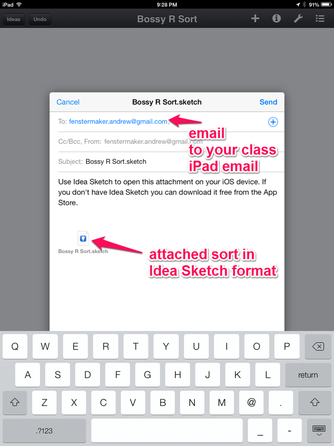 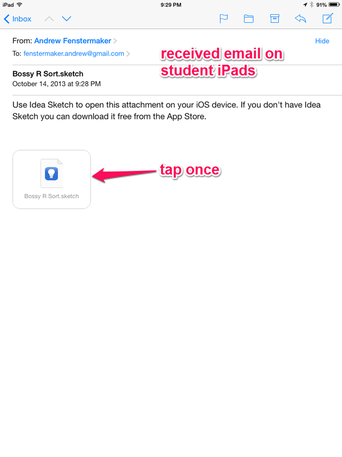 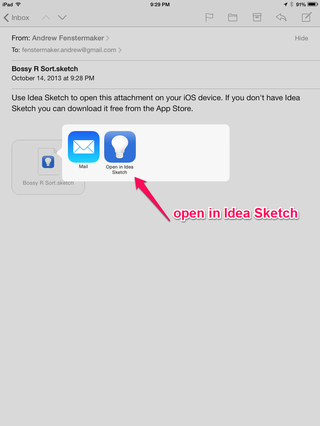 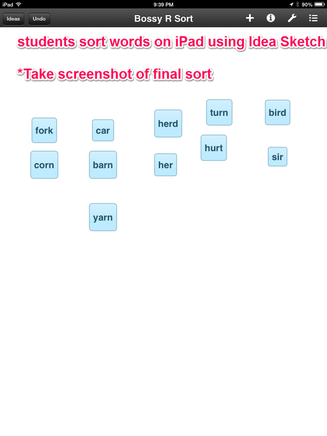 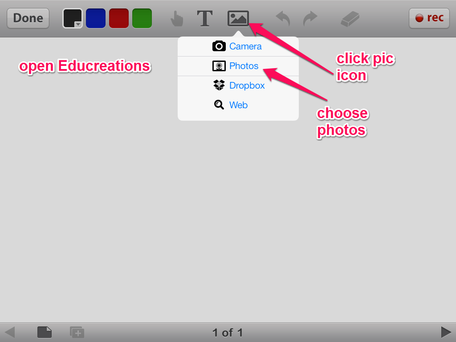 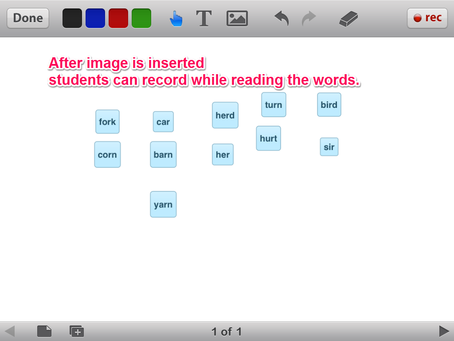 Below is an example of a final product created by a student.
With teaching 1st graders how to read, sometimes having students listen to their own voice while reading can be very beneficial. This helps them see if they are reading like a robot, word by word or paying attention to punctuation. Parents that are not familiar with the term fluency or reading with intonation can have a hard time understanding some "teacher" talk about reading. This is where the Educreations app comes into play. My 1st graders are becoming experts with the Educreations app. We keep digital portfolios throughout the school year. One element that we keep in the portfolio is their development with reading. Moreover, we use these portfolios to show parents what fluency sounds like as well as how reading with intonation can impact the meaning of sentences. Below is how we use the Educreations app for cataloging our reading development.    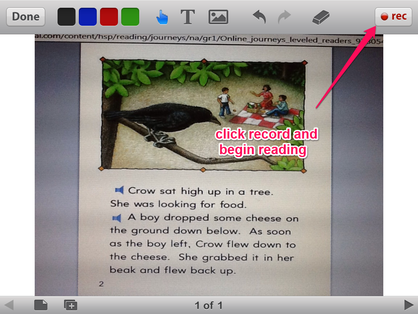 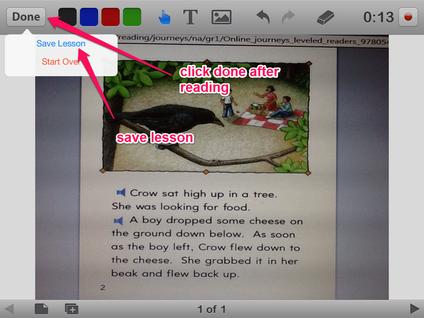  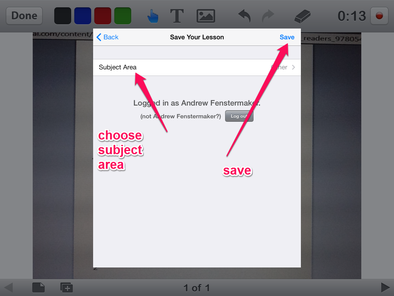 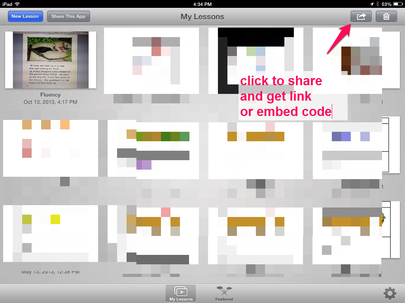 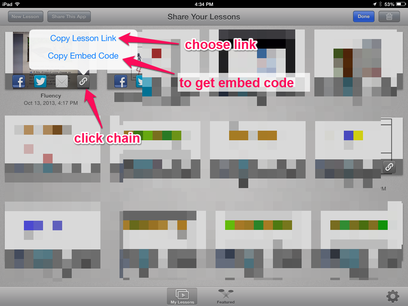 You can take the link and place into the digital portfolio. We use Evernote to create our digital portfolios. You can even take the link and send it to parents. They can open the link to view/listen to their child's fluency. **Students are limited to sharing links only. **You are able to get the embed code if you save as "public" and are not signed in as a student. Below is an embedded sample. 
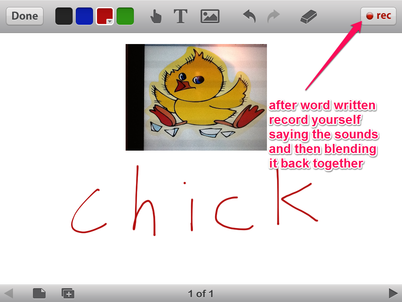
Today we put a twist on our whole group reading instruction block. We use HMH Journeys as our reading curriculum. This week we are learning about the short "i" sound. As a component of our daily routine, we work on breaking words into pieces and blending their sounds together. This has been an activity that we do as a whole group. Even by having the students orally participate, this has been a teacher-centered activity (in my mind). I tried something different today to hopefully make the learning more meaningful. I wanted it to be student driven, provide choices and build some collaboration skills in the process. Below is what I came up with and tried out today.
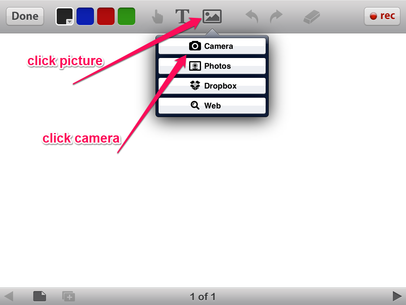
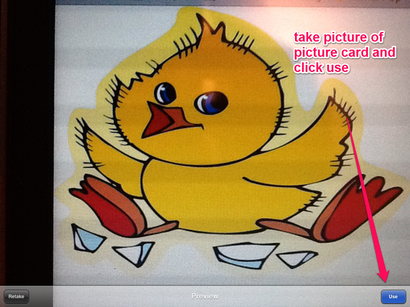
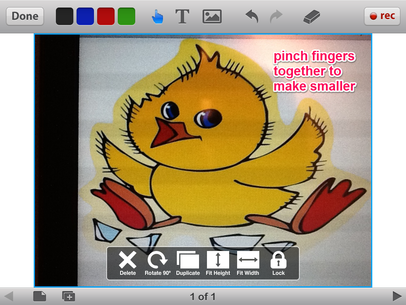
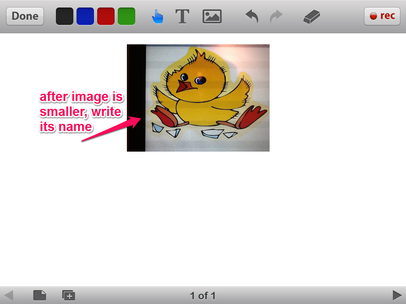
The curriculum has some picture cards. I went through and found some pictures similar to the ones above. Once I had these picture cards, I spread them around the room. I then modeled the process for my students for using Educreations to build words. 
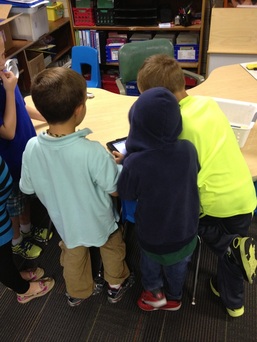
After the first student had done his/her picture, the iPad was given to the next student. Once all the students in the group had finished, they saved it to share with the class. See the finished product by clicking the links below. Group # 1 Group # 2 Group # 3 Group # 4
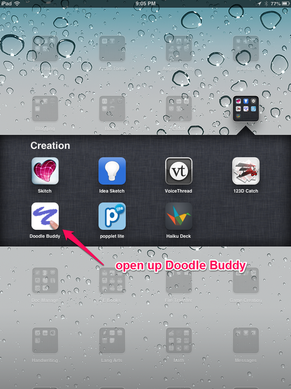
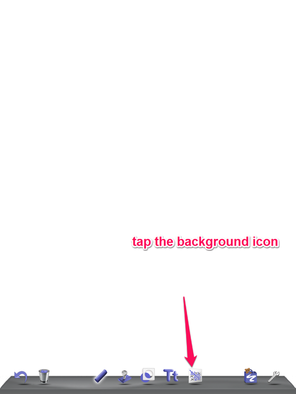
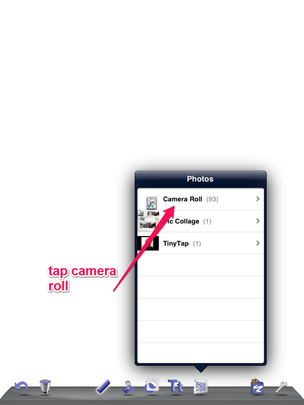
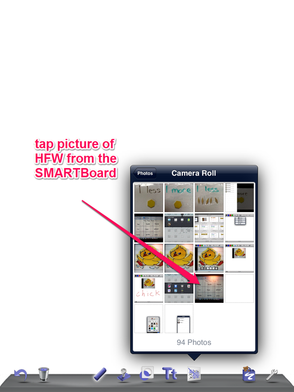
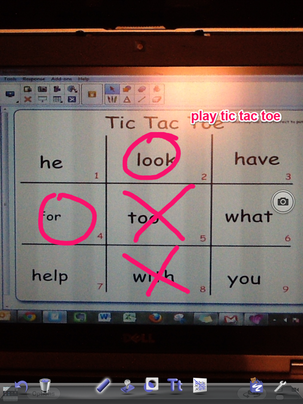
Since they all finished at different times, I wanted something for them to do as a group when finished. Another part of our curriculum is high frequency words. Each week we have a new list that we work with. I had my students use the Doodle Buddy App to practice their words in groups when they finished building their words with Educreations. Below is an example of what they had to do to practice their high frequency words in groups. They played tic-tac-toe. 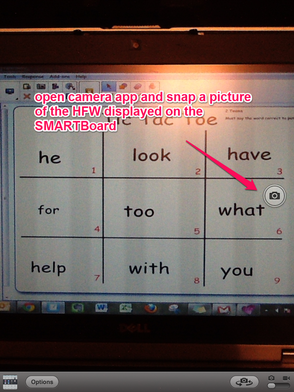
FUTURE CHANGES
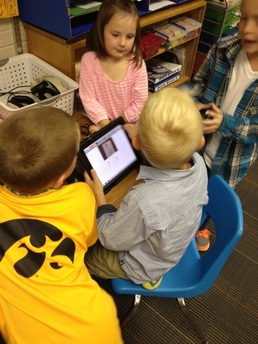
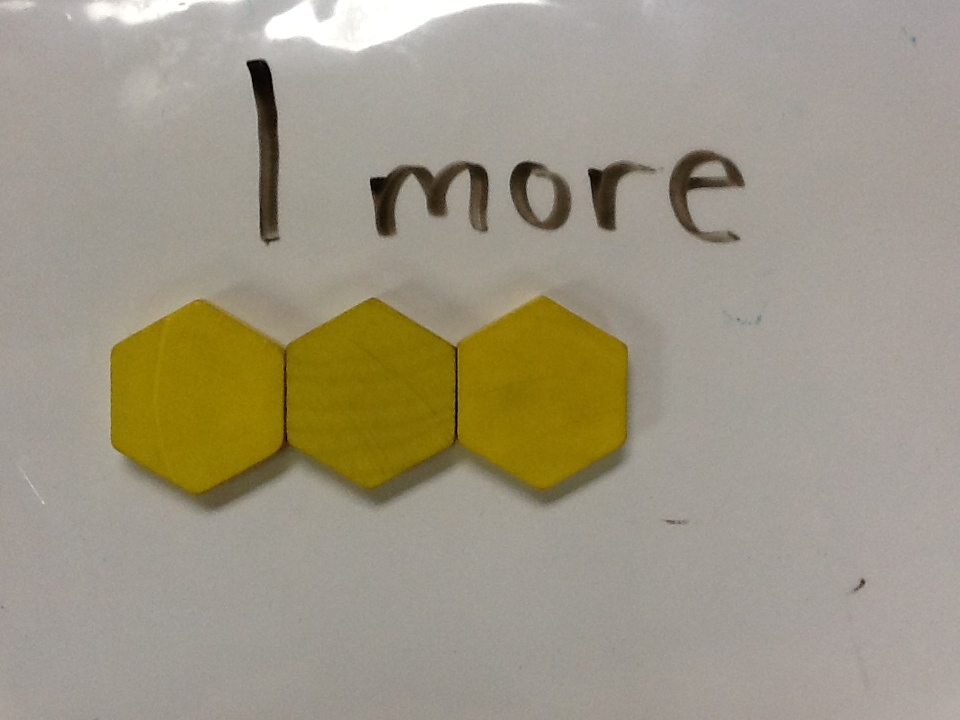
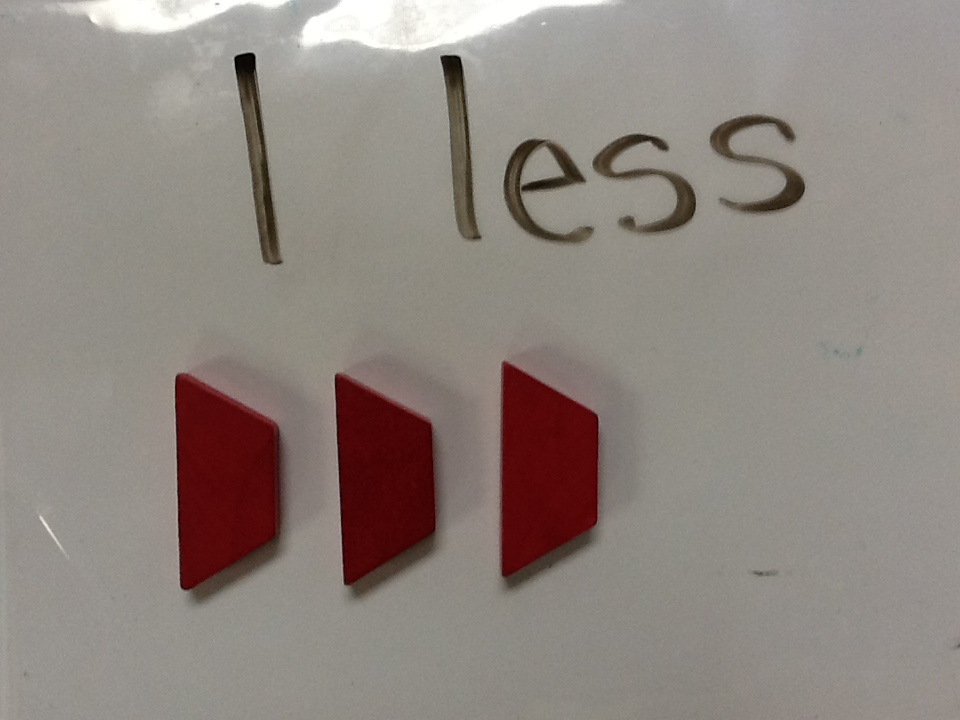
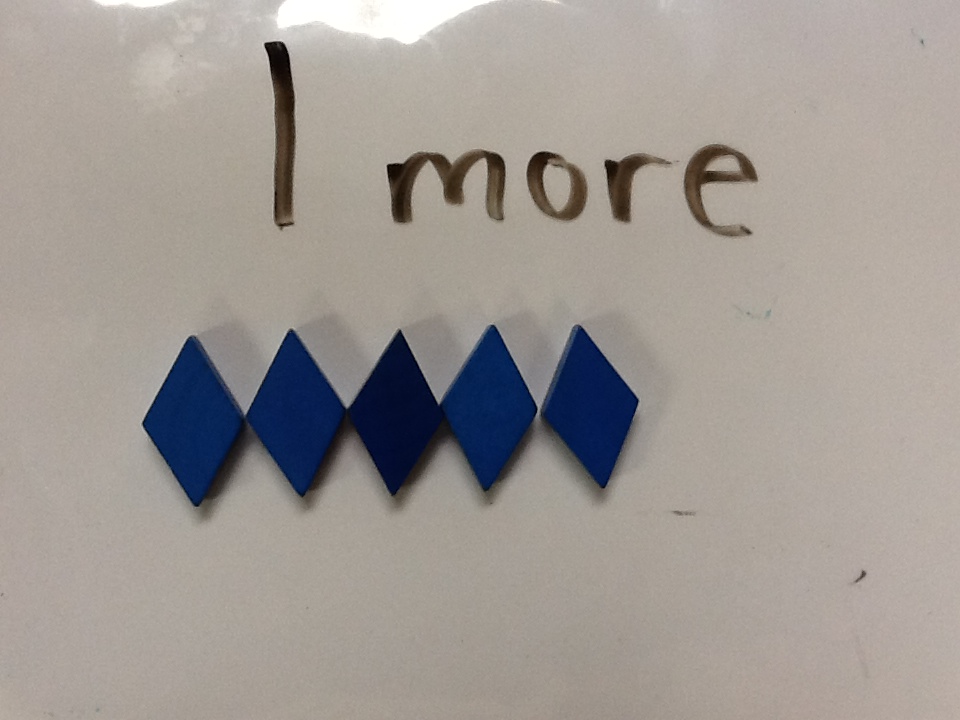
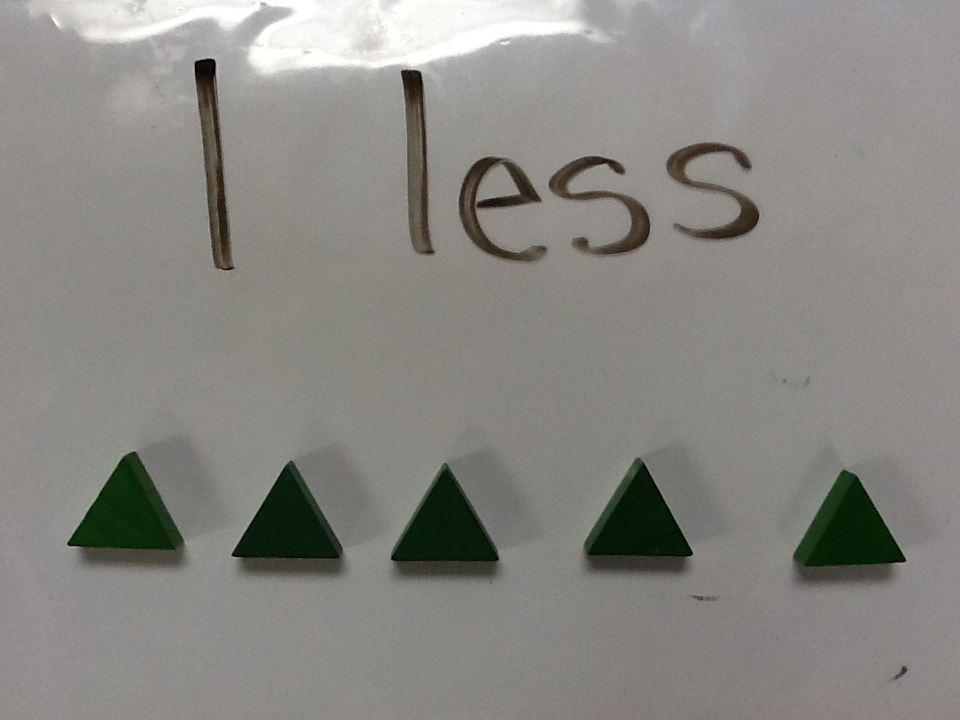
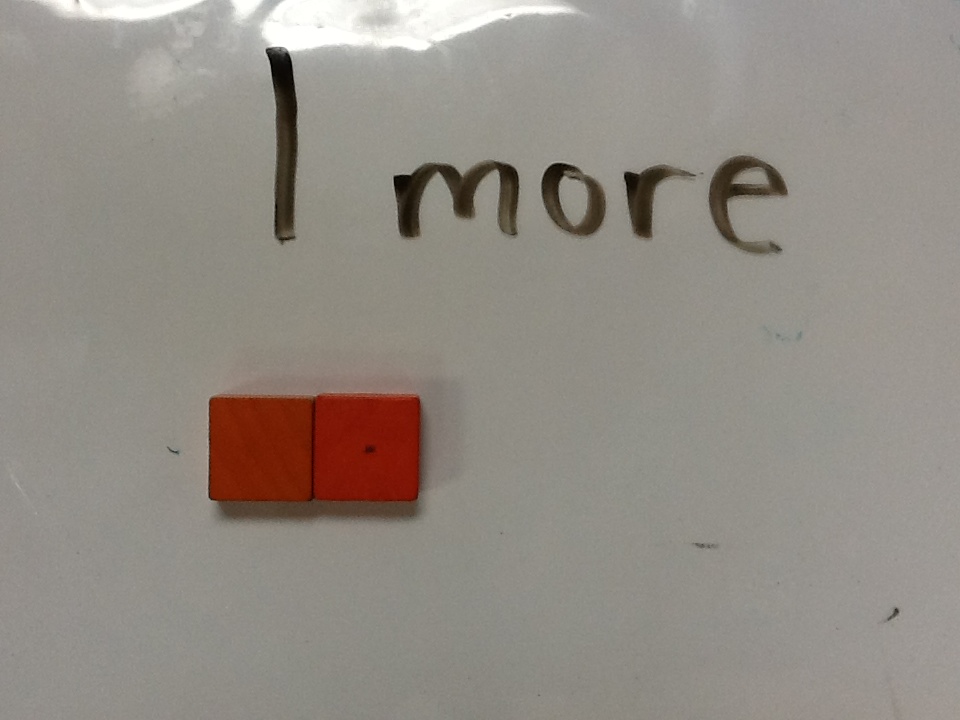
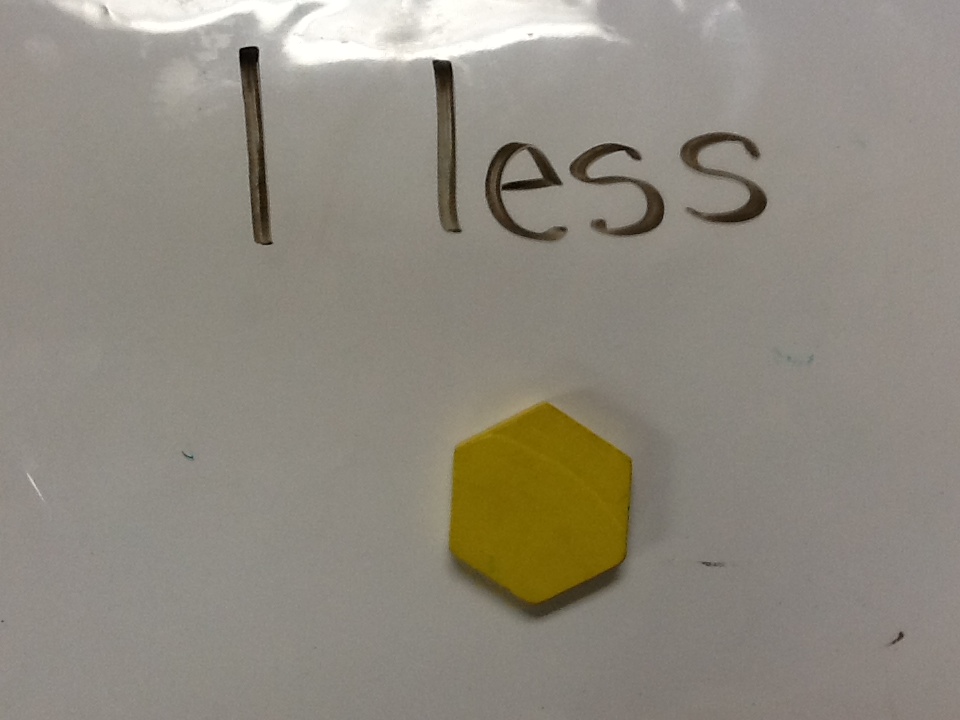
One of the things that we didn't talk about prior to this activity was group expectations. After all the groups had finished we brought up the videos via the Educreations website. We watched each video together to talk about what was good and what we needed to change for the future. Here is my takeaway: 1) After done recording, you are to stay with your group and work together on spelling the word correctly as well as ensure that the words are blended correctly. *One person blended a word wrong and we talked about how the group is working together to make sure all words are built correctly. 2) When recording, make sure to hold the iPad close to your mouth and talk loud. While some students did this, there were some that were far away from the iPad or talked very quietly. I explained it was okay to chat with each other during this process because it was a collaborative project. I didn't want to tell them they all had to be quiet unless it was their turn to record. 3) When playing tic tac toe, model how to pick teams. We did this after we talked about the videos. We practiced numbering off in our small groups (1,2, 1,2, 1,2). Overall, I thought this activity went well. It was great to see the kids working together to build words rather than having a teacher direct the activity. While there were some bumps, the students still were able to showcase their ability to build and blend words with the short "i" sound.  During our reading rotations today, students used the Educreations app on the iPads to model 1 more or 1 less. This was to provide some practice with our math lesson from yesterday. In math we had talked about and practiced problems with 1 more and 1 less. 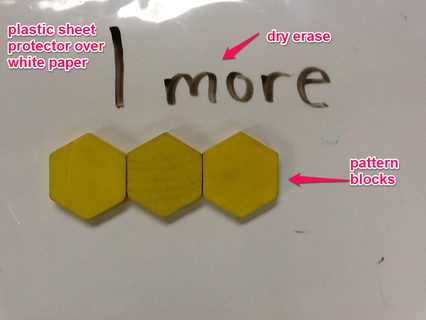 To get this set up this morning I began by taking some pictures with my iPad. I have little tubs of pattern blocks that I planned to have students use for this activity. Using a dry erase marker, some pattern blocks and a slate (white paper with plastic sheet protector) I created a total of six problems for students to complete using the Educreations app. Below are the six problems I created using my iPad.
I took these 6 images and uploaded them to a shared folder in my Dropbox app. I have my own personal Dropbox account and I created one generic Dropbox account that my student iPads are signed into. Since I have a shared folder, I can put items into it and those items will automatically show up on the student iPads. This saves me from having to load the pictures onto each iPad individually. **In the picture below you can see that each picture was labeled for it's corresponding page. This helped students know which picture to put on which page in Educreations. 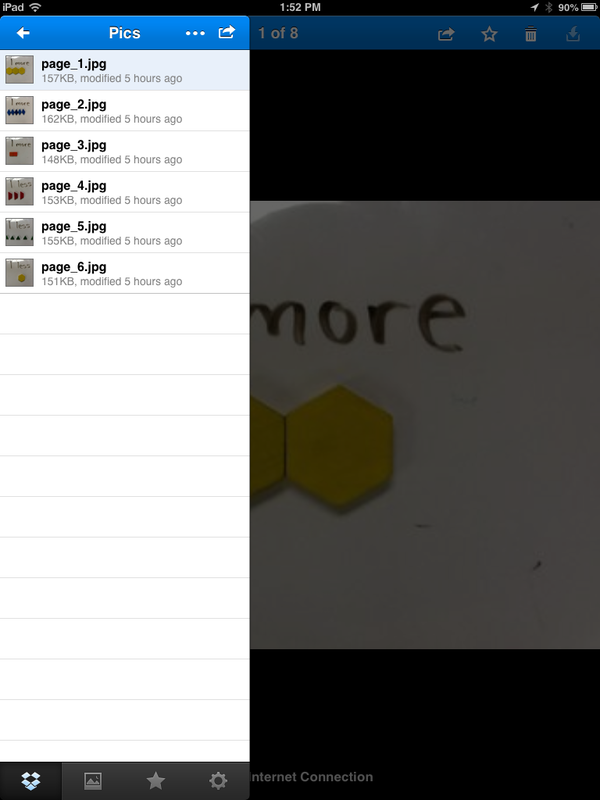 After I had all the pictures in the shared folder, my work was done. All that was left was explaining the steps to my students. Below is what I explained to students for completing this task. If the presentation doesn't load try clicking here. What I learned **I got my iPads for my students in the spring of last school year. I got spoiled by my 1st graders being able to follow multiple step directions and being more independent.
Just as we encourage students to fail and learn from their mistakes, today was an epic failure on my part. After modeling and modeling again about the Educreations app and what I wanted students to do, it was one hot mess. "What do I do again?" "How do I add a picture?" "Where do I press to record?" "How do I get a new page?" "How do I save?" I now know what my students feel like when something doesn't work that they tried so hard to master! As with all technology in the classroom, you have to take risks and learn what will work. We will be revisiting this assignment and I will be remember to---KISS (keep it simple stupid). My goal tomorrow will be to require only one picture inserted, recorded and saved. The following day we will require two pictures. While I felt like a failure, check out this student sample for what I was hoping to accomplish. |
Andrew FenstermakerInstructional Technology Coordinator | Innovation Coach | Google Certified Innovator | Presenter | Blogger | Adjunct @UiowaEducation | Owner @kids_f_i_r_s_t 


|


 RSS Feed
