I previously posted about creating a rubber band gun using an Arduino Uno. I had set out to build the rubber band gun for a STEM summer camp that I will be conducting this summer. I am doing some work with Arduino micro controllers and wanted something for students to do that was more than making an LED blink on and off.
After completing the rubber band gun, I thought about making a catapult. Rather than using two servo motors like the rubber band gun, I planned to use just one servo motor for the catapult. While the catapult was more difficult to build than the rubber band gun, both projects were equally enjoyable and I am excited to see how students do with these projects this summer. Materials
If you watch the how-to video, I left out some of the materials. Below is a list of materials I used during the construction of the catapult.
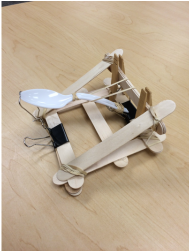
1. Arduino Uno 2. Potentiometer 3. Breadboard 4. jumper wires 5. jumbo craft sticks 6. rubber bands 7. binder clips 8. plastic spoon 9. paperclip 10. clothespins 11. hot glue gun 12. needle nose pliers Breadboard layout and codeStep-by-step directionsShare This:
5 Comments
Michael
3/15/2018 03:37:49 pm
What size clothes pin did you use? I tried this project as described, and the clothes pins did not fit.
Andrew
3/15/2018 07:42:13 pm
I used the regular sized clothes pins that you can get from your local store like Walmart, Target, etc. You do have to stretch the clothespins open to get the craft sticks (popsicle sticks) to fit.
Sharon
5/10/2018 06:10:45 pm
I am having trouble seeing the breadboard layout and code.
Andrew
5/11/2018 01:52:08 pm
Sharon,
Maria Aguilar
10/25/2018 05:28:04 pm
Hi, Your comment will be posted after it is approved.
Leave a Reply. |
Andrew FenstermakerInstructional Technology Coordinator | Innovation Coach | Google Certified Innovator | Presenter | Blogger | Adjunct @UiowaEducation | Owner @kids_f_i_r_s_t 


|
 RSS Feed
