 What? Working with the 21st Century Learner, we are responsible for creating responsible digital citizens. This is especially true for the under 13 crowd. One tool that we have used in my classroom is the Lego Avatar Creator. The website lets students create a Lego avatar of their liking. They may customize it to suite their needs. Why? When using Kidblog, Voicethread or one of the many other digital tools, my students utilize their initials. In another layer of security, we use their Lego avatars with each of their accounts. This has proven to not only be a safe method but a fun way for kids to create a unique profile picture. How? The first step in the process is to access the Lego Avatar website. 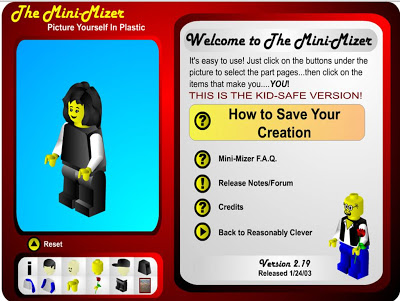
2) Once students are on the page, they can begin customizing all the features by using the body part icons in the lower left under the screen showing their current Lego person. 3) Saving the image can be a bit tricky depending on your platform. Macs are much easier being able to take a screen shot of only the Lego person. PC is a little more in depth. PC a) print screen b) http://www.picresize.com c) CTRL + V (this will paste your image to allow cropping) 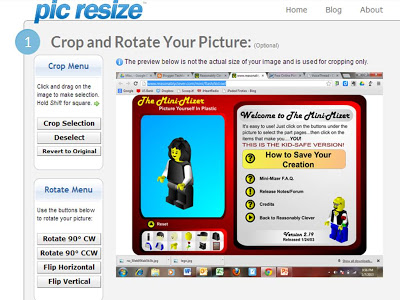
d) Use your mouse to draw a box around the part of the image you want to crop then click on crop selection 
e) In option 2--choose if you want to resize. In option 3, choose a special effect and in option 4, choose the file format to save your avatar. Click the yellow "I'm Done." button. 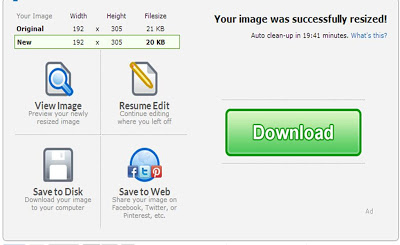
f) Your final step is to save to disk, a social site or you can continue editing.
**There are other methods for cropping your Lego avatar. However, this website allows anyone with an internet connection to crop their image. Since we have PowerPoint on all our computers, students just paste their screen shot into PowerPoint, double click on the picture, crop, right click and save as a .jpg. More Check out the wiki link below for a large list of tools for creating avatars. http://copyrightfriendly.wikispaces.com/Avatar+Makers
1 Comment

Looking for a fun, new tool for creating digital stories? Meograph is one of the latest that I have been using with my first graders. We have been using Skype to connect with classes across the United States. You can see our progress at Skype R' US. One goal of this project is to create a digital portfolio of facts learned throughout the school year. This allows us to compare and contrast our school to others across the US. To help explain Meograph, I have a short video embedded below. Below is an example of a final product that we created. For more information about tools for creating photo/digital stories check out Richard Byrne's post. Find out about another tool here.
If you are looking for a fun resource for helping students learn their alphabet then you should check out the Alphabetimals site. They also have an app. Check out the interactive book to hear an animal for each letter. In addition, there are some great resources such as flashcards, coloring pages and wall posters. You can even type your name/words with animals and then print them out, share them via social media or even order items with the name/word.
 Walls in a classroom do not have to create barriers to learning for your students. One way to flatten the classroom wall is to use Google's ever growing street view collection. It allows you the opportunity to explore regions around the US that you never thought possible.
My first graders explored NASA. In our reading curriculum we read an informational text about astronauts and landing on the moon. The NASA collection allowed us to take a virtual field trip through NASA. We also used the Ocean collection when we were reading about sea animals. This gave us a first hand perspective on the habitats that sea animals encounter on a daily basis. My first graders loved taking a dive under the water and staying dry at the same time. If you are looking for a simple way to integrate technology into your K-2 classroom, Google Street View can be a great tool for breaking down your classroom walls. 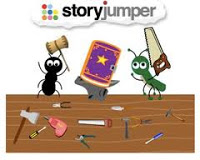 One of my favorite tools for digital story telling is a site calledStoryJumper. One of the challenges with my first graders is being able to put words onto paper. An easy way for them to start creating their own stories is by using StoryJumper to create stories with pictures. As a teacher, I create a class and then add my students to my class roster. After I have created my class, I am given a unique log in page that shows all my students' usernames on one page. All the kids have to do is find their username and click it, enter their password and they are ready to begin creating their very own stories. When kids get completely done with their stories their parents have the option to purchase their book. We print them out and make them into our own books at school. 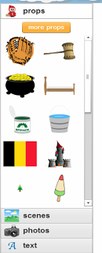 When creating their digital stories, they may choose from StoryJumper's library of props and scenes. Students can click on more props or scenes and access categorized props/scenes. If you would rather upload your own picture, StoryJumper provides that option as well. At first it may be easiest to have kids make their stories with only pictures and no words. When they are ready to begin adding text to their stories, you simply click the text tab and choose the style of text box that you want. 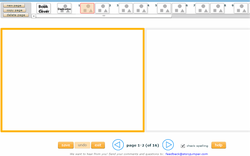 The work area is very user friendly for primary age kids. It has a dual page display and a ribbon at the top with the pages available in the book. You can customize the book cover as well duplicate pages.
One of the nice features for primary kids is the undo option at the bottom of the work area. It never fails that their click happy fingers accidentally delete something. The undo button can be a tear saver. Like I mentioned, StoryJumper is by far my favorite tool for creating digital stories. I know their are many other options out there, but I have found StoryJumper to be the best. Tips *The first time you introduce this to kids, don't expect to accomplish a lot. Let them play with the props. Then model how to add more props to their tool bar. Let them play with scenes. Model how to add more scenes to their tool bar. Let them play with the text box options. *When you are ready for more structure, have them repeat after each step that you do. Add a prop, add a scene, resize a prop, move a prop, rotate a prop, remove a scene, add text, delete text. *There are lots of other fancy options when making their books but don't try to put it all in at one time. KISS--keep it simple stupid. I have saved myself lots of headaches by focusing on simple tasks and expectations instead of reaching for the stars on day 1. Looking around Free Technology for Teachers, I came across Richard's post by Mike Amante. The Slide Share is embedded below. With my school recently obtaining a class set of iPads, Mike's resources will be a good starting point for determining what apps might be essential across K-6.
 I previously posted how I have been trying to integrate Evernote as a tool for cataloging student artifacts of their learning. To compliment Evernote, I have also been using Skitch. This tool allows me to annotate over my pictures that I take of the artifacts. Skitch is also available on the app store. I have it installed on my iPad and iPhone to make recording artifacts in my classroom a point and shoot task. Below is an example of how I used Skitch to capture an image of a student's spelling test. Using Skitch, I made a note that the student knew it was a "D" but wrote the letter "B" in place. This is a very low student. This is great progress for this student to know the two sounds. By taking this picture and annotating, I will have a quick, easy reminder during conference as to why I wanted to share this artifact. 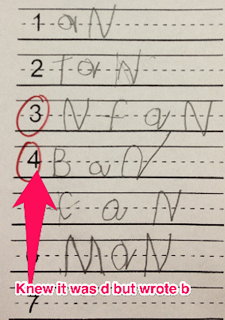  After recently attending the ITEC conference in Des Moines, Iowa, I revisited my Evernote account. With parent teacher conferences quickly approaching, I find myself wondering what I can do differently to provide a valuable experience for parents at conferences. Many times they are confused by the "teacher talk" during these short meetings. I wanted a tool to visually show parents their child's strengths and areas for improvement.
Evernote provides a free tool (limited monthly uploads) to categorize and catalog each student's work. In addition, apps are available for the iPhone/iPad in the app store. I have since created a premium membership and created a folder in Evernote for each of my students. My goal in the future is to allow students the opportunity to catalog their learning experience with Evernote but for the time being I will be using my iPad and iPhone to collect artifacts for the upcoming conferences. To find out much more on how to use Evernote as an ePortfolio tool check out Rob Van Nood's blog about how he has used it in his classroom for multiple years.  I got the privilege of presenting at the ITEC conference in Des Moines, IA. I shared on Tech Tools for the K-2 classroom. When deciding on the tools to share at this conference, I wanted to ensure that I had examples that provided the opportunity to enrich the curriculum. I created a Pearltree to create a visual of all the tech tools for K-2. In addition, I created a Google Spreadsheet to list the items for those of you that may prefer lists versus visual graphic organizers. I had a great audience and I hope they were able to pick up a couple new ideas. Feel free to check out my Pearltree or myGoogle Spreadsheet.
 For the last few years, I have always had atleast one first grader that has had a cell phone. While it is debatable about the parent's intentions for this cell phone, it never fails to at least ring one time during class. I can only imagine that it is a matter of time before more and more primary aged kids are bringing their own devices. While this may be a few years out, I came across a site that allows you to embrace cellular technology now. iFake Text allows you to input a conversation. After inputting the conversation, it creates a "fake" screen shot of your conversation on an iPhone. How can this be used in my classroom? One way that I have been integrating this into my classroom is for our daily proofreading. I create a conversation on iFake Text. When creating the conversation, I make sure to leave some errors that need attention. My first graders then use the screen shot of the "fake" conversation to perform their daily proofreading. It is a simply tool that provides an authentic experience. 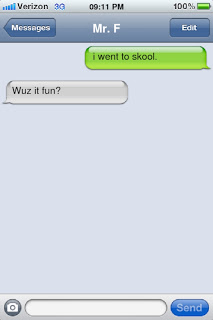 |
Andrew FenstermakerInstructional Technology Coordinator | Innovation Coach | Google Certified Innovator | Presenter | Blogger | Adjunct @UiowaEducation | Owner @kids_f_i_r_s_t 


|
 RSS Feed
