**If you are unfamiliar with this project, check out my first post introducing my pilot project with LearnPads and comparing them to iPads. In first grade we have been learning about attribute rules with 2-D shapes. We began our lesson exploring and reviewing different 2-D shapes. We practiced identifying the different attributes of each shape. After a quick review, we began working together to sort shapes based on an attribute rule (all red shapes, all squares, only triangles, etc.). This led to having shapes already sorted and working to identify the "mystery" attribute rule. This is where the LearnPad/iPad got integrated into the lesson. In an attempt to have my students apply their learning while creating and collaborating, we sorted shapes on our tablets. After sorting these shapes into two categories, students wrote "rule" above the side with their "mystery" rule. This final product was posted to their blog. After posting to the blog, students were able to leave comments with their guesses about the attribute rule being represented by the posted image. This was helping us work towards CCSS 1.G.A "Reason with shapes and their attributes." Below is a video that highlights how this activity was done in my class as well as how it can be done on both LearnPads and iPads. Below are some screenshots of a final product that was posted online. You can see the rest of the post by clicking here. 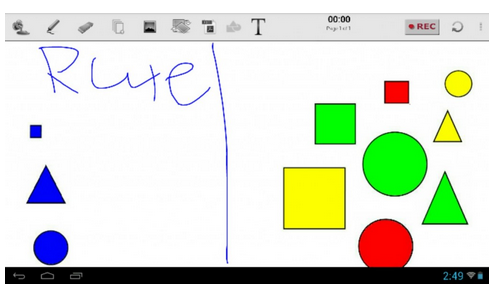 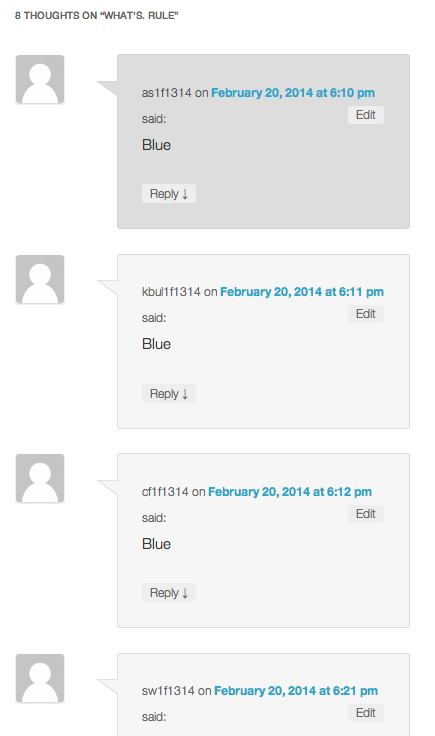 Share This:
0 Comments
**If you are unfamiliar with this project, check out my first post introducing my pilot project with LearnPads and comparing them to iPads. In first grade we have been learning how to tell time throughout the school year. We started with time to the hour, moved to half hours and then went to quarter hours. Our most recent adventure took us to writing the digital time represented on analog clocks. The activity that we did can be done on both the LearnPad and the iPad. While the apps used to complete this activity were different, the end result turned out the same. In an attempt to have my students apply their learning while creating and collaborating, we annotated a time on an analog clock and posted it to a blog. Having students annotate a time on an analog clock required them to apply their understanding of Common Core Standard 1.MD.B.3 which requires 1st graders to tell and write time in hours and half-hours using analog/digital clocks. To add an additional layer to this activity, students then went to their peers' blog posts and left a comment with the digital time that the analog clock was representing. Below is a video that highlights how this activity was done in my class as well as how it can be done on both LearnPads and iPads. Below is a few screen shots from a students final product posted on the blog. You can see the rest of the post by clicking here. 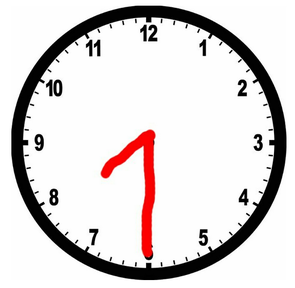 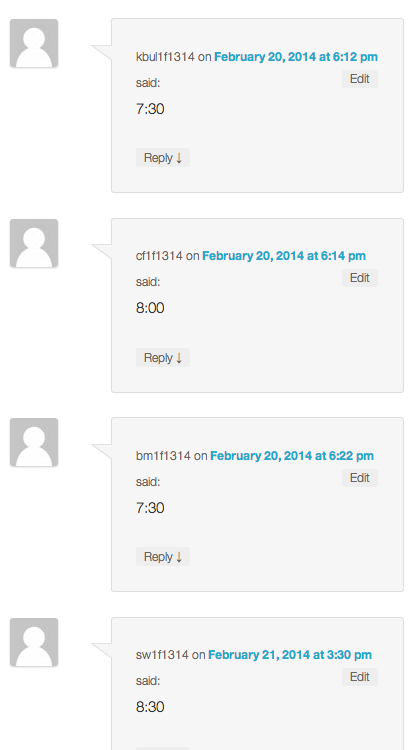 Share This:
LearnPads We have been using the QR Code Reader app on the LearnPad to provide students with the opportunity to get up and move around the classroom. During our math lesson today, students used their LearnPads to scan codes. After the code was scanned, a question was displayed. According to what the question asked, students then had to record their answer. While this is something that could have been accomplished on paper, it got kids up and moving. It was a great way to utilize the LearnPads, have kids moving and learning at the same time. Below is the file we used if you know some early primary teachers that would like some practice with telling time in the digital format. iPads On the iPads we have always used the Qrafter app. It has the same functionality as the QR Code Reader on the LearnPads. It allows you to scan with either the front or rear facing cameras. You can also tog on and off what happens when the code is scanned. You can set it to automatically open to the code or ask approval before opening. We have been able to use both iPads and LearnPads to complete our QR Code activities. If you would like to see some of the activities we have done with the iPad and QR codes, check them out here. Share This:
 For our math lesson today we used the Extreme Collaboration add on for the SMART Notebook software. This is an add on that can be downloaded from SMART Exchange. There are directions along with the download to walk you through the process to get up and running. We were learning about digital clocks. To put the LearnPads, our network and the Notebook software to the test, we utilized Extreme Collaboration to keep everyone engaged, informally assess and provide opportunities to embrace the teachable moments. I was in awe as we progressed through the lesson. Students were all able to share their answers in real time. These answers were able to be manipulated on the SMARTBoard. We could sort correct answers and group incorrect answers. This was perfect for capitalizing on teachable moments for wrong answers. Kids enjoyed learning from each others correct and incorrect answers. It fostered a collaborative learning experience that was not possible before. Check out the video below to see an example of how this was set up. I also compare how this looks on both the LearnPad and iPad during the video. Share This: **If you are unfamiliar with this project, check out my first post introducing my pilot project with LearnPads and comparing them to iPads. I have been comparing both the LearnPad and iPad as options for tablets in the classroom. Typically I showcase an app/resource and how it functions on both devices. After comparing, I give my two cents on which one I prefer. For this post, I will only be talking about the iPad and an option for going paperless in the classroom. Check out the video below for an explanation. Check out the LearnPad's options for a paperless classroom here.  PDF Expert is the app that provides a great option for going paperless with iPads. It does have a big price tag at $9.99 but it is well worth the investment. One of the nice features about this app is the amount of options you have for syncing with cloud storage. This should be able to accommodate the variety of cloud storage services that schools use. Below is a screen shot of some of the options for cloud storage. 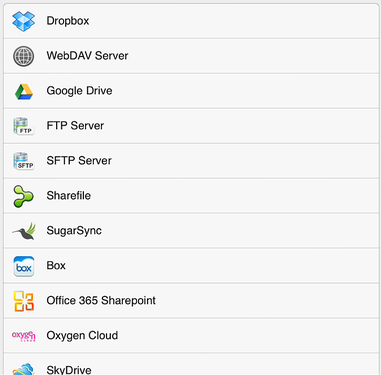 One of the steps to begin this process is to sync a folder within the PDF Expert app itself. To do this, you must first ad your cloud based network. Your network then appears under "favorite networks." 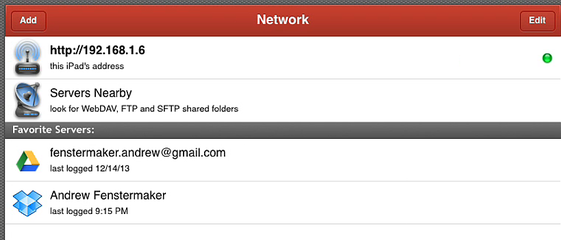 Open up your favorite network and locate the folder you would like to sync within the PDF Expert app. Once you have opened the folder you wish to sync, click the "sync" button in the top right. 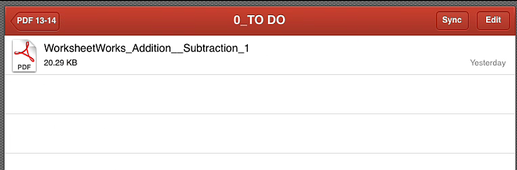 Once you have done this, you will need to repeat the process for each student iPad. This would also need to be done on your "teacher" iPad so you could access their files and annotate feedback for them. *Note--when a student would make annotations, it will sync with the cloud. So you can view their annotations via the cloud service from your computer. So you don't necessarily need a "teacher" PDF Expert option unless you want to annotate feedback. Students will need to make sure that they open up "assignments" from the documents folder within the app. If they use the network tab, it will create duplicate copies of files which eats up cloud storage space.  I really like this option for the fact of being able to provide feedback in the same file that a student completed. That student can then make corrections according to the feedback in the same file as well. Essentially you are only using one file instead of creating a duplicate every time changes are made. Share This: **If you are unfamiliar with this project, check out my first post introducing my pilot project with LearnPads and comparing them to iPads. I have been comparing both the LearnPad and iPad as options for tablets in the classroom. Typically I showcase an app/resource and how it functions on both devices. After comparing, I give my two cents on which one I prefer. For this post, I will only be talking about the LearnPad and two options for going paperless in the classroom. Check out the video below for an explanation. Check out the iPad option for a paperless classroom here. Hand out/Hand in features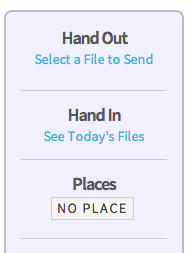 With the newest LearnPad OS update 271, you are given the option to Handout items as well as hand in items. From your the LearnPad dashboard online, you can select the devices you would like and then choose "select a file to send." You will be provided a box to select the file you would like to upload and distribute. Once the file is selected and sent to students, they will have to check their "handouts" folder, click the file and it should open in the app association you have created for the file type of the "handout." 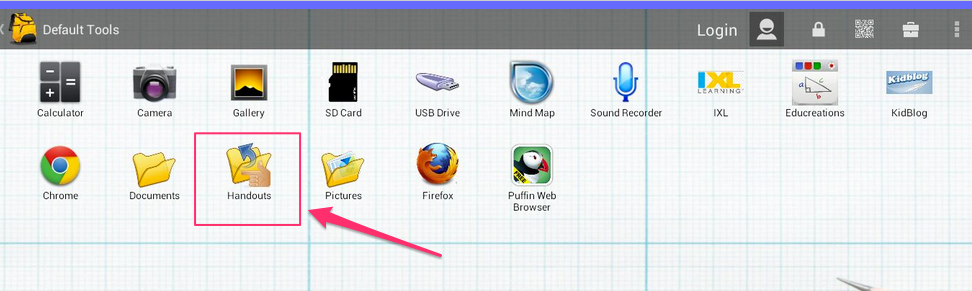 After students have annotated (I used Note Anytime) they will be to choose "send to application" at which time they will be provided with choices for "sending" their annotated file. They can then select "hand in" as the option to submit it to the teacher. 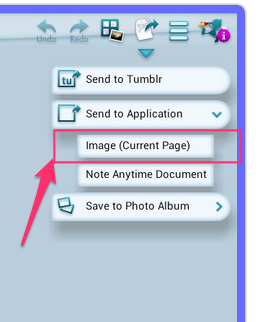 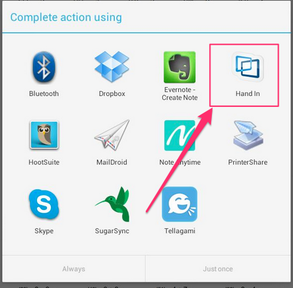 Teachers can then access the handed in files via the dashboard online. 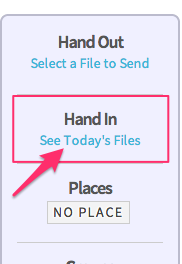 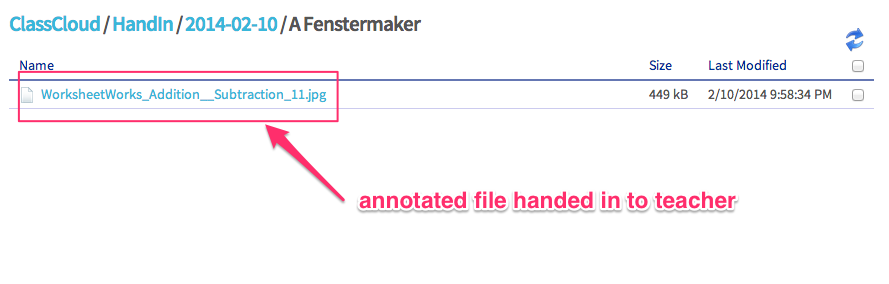 dropbox option **The option that I will use in my classroom is via Dropbox because we have been using Dropbox a lot and the learning curve will be minimal. I have created a generic student Dropbox account. Within this account, I have created a folder for this years class. Within this folder is an individual folder for each student. I have also shared this folder with my own personal Dropbox account. I can put files into this shared folder and they will automatically be accessible by my students. They will start by clicking the "to do" folder to access the files for the day. They will then click on the file and choose which application to open the file for annotation (we will use Note Anytime). 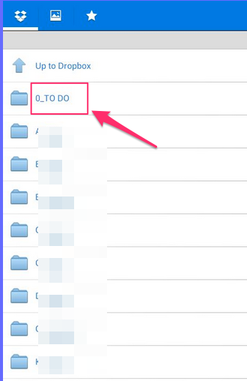 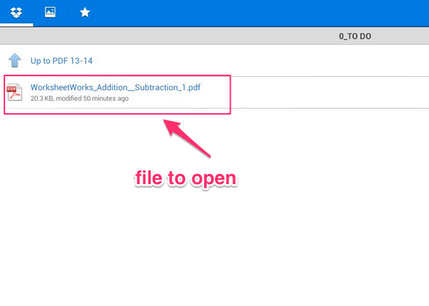 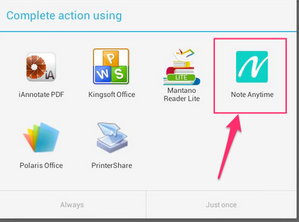 After opening in Note Anytime and annotating the file, they will still select "send to application" like with the hand in/hand out feature. However, they will now select Dropbox as the application to send the file to for saving. 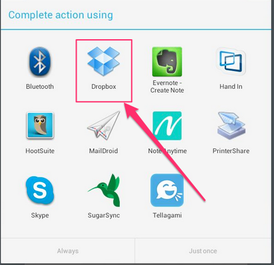 Once in the Dropbox app, they will need to select their personal folder to submit the work. Since this folder is shared with my personal account, I will be able to access these files from any device with Dropbox installed and logged into my personal account. One of the big reasons I am using this method is the ability to share the annotated files. By saving into Dropbox, students or I can click on the files and share. When shared, you are provided a link. This link can be posted onto their Kidblog accounts, sent to parents or added to Evernote. All of these can serve as portfolios as we create digital artifacts. Share This:
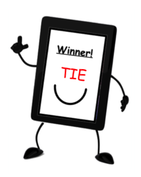
**If you are unfamiliar with this project, check out my first post introducing my pilot project with LearnPads and comparing them to iPads.  Tellagami is an app that allows you to create an avatar, customize the background, record for 30 seconds and share with the world. After you have recorded your voice, your avatar will then speak your words with gestures and all. It is available for IOS and Android. This past week my students were working on writing friendly letters. We spent time reviewing the different parts of a friendly letter. After some review and practice with the different parts of a friendly letter, we used a template to create our rough draft. You can see a picture of it below and download the template here. 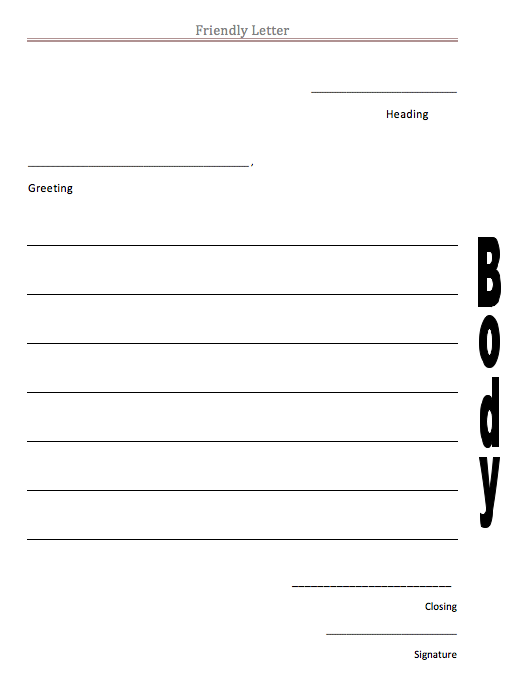 After my students had created their rough draft we made some revisions and proceeded to publish. We decided to put our new LearnPads to the test with publishing our friendly letters. Students used the Tellagami app to record themselves reading their friendly letters. After completing these recordings, they shared them to our class Twitter account. I have included a few examples below for you to see the final products. LearnPad vs. iPad I have been comparing the LearnPad with the iPad. Using the Tellagami app on both devices was almost identical. The options to share via the LearnPad can be different from the iPad. However, after trying this app out on both devices, I would say it is a tie between the two devices. See my video below highlighting some of the small differences between this app on the LearnPad and iPad. Share This:  **If you are unfamiliar with this project, check out my first post introducing my pilot project with LearnPads and comparing them to iPads. **Correction--after posting this, I got some feedback and wanted to clarify. This post would be a better reflection on the Lensoo and Educreations apps. I said the iPad is the winner based on how the two devices and apps are being used in my 1st grade classroom. I don't want to throw either device under the bus but want to show case which tablet I would favor during certain activities in my classroom. *Educreations is available on the LearnPad. However, it is not an app. It is the web version of their interactive whiteboard. You are unable to insert images from Dropbox like you can from the app. Also, you can't resize images on the web version of Educreations. If Educreations had an app for Android that functioned the same as the IOS app, the LearnPad/iPad would be a tie in my classroom for screencasting. One of my goals when integrating a tablet into my classroom has been to push what is possible with the tablet as a creation device. While we do our share of consumption, we continue to focus on creation. One tool that we have been using is the ability to screen cast in order to show case our learning. It allows us to create digital artifacts of our learning adventure. I am comparing the LearnPad and iPad's ability to screencast. The apps are different on each device, but they both function almost the same. There are a few features on the iPad that put it ahead of the LearnPad. I highlighted some key similarities and differences below. There is a video at the bottom of this post that shows each app/tablet in action and how they compare when it comes to screencasting. LearnPad and the lensoo app Lensoo is an app that allows your Android device to become an interactive whiteboard. Similarities to iPad
Differences
iPad and Educreations app Educreations is an app that allows your IOS device to become an interactive whiteboard. Similarities to LearnPad
Share This:  If you are unfamiliar with this project, check out my first post introducing my pilot project with LearnPads and comparing them to iPads. My school district utilizes HMH Journeys as our reading curriculum. One of the components that we have access to is called ThinkCentral. This is basically an online portal to access digital versions of the curriculum. One nice feature of this tool is the ability to add classes and students as well as give assignments. 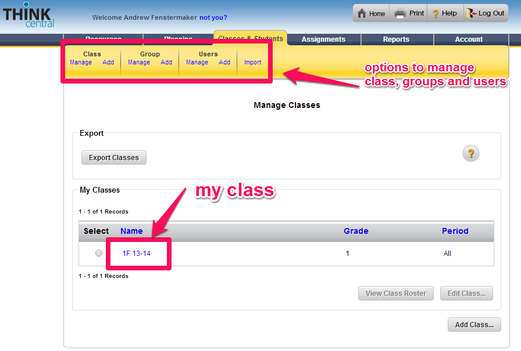 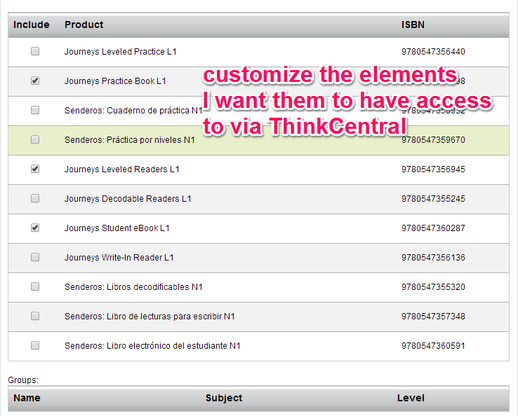 I mentioned the ability to give assignments. This is the piece that I will highlight about using an iPad vs LearnPad. Below is a screenshot of what options I have for assignments. You can see that I have a test assigned currently. This is a quick assessment to check comprehension that will be given after reading a whole group story. 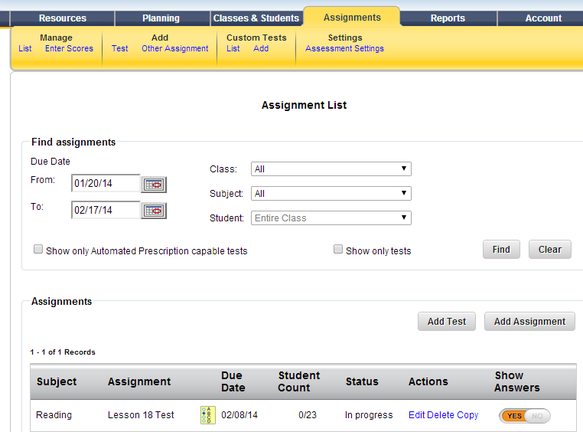 iPad vs Learnpad The iPad and LearnPad look a lot a like when using the ThinkCentral component of the reading curriculum. Below are the steps and images as a student would log in and access an assignment. 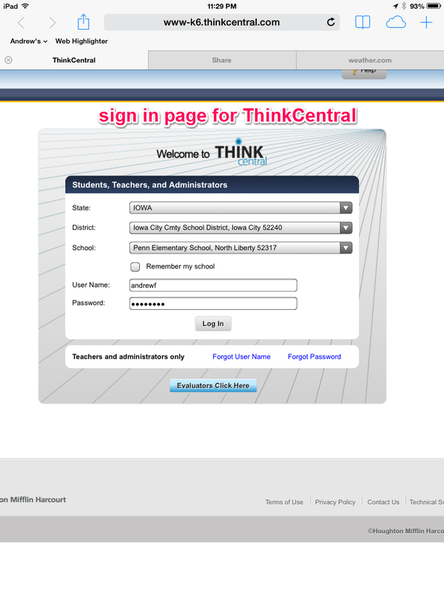 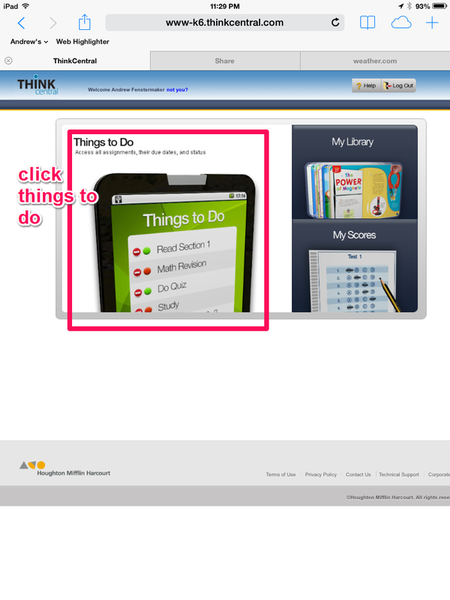 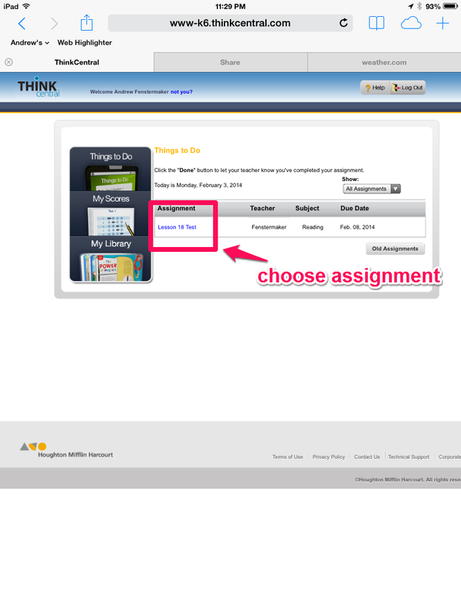 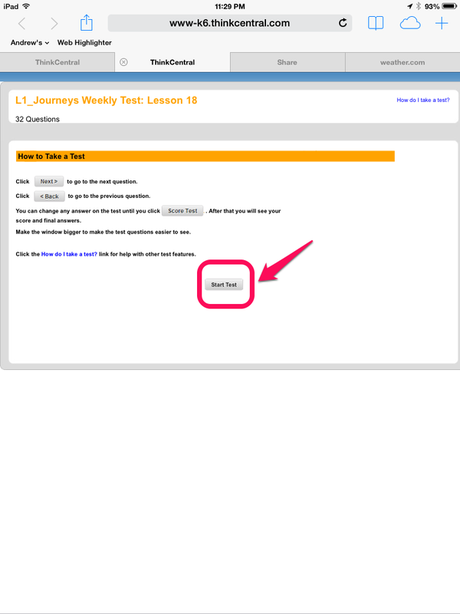 So far each step has looked almost identical. The big difference is when you click start test. Below are screenshots from both the iPad and LearnPad highlighting the big difference. 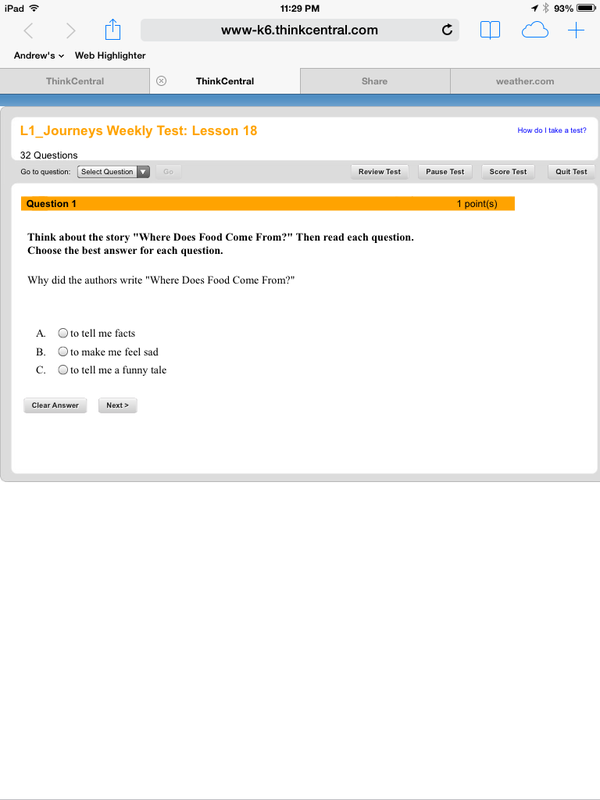 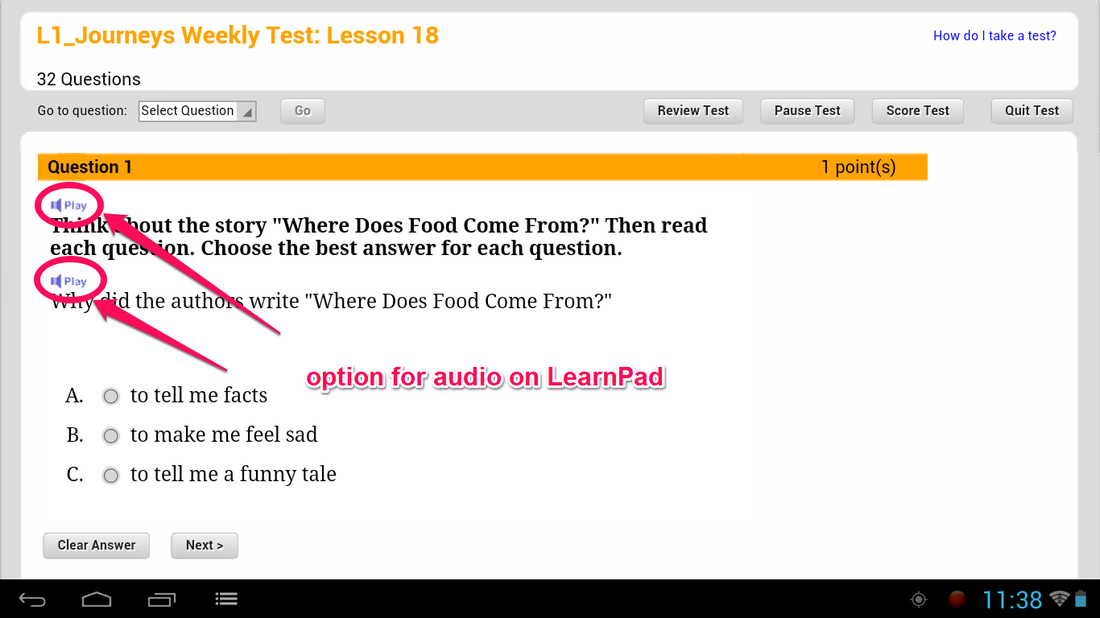 You can see that when using a LearnPad to take this assessment, you have the option to play audio. Since the iPad does not support flash, it is unable to provide the audio piece for the assessment. This may not be a huge deal but for early primary aged students, having the option to "read aloud" parts of the assessment is a huge asset. With assessments being a great tool to inform instructional decisions, I would give an edge to the LearnPad on this head to head comparison for integrating assessments with HMH Journey's ThinkCentral. Share This: Over the past year, my first graders and I have been fortunate enough to utilize five iPads. We have integrated these five iPads in a variety of ways. Our goal was to find meaningful ways to use the iPad as a creation tool vs. a consumption only device. Furthermore, we tried our best to be above the line on the SAMR model. Most recently, my first graders have received a class set of LearnPad tablets. We received these tablets as part of a pilot project. My district is evaluatingiPads, LearnPads, Kuno and Microsoft Surface RT tablets. The overall goal is to determine what may be our "standard" tablet as buildings move towards purchasing and integrating tablets. There may be one clear winner or maybe even a tablet chosen for K-6 and a different one for 7-12. Throughout this process, I plan to catalog the integration of the LearnPads into my classroom. Specifically, I will try to highlight and compare the pros/cons between the LearnPad and iPad. This is an exciting project for not only me but my first graders as well. We hope to provide some snapshots of our adventures along this journey. Share This: |
Andrew FenstermakerInstructional Technology Coordinator | Innovation Coach | Google Certified Innovator | Presenter | Blogger | Adjunct @UiowaEducation | Owner @kids_f_i_r_s_t 


|


 RSS Feed
