|
I had the privilege of sharing at the Central DeWitt School's annual tech conference. This year's #cencon16 was awesome. There were many speakers from across Iowa. Below you will find the presentations that I shared.
Google Fun for Digital StoriesAssessment HeroSphero Smackdown 2Map it Up
0 Comments
Our Final ProductOverview
I had the privilege of listening to Dean Shareski about the Classroom of the Future. When he talked about "literacy" in the 21st Century, he had us collaboratively complete a six word story about the state of Iowa. This activity was applicable to the classroom and led to a Six Word Story collaborative project between three schools, and seven teachers.
Set Up
I began by setting up a Google Classroom that all the students could join. I also added each teacher as a co-teacher to this Classroom. You can see the project lesson plan for a quick snapshot of the layout.

Part 1: Six Word Story Introduction
The first phase of this project was to introduce students to the concept of a six word story. We showed them a Google Slideshow. We completed an "I do," "We do," "You do," process when introducing the six word stories. The "You do" part utilized a Padlet for Font, Image Choice and Word Choice. This allowed all students to practice identifying how different elements of a story can impact the meaning for the reader. Furthermore, it allowed students to see everyone's ideas so it wasn't just their classmates. Below is a screenshot from Part 1 on Google Classroom.
Part 2: Practicing Word Choice, Font type, size and color
After students had started to develop an understanding of six word stories, we wanted to provide them with an opportunity to identify words that they felt connected with a chosen picture. In addition, we wanted them to practice changing the font type, color and size in a way they felt brought the story to life. To accomplish this, a single Google Slideshow for Word Choice was used for all students to practice. Moreover, a single Google Slideshow for Font allowed students to not only practice, but also view student examples from all who were participating in this collaborative project.
Part 3 and 4: Web your Words
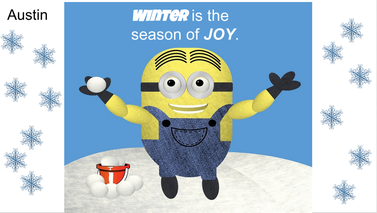
The next step in this process was to get students to start brainstorming words. They had the choice to write about the season of winter or what they planned to do over winter break. We used a PDF web for them to start brainstorming words. This was beneficial for some students. However, many students were able to come up with their six words without needing to web a variety of words.
Part 5 and 6: Creating Stories and Leaving Comments
The last phase of this project was for students to create their own six word story. We used a single Google Slideshow that all students had editing privileges to construct their stories. They got to select the image they felt brought their story to life. Furthermore, they got to play with the font size, type, color and location to enrich the impact of their story.
After students had the chance to build their stories, their final task was to leave comments on other stories. The goal was to have students leaving feedback about the element of the story they felt had the most impact on a reader and why they felt that way. 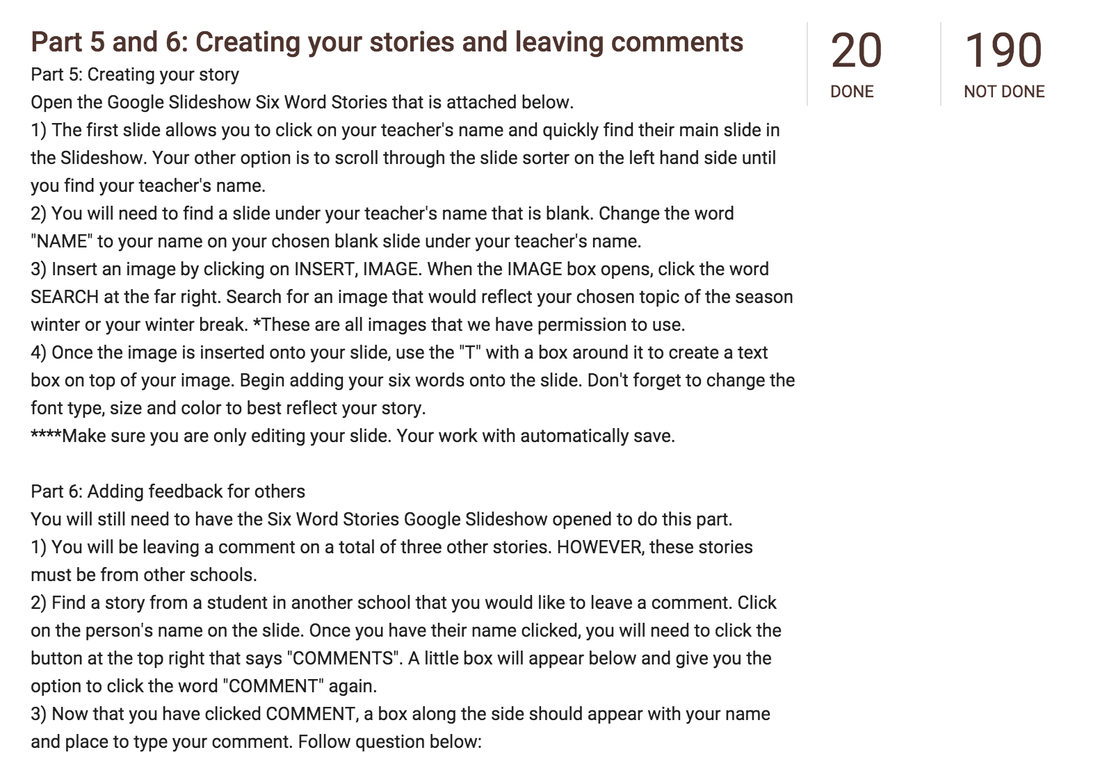
Conclusion
I feel very fortunate to work in a district with so many amazing teachers that are willing to take on a collaborative project the week prior to winter break. We had never done this project before, but we were willing to take a risk. Besides, how could students refuse to write only six words?
We were truly blown away by the amazing creations that students came up with. They had a blast being able to create and share with others around the district. I am looking forward to making this an annual project and hope to grow it in the future. Share
It is that time of year again. Most of us will stuff ourselves with turkey, ham and many other traditional Thanksgiving dishes. Maybe even finish off with a fluffy heap of whip cream with a sprinkle of pumpkin pie. Regardless of your Thanksgiving tradition, it is also a time to reflect on what we are thankful for in our lives. This is a project that I wanted my students to complete using Storyboard That.
Google Doc Template
We began this project by brainstorming the things we are thankful for in our lives. We used the template that is pictured below. Feel free to use it yourself. It is available by clicking here.
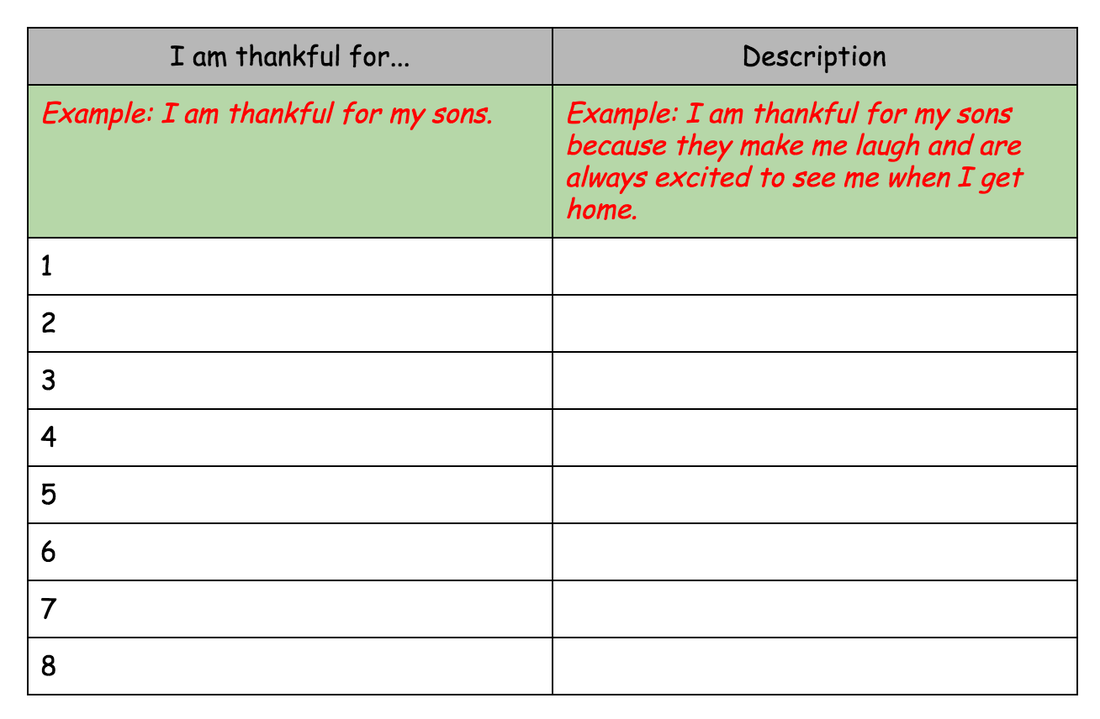
The students had the choice to fill in as many boxes as they liked. However, the minimum was four. In addition to providing the list of things, I wanted them to reflect on why they were truly thankful for the "things" in their life. It is easy to spew out the standard "things": friends, family, food, etc. By requiring them to provide the "why" students got to think a little more critically about their list.
Storyboard That
With Storyboard That, I am able to create an assignment for my students (I upgraded to a premium account). By creating the assignment, all the directions and examples automatically show up for those enrolled in my class.
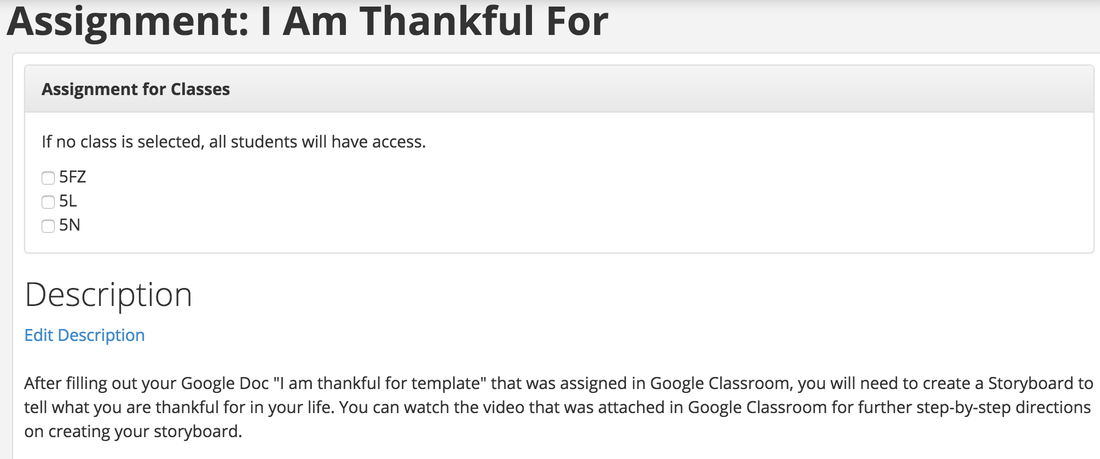
Once the assignment was created, I could choose which classes to assign it to. In addition, I could add an example for them to see how to set up their storyboard. I also had the option to make my example a "template" so all they had to do was copy the template to begin creating. However, since students had the choice for how many "things" they were thankful for, I wanted to have them create their storyboard from scratch so they could customize how many boxes they wanted.
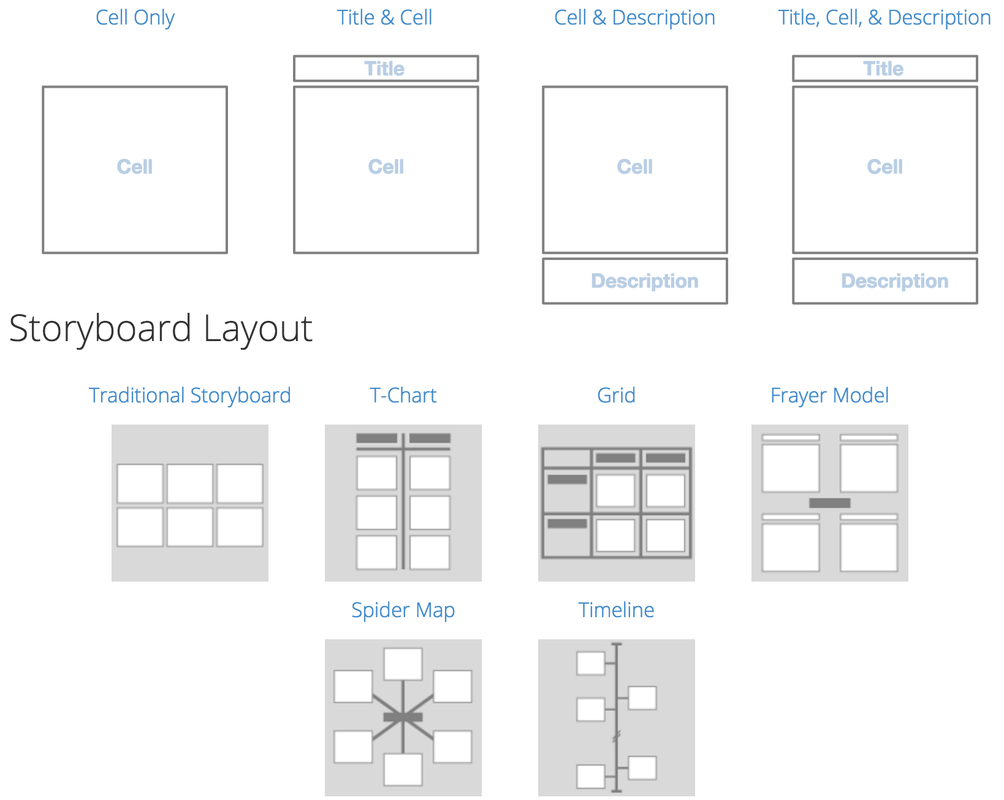
When they began to create their storyboard, they had to customize the cell so it had a title on the top and a description on the bottom. Furthermore, they had to select "Spider Map" for the layout of their storyboard.
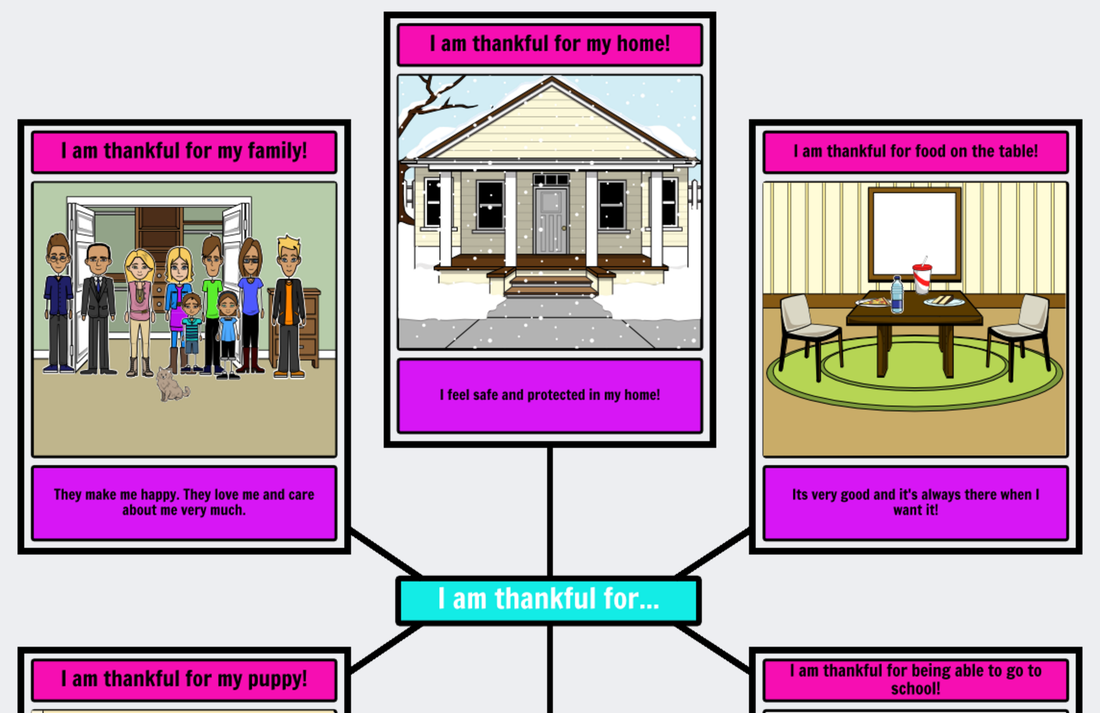
After selecting the correct cell structure and layout of the storyboard, students were able to copy their "things" and descriptions from their Google Template. As you can see above, it was entirely up to the students to pick pictures they felt best represented their "things."
When students finished their storyboards, they were able to save it. A nice feature of Storyboard That is students can select which assignment to associate the storyboard with when saving. When my students saved their storyboards, they selected the "I am thankful for..." assignment. I am able to quickly see all the storyboards that are associated with this assignment. Changes
Thinking about this assignment, I feel like I could take this to the next level by harnessing the power of the Internet. It is easy to block out the world and focus on our little bubble that we live in everyday. I would love for my students to connect with other students around the world. Specifically, students that completed a similar project. This would provide an opportunity for my students to pop their "little bubble" and see thankfulness through a global lens. I would be curious if this could potentially inspire my students to research why some other areas of the world may be thankful for items we take for granted here in our current setting. Lastly, I wonder if this could potentially lead to my students taking on a project to provide some of those thankful "things" around the world that my students take for granted everyday. For example, if a class from around the world was thankful for water because of not having adequate clean water, would it inspire my students to attempt to solve that issue since water is in abundance in our "little bubble."
Connect
Are you a school that would like to share things you are thankful for in your lives? Do you want to create a connection to help pop our "little bubble" so we can broaden our understanding of what "things" we take for granted that are so precious to others? We would love to connect and learn together about being thankful.
Share This:
One of the skills we recently worked on was being able to draw conclusions based on the facts from the story and our own personal background knowledge. We started this conversation by watching the two videos below.
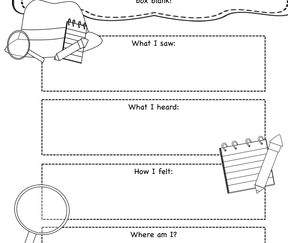
After we finished watching these short videos and drawing conclusions, we began the process of creating our own mysteries for each other to draw conclusions. Using a template, which is picture below (available on TPT for free), students began to create details for a mystery location.
After completing their mystery clues, they were to use Vocaroo to record their clues. Vocaroo is a super simple website. Clicking the record button (need to allow access to your microphone) will allow you to record your audio. You can listen after you are done and retry if you are not happy with it. End the end, you can click to save your audio clip. You are then provided with a link as well as embed code. You can even get a QR Code for your audio clip or download it as a MP3 or WAV file.
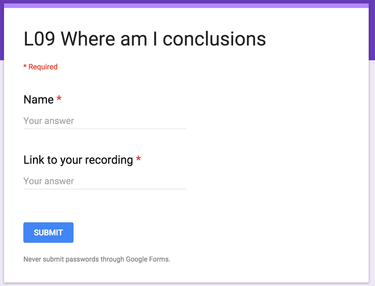
Students used a Google Form (pictured above) to submit their links to their audio clips. All of the links were compiled into a spreadsheet. This Spreadsheet was shared in Google Classroom as a view only file. Students opened up this view only file as well as created a new Google Doc. They spent some time listening to each audio clip and typing their conclusion in their Google Doc. After they had listened to all their classmates' audio clips and typed all their conclusion guesses, they attached their Google Doc to the Google Classroom assignment.
Summary
This blog post is long overdue. To end the my first year as a 5th grade teacher after transitioning from 1st grade, we decided to have a little fun with Sphero Robots. Students were checked out the last week of school and I wanted a fun way to wrap up our year and do some learning at the same time. During the #hourofcode my students had used the Sphero robots to practice coding. I wanted to provide one last opportunity for them to practice their coding and play with the Sphero robots.
Slideshow
Below is the Google Slideshow we used to facilitate this Sphero Chariot Challenge.
Pre-Assessment
I wanted a way to gauge their learning that took place during this lesson. I gave them a pre-assessment that I had created using Google Docs. After the pre-assessment, I wanted them to spend some time researching about chariots before we began fabricating.
Engineering Design Process
I wanted to introduce them to the engineering design process before they had the chance to build. I put them into partners and we discussed the different phases of the engineering design process. Students began with the "ask" phase of the process. We discussed the challenge and any constraints.
After identifying the problem and constraints, we moved onto the imagine and plan phase. At this time I shared what materials they would be able to use during the build. Using the knowledge of the material, students had to create three collaborative designs. They had to label what materials they used in their design. After creating their three designs, they had to decide which one they would use first. Create
Once they showed me their chosen design, they were set loose to build. This phase of the engineering design process was so fun to watch. Some groups were able to plow ahead with their designs while others quickly realized some of their chosen designs were not going to work.
Improve
We spent the most time in the improve phase. They were able to test their design periodically with the Sphero. Many began observing what others had figured out to work. Some started to abandon their designs and fabricate their chariots similar to their classmates that were having success. I did have some students stick with their original design.
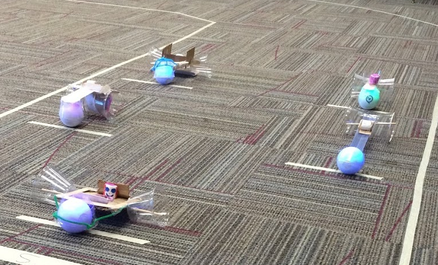
Race Time
Our final test was having a race around a track on our classroom carpet. You can see some images and videos here. The amazing part of this challenge was the winner of our racing challenge. The partnership that won was a pair that I had written off early on due to the numerous failures and flaws with their design. However, they continued to improve and modify their design. After multiple failures, they successfully created a reliable chariot that won all the races.
Reflection
This was definitely a fun way to end the school year. The students really enjoyed this challenge. There were a lot of bumps along the way. I loved how determined all of the students were regardless of how many times they failed. We were able to incorporate reading, writing, history, social studies and science into this activity. In addition, students got to employ their creativity into decorating their chariots. It was a great time and great way for my first year in 5th grade to end.
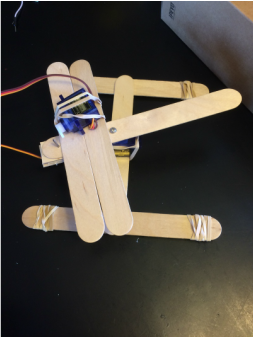
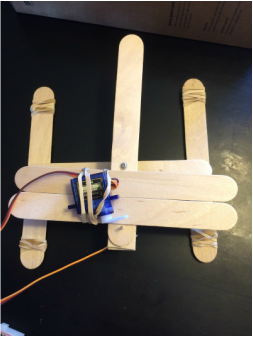
I previously posted about creating a rubber band gun using an Arduino Uno. I had set out to build the rubber band gun for a STEM summer camp that I will be conducting this summer. I am doing some work with Arduino micro controllers and wanted something for students to do that was more than making an LED blink on and off.
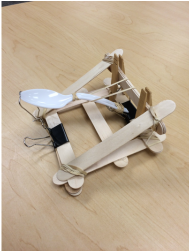
After completing the rubber band gun, I thought about making a catapult. Rather than using two servo motors like the rubber band gun, I planned to use just one servo motor for the catapult. While the catapult was more difficult to build than the rubber band gun, both projects were equally enjoyable and I am excited to see how students do with these projects this summer. Materials
If you watch the how-to video, I left out some of the materials. Below is a list of materials I used during the construction of the catapult.
1. Arduino Uno 2. Potentiometer 3. Breadboard 4. jumper wires 5. jumbo craft sticks 6. rubber bands 7. binder clips 8. plastic spoon 9. paperclip 10. clothespins 11. hot glue gun 12. needle nose pliers Breadboard layout and codeStep-by-step directionsShare This:
Summer Camp This summer I will be conducting a STEM camp. This will be my second year of doing this for students in the school where I teach. I wanted to try and add something different for 5th/6th graders. This summer I will be doing a week long camp over Arduino. Each camp participant will receive an Arduino Uno. We will be learning some of the basics of Arduino during this week long camp. In addition, students will get the chance to complete a couple of projects. Rubber Band Gun Rather than focusing only on projects with LEDs, I decided to incorporate some servos and potentiometers. One project students will build is a Rubber Band Gun. Students will use two servos to control the side to side movement and the firing of the rubber band. The potentiometers will control the servo rotating the gun and firing the gun. Below is a video explaining the steps of the process. Breadboard layout Below is how I wired everything up. If you click on Code Editor, you can see the code that I used to make this rubber band gun work. If you have suggestions for improving the code, I would love to hear. I am very new to this process and sure that there is a better way to wire this up and program it. Background with Arduino I continue to be blown away by the power of the internet. As of a month ago, I had never touched an Arduino or done anything with programming. Since purchasing an Arduino Uno, I have scoured the internet for articles and videos about getting started with Arduino. I am still very new to programming, but love the limitless possibilities with the Uno board and other electronic components. It will be a great resource and tool for working with 5th/6th grade students this summer.  The Template For a recent writing project, we had 5th graders complete a "Choose Your Owen Adventure" story using Google Forms. We chose to use Google Forms for a couple reasons. 1) We are a GAFE district which means each student has his/her own Google Account. 2) Google Forms provides a simple structure for adding text, images, pages and linking between pages based on answers. To get the project started, I created a story map (flow chart) to assist with getting ideas on paper. In addition, this story map provided specifics for which page each question/answer should link to during their story. When I created this story map, I allowed for two different levels of difficulty. Both of these options are provided in the example below which you can download and use as you would like. Feel free to tweak it and make it your own. Beginner Format To use the beginner format, you will need pages 1 and 2 from the story map template listed above. This format provides a total of 15 pages in your Google Form. Below is an example of how you could lay out the papers in the beginner format to visually assist with the flow from one level of your story to the next. 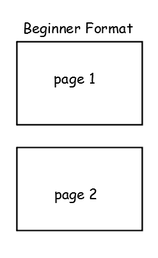 Challenge Format You will still need page 1 of the story map template. However, you will add in pages 3, 4 and 5 as well. The challenge format ends up with a total of 31 pages in your Google Form. Below is an example of how you could lay out the papers in the challenge format to visually assist with the flow from one level of your story to the next. 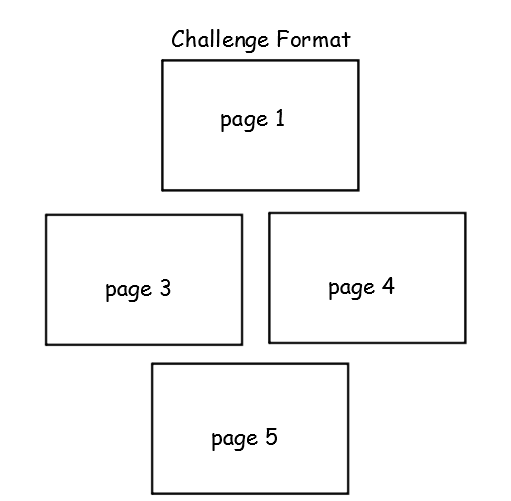 Our 5th Grade Results The 5th grade students used the beginner format to complete their Choose Your Own Adventure stories. We broke this into four different sessions. Session 1: A completed story was demonstrated for students to see the final product. The beginner story map was provided to students. They began mapping out their story. Session 2: A Google Form was introduced to students. Adding pages was demonstrated after creating a new form. Students could finish their story map and move onto creating a Google Form. Their main goal was to create a Google Form that had 15 pages. We labeled pages 2 through 15 as follows: page 2, page 3, page 4, etc. Session 3: Students were introduced to adding multiple choice questions to each page of their form. In addition, they were shown how to link to specific pages based on answers. Students spent time during this session, adding their text from their story map to the correct page in their Google Form. We had students link to the correct pages as they created their multiple choice question for each page. **Some students benefited from adding their questions to all pages first. After finishing all pages, they went back and linked. They were frustrated with creating questions and linking at the same time. Allowing them to type their questions and then go back and link alleviated that frustration. Session 4: We introduced students to adding images to each of their pages in their story. In addition, we modeled how to view their live form, copy their live form's URL and submit it to me via a Google Form that I had created. Students spent this session adding images and then submitting their final story's link to me. 5th Grade Choose Your Own Adventure Website To conclude this project, I took all the links that were submitted to me and added them to a Google Site. We originally talked about turning each Choose Your Own Adventure story into a QR Code and allowing students to scan and try out each other's stories. In the end, we went with a Google Site that students could navigate at school or home and try out each of their classmate's stories.
Choose Your Own Adventure Google Site 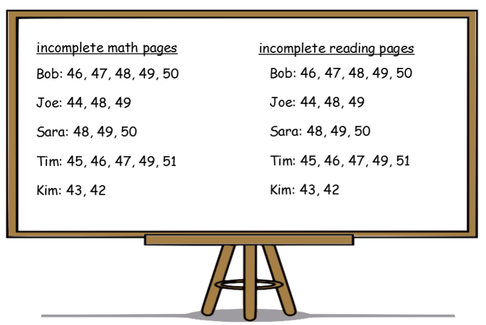 Does your whiteboard or chalkboard look like the one above? Do you have student names and incomplete work listed? Are you sick of trying to remind students of what they still haven't completed? I spent the last six years in first grade. This year is my first year in fifth grade. While it has been a nice transition, there is little difference in students taking responsibility with what work they need to finish. I feel like I am consumed with managing work that is finished vs. unfinished. Shouldn't it be the student's responsibility to manage his/her assignments? Wunderlist: My Solution My students all have a tablet that they are able to use each day in my classroom. In addition, all students either have a cell phone, iPod touch or tablet of their own. Keeping this in mind, I wanted a tool that students could continue to use well passed fifth grade. To achieve this goal, I chose Wunderlist. It is available on IOS, Android and the web. What a perfect solution. I sent home permission forms to parents about having their child create a Wunderlist account. Since we are a GAFE school, each student already has an email address they could use to register for Wunderlist. All the parents were on board with their child using this tool. Having students create the accounts went very fast. Once they had created their free account, I had them create a new list with their initials and our class code (5f). This list was to be their "Virtual Planner." After their new list was created, they shared the list with me.  Their shared lists show up in my own Wunderlist account. I can quickly see what assignments students are still working on. In addition, students are able to manage their assignments to determine what they have to complete. One of the coolest things from doing this was when students started adding other daily jobs to their lists. Some students put baseball, basketball or other after school practices that they had. I even began seeing students add chores that they had to do at home. At the end of the day when it is time to record homework, many students no longer use their paper planner, but use Wunderlist instead. It took some time initially for them to develop the habit of adding their assignments to Wunderlist. However, it has been worth the time of teaching them how to use this tool effectively. I no longer stress and have to keep my whiteboard filled with student names and their incomplete work. Using Wunderlist is teaching them responsibility and accountability for not only this school year, but their entire life. Time management is such a critical life skill and providing them with some structure and strategies for managing their time is something that Common Core does little to teach or assess. What do you think? What tools have you used for students to manage their work?  I am beginning a new adventure with learning Arduino. I am the true definition of a noob in this realm of technology. I taught a STEM summer camp during the summer of 2014. We used Sphero Robots to practice coding. The kids loved it, but when camp was over, so was their ability to explore with Sphero unless they went out and bought one on their own. This is what initiated my exploration with Arduino. I wanted a tool for students to be able to hack, tinker and engineer. In addition, I wanted something that they could keep and continue to learn beyond the summer camp. With the -25 temperatures, it is hard to think that summer will be here soon. My goal this summer is to provide a beginner's camp on Arduino for 5th and 6th grade students. When the camp is over, these students will be able to keep the Arduino and some other supplies to continue their learning. My Initial Supplies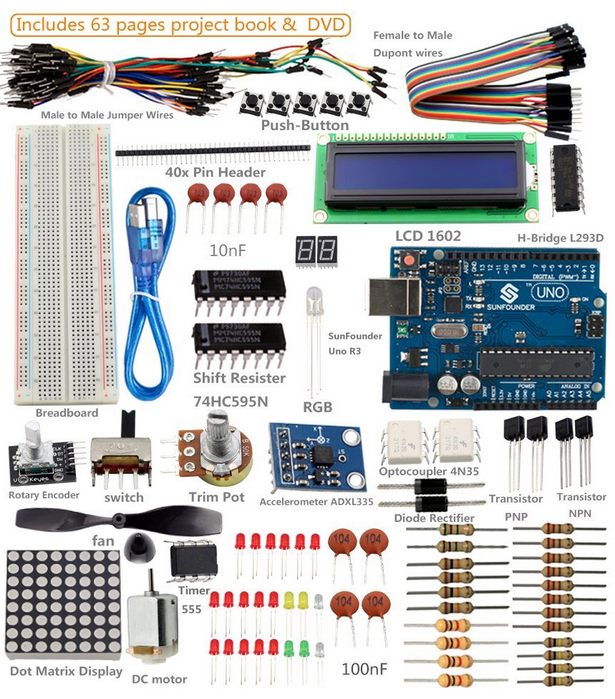 I looked around at sites such as Adafruit, Sparkfun, and Amazon. I eventually decided on the kit pictured above. It is a Sunfounder New Uno R3 Super Starter Kit. It cost me a little under $50 for the kit. It looks like it has more than enough supplies to stress my brain out over the next few months. 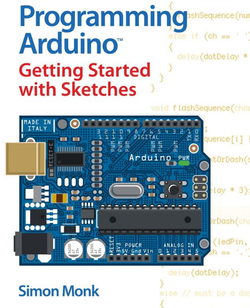 With my Sunfounder kit, I also purchased a book by Simon Monk called Programming Arduino Getting Started with Sketches. It was a highly recommended from the book I was reading titled Invent to Learn. As I mentioned, I am a complete beginner and have no prior experience with programming using any kind of computer language. My class did use Scratch in the fall during the Hour of Code. I was able to get Sprites to move around, talk, disappear and reappear. However, that is about as extensive as it gets with programming for me. While I waited for my kit to arrive, I read atutorial that I found linked fromAdruino's Website. As I was reading through it, I used Autodesk's web app called 123D Circuits. This resource allows you to virtually create circuits using an Arduino Uno and other electronic components. Below is a video about my learning so far. Share This: |
Andrew FenstermakerInstructional Technology Coordinator | Innovation Coach | Google Certified Innovator | Presenter | Blogger | Adjunct @UiowaEducation | Owner @kids_f_i_r_s_t 


|
 RSS Feed
