Our Final ProductOverview
I had the privilege of listening to Dean Shareski about the Classroom of the Future. When he talked about "literacy" in the 21st Century, he had us collaboratively complete a six word story about the state of Iowa. This activity was applicable to the classroom and led to a Six Word Story collaborative project between three schools, and seven teachers.
Set Up
I began by setting up a Google Classroom that all the students could join. I also added each teacher as a co-teacher to this Classroom. You can see the project lesson plan for a quick snapshot of the layout.

Part 1: Six Word Story Introduction
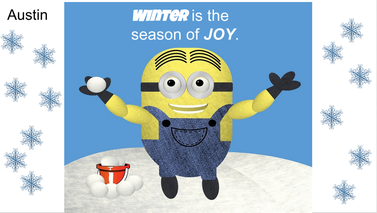
The first phase of this project was to introduce students to the concept of a six word story. We showed them a Google Slideshow. We completed an "I do," "We do," "You do," process when introducing the six word stories. The "You do" part utilized a Padlet for Font, Image Choice and Word Choice. This allowed all students to practice identifying how different elements of a story can impact the meaning for the reader. Furthermore, it allowed students to see everyone's ideas so it wasn't just their classmates. Below is a screenshot from Part 1 on Google Classroom.
Part 2: Practicing Word Choice, Font type, size and color
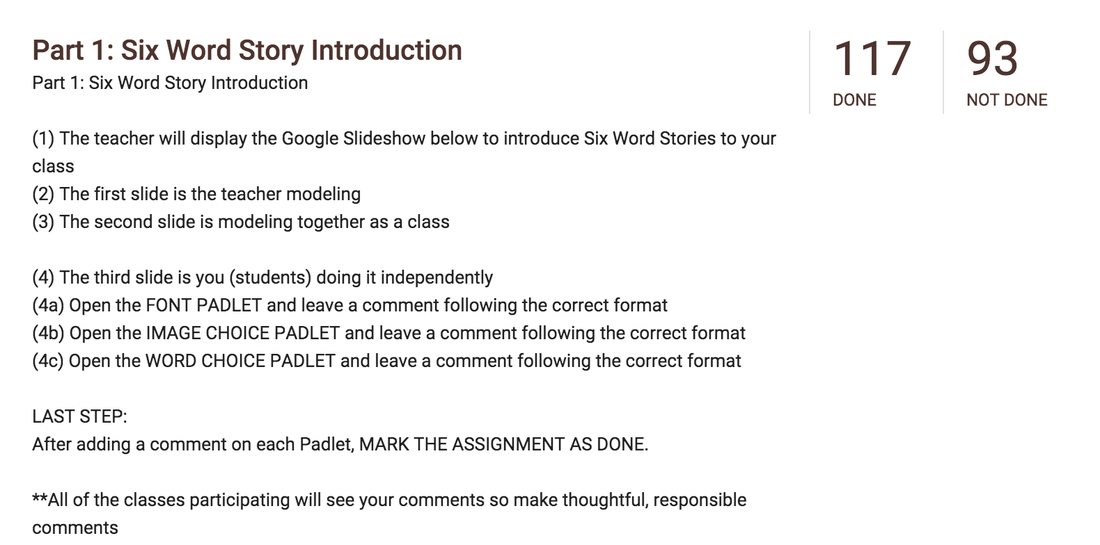
After students had started to develop an understanding of six word stories, we wanted to provide them with an opportunity to identify words that they felt connected with a chosen picture. In addition, we wanted them to practice changing the font type, color and size in a way they felt brought the story to life. To accomplish this, a single Google Slideshow for Word Choice was used for all students to practice. Moreover, a single Google Slideshow for Font allowed students to not only practice, but also view student examples from all who were participating in this collaborative project.
Part 3 and 4: Web your Words
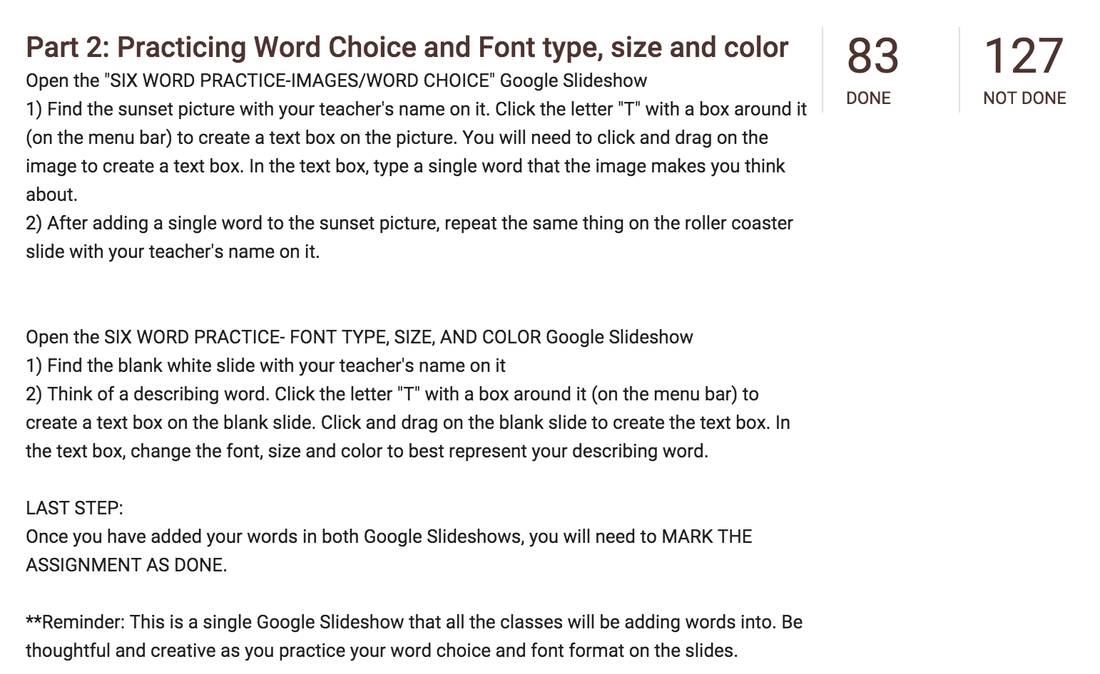
The next step in this process was to get students to start brainstorming words. They had the choice to write about the season of winter or what they planned to do over winter break. We used a PDF web for them to start brainstorming words. This was beneficial for some students. However, many students were able to come up with their six words without needing to web a variety of words.
Part 5 and 6: Creating Stories and Leaving Comments
The last phase of this project was for students to create their own six word story. We used a single Google Slideshow that all students had editing privileges to construct their stories. They got to select the image they felt brought their story to life. Furthermore, they got to play with the font size, type, color and location to enrich the impact of their story.
After students had the chance to build their stories, their final task was to leave comments on other stories. The goal was to have students leaving feedback about the element of the story they felt had the most impact on a reader and why they felt that way. 
Conclusion
I feel very fortunate to work in a district with so many amazing teachers that are willing to take on a collaborative project the week prior to winter break. We had never done this project before, but we were willing to take a risk. Besides, how could students refuse to write only six words?
We were truly blown away by the amazing creations that students came up with. They had a blast being able to create and share with others around the district. I am looking forward to making this an annual project and hope to grow it in the future. Share
0 Comments
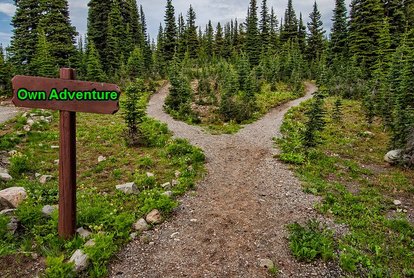 The Template For a recent writing project, we had 5th graders complete a "Choose Your Owen Adventure" story using Google Forms. We chose to use Google Forms for a couple reasons. 1) We are a GAFE district which means each student has his/her own Google Account. 2) Google Forms provides a simple structure for adding text, images, pages and linking between pages based on answers. To get the project started, I created a story map (flow chart) to assist with getting ideas on paper. In addition, this story map provided specifics for which page each question/answer should link to during their story. When I created this story map, I allowed for two different levels of difficulty. Both of these options are provided in the example below which you can download and use as you would like. Feel free to tweak it and make it your own. Beginner Format To use the beginner format, you will need pages 1 and 2 from the story map template listed above. This format provides a total of 15 pages in your Google Form. Below is an example of how you could lay out the papers in the beginner format to visually assist with the flow from one level of your story to the next. 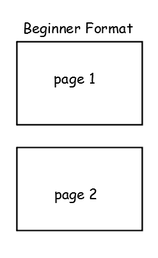 Challenge Format You will still need page 1 of the story map template. However, you will add in pages 3, 4 and 5 as well. The challenge format ends up with a total of 31 pages in your Google Form. Below is an example of how you could lay out the papers in the challenge format to visually assist with the flow from one level of your story to the next. 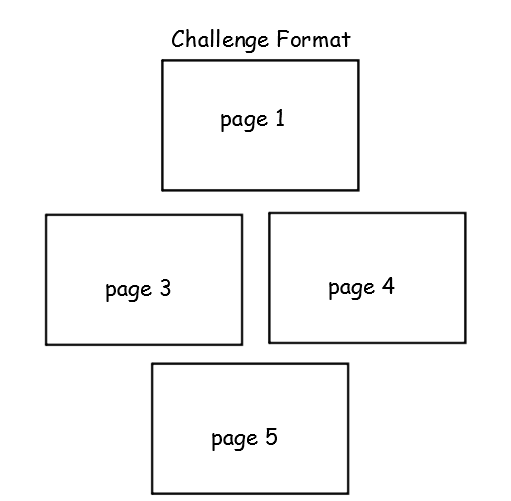 Our 5th Grade Results The 5th grade students used the beginner format to complete their Choose Your Own Adventure stories. We broke this into four different sessions. Session 1: A completed story was demonstrated for students to see the final product. The beginner story map was provided to students. They began mapping out their story. Session 2: A Google Form was introduced to students. Adding pages was demonstrated after creating a new form. Students could finish their story map and move onto creating a Google Form. Their main goal was to create a Google Form that had 15 pages. We labeled pages 2 through 15 as follows: page 2, page 3, page 4, etc. Session 3: Students were introduced to adding multiple choice questions to each page of their form. In addition, they were shown how to link to specific pages based on answers. Students spent time during this session, adding their text from their story map to the correct page in their Google Form. We had students link to the correct pages as they created their multiple choice question for each page. **Some students benefited from adding their questions to all pages first. After finishing all pages, they went back and linked. They were frustrated with creating questions and linking at the same time. Allowing them to type their questions and then go back and link alleviated that frustration. Session 4: We introduced students to adding images to each of their pages in their story. In addition, we modeled how to view their live form, copy their live form's URL and submit it to me via a Google Form that I had created. Students spent this session adding images and then submitting their final story's link to me. 5th Grade Choose Your Own Adventure Website To conclude this project, I took all the links that were submitted to me and added them to a Google Site. We originally talked about turning each Choose Your Own Adventure story into a QR Code and allowing students to scan and try out each other's stories. In the end, we went with a Google Site that students could navigate at school or home and try out each of their classmate's stories.
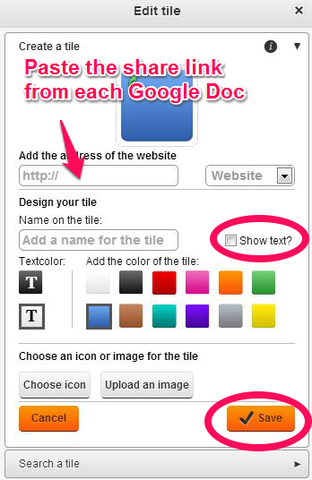
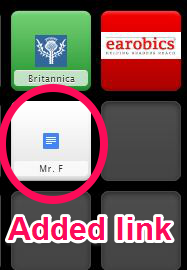
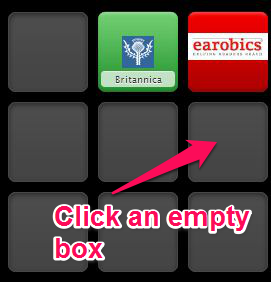
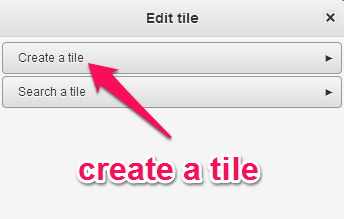
Choose Your Own Adventure Google Site 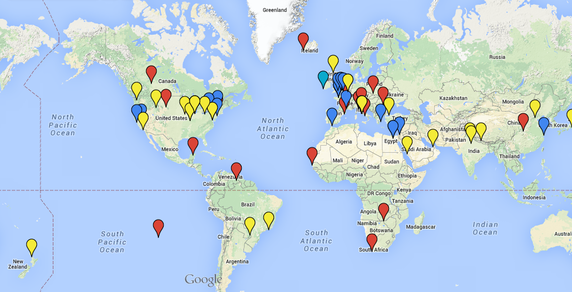 We recently completed a research project with all three fifth grade classes at my school. During this project, students got to pick a landmark to research. After picking a landmark, they used a template to begin filling out information. The template was laid out in a specific grid to match a Pic Monkey Collage we used later in this process. Once students had recorded all their information in the grid, they were then required to find an image for each cell in the grid that best represented the information in that cell. Students used Pic Monkey to create a collage of their images they had found for each cell in their grid. This picture collage was uploaded into Thinglink to begin adding "tags" to their collage. Each photo of their collage had a "tag" added to it with the corresponding information from the cell on their grid template. After all the "tags" had been added, students then copied their Thinglink URL, opened up a shared map, searched for their landmark and added their landmark to the Google Map. They were then able to add their Thinglink URL to their landmark location. To conclude, each student was recorded giving his/her speech about their landmark. This speech was uploaded to YouTube. The URL for their YouTube speech was copied by students and added on the Google Map to their landmark. The final result was a single Google Map with a landmark represented for each student's research. Each landmark had a Thinglink URL and a YouTube URL. Below are more detailed steps of the process for this project. Landmarks We used this website for students to choose their landmarks. Students started by exploring the list of 100 landmarks. They chose their top five landmarks. We then went one by one and had students select a landmark. We did this so we would not have duplicates of the same landmark. They were allowed to search the internet to answer the questions on the Landmark Research Template. They did use TripAdvisor to determine the landmark's rating as well as the average price of activities to do at the landmark. Pic Monkey I created a Symbaloo Mix for students to use when searching for images that they had rights to use in their project. However, we still had some students that didn't filter Google or Bing results based on license. When they published their ThingLink, it would not display because of using copyrighted images. It was a good lesson for students to see why we stressed using pictures that they had permission to use. 1) After pictures were found, students went to PicMonkey. They clicked on collage to build their collage. 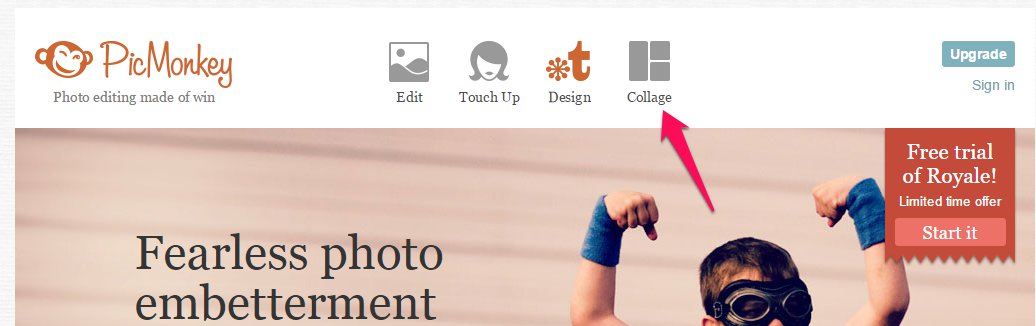 2) After adding the images from their computers, they had to change the layout of the collage. To do this, they had to click the layout icon like the picture below. 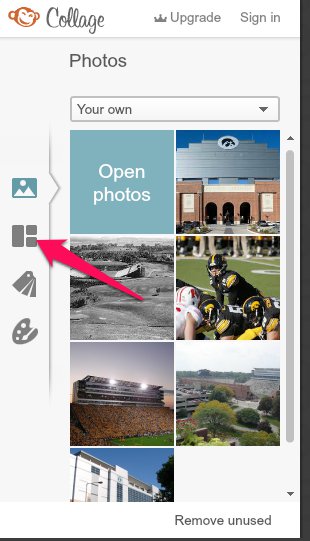 3) After selecting the layout option, they clicked "cards," changed the layout to 6 x 8 and then chose the last option to the right like the image below. *This layout was chosen because it matched out Landmark Research template that students had used to record their information. This was set up this way to assist with easily adding "tags" during the Thinglink step.  4) After changing to the correct layout, they just had to drag and drop their images into the correct cell of the grid. Once done adding images, they clicked save at the top. 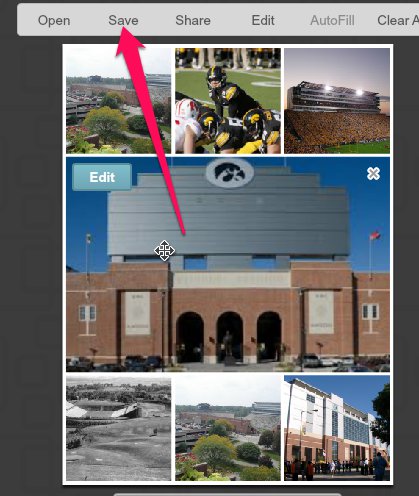 5) After clicking save, they are given the option to rename their image and specify the save location. We saved all our images to Google Drive during this project. 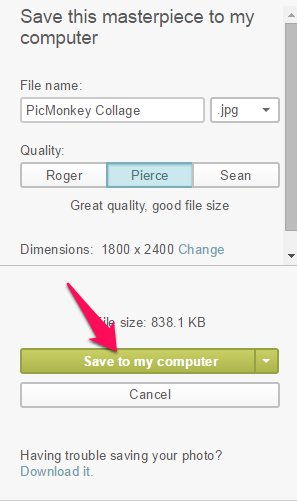 Thinglink Prior to this project, I had purchased a license to Thinglink. It was $35, but provided some nice features for using it with 75ish 5th graders. 1) The first thing students did after logging into their account was click create.  2) Next students had to click the big blue button to be able to select their pic collage they had made using PicMonkey. 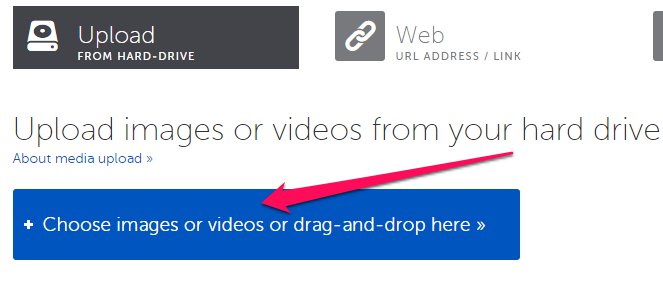 3) After their image was loaded, they were able to rename their Thinglink image and begin adding tags.  4) When adding a tag, they had the option to put in a URL or they could simply type in text that would be visible when the tag was hovered over by the mouse. We had students type in text. The text was the information they had recorded from their Landmark Research template. 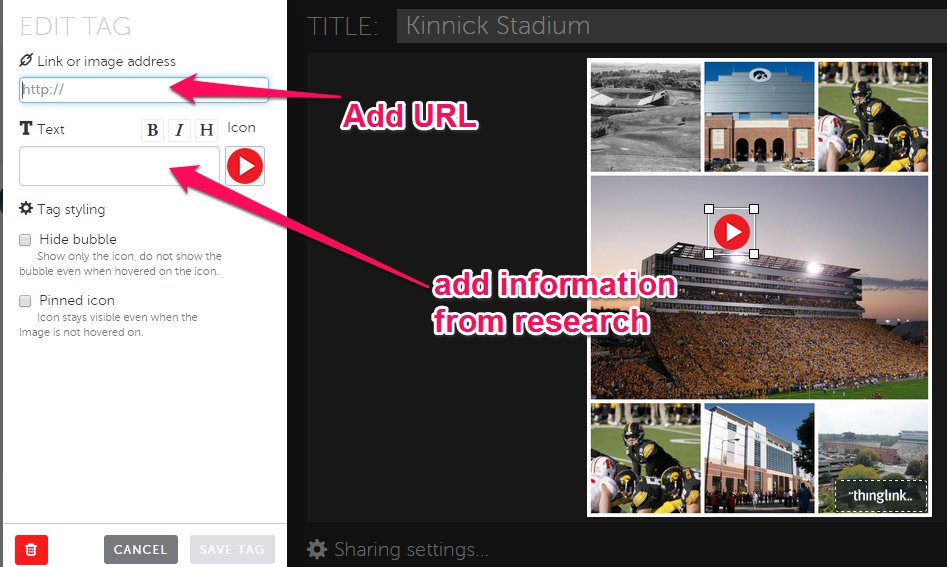 5) After adding all their tags, students were able to save their Thinglink image by clicking the green save button. 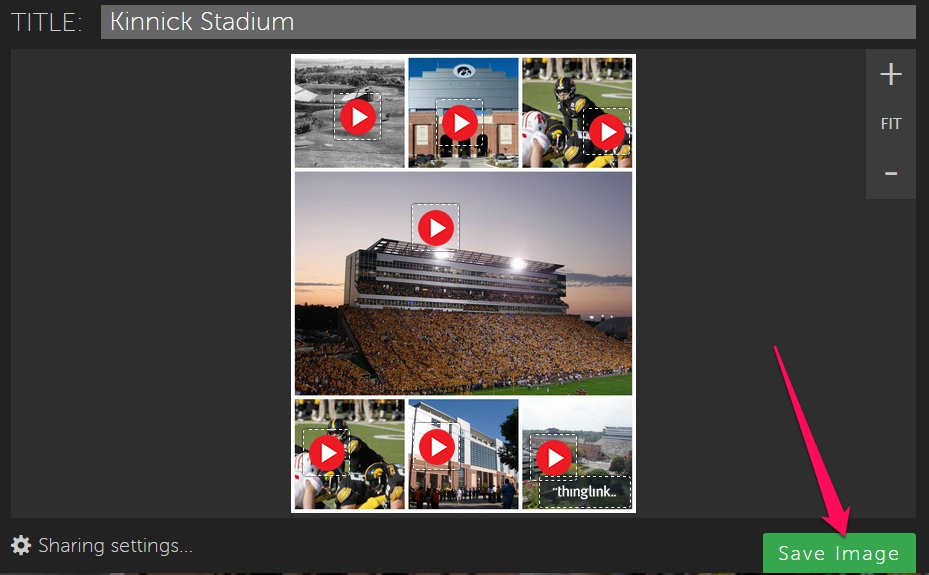 6) After saving their Thinglink image, they were able to click the share button. This provided them with multiple options for sharing. We chose to have students copy the URL to add to our shared Google Map. 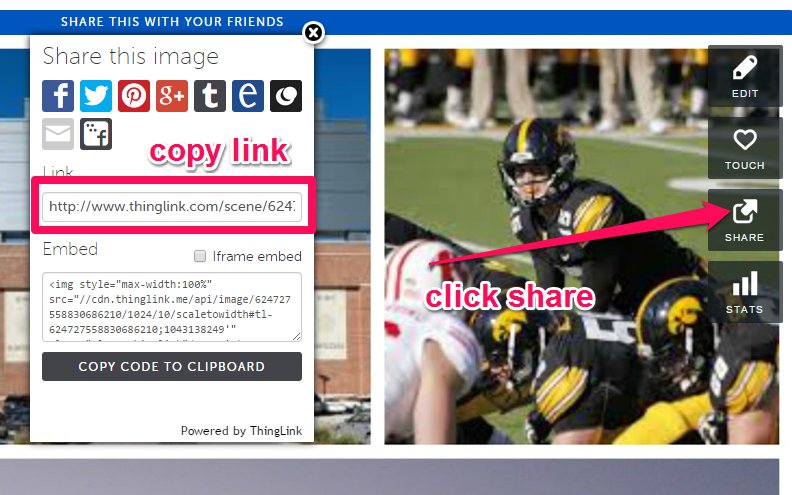 Google Maps Prior to students adding their links to a shared Google Map, I had to set up some of the basics of the map. 1) I first had to go to maps.google.com and click in the search bar. Make sure you are signed into Google which should give you the option for "my maps." After clicking my maps, you should have the option to "create" a new map. 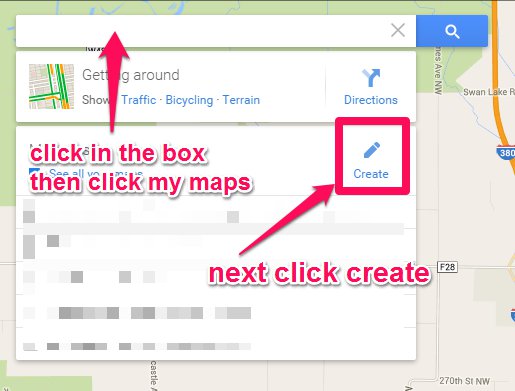 2) At this point you can rename your map as well as your first layer. 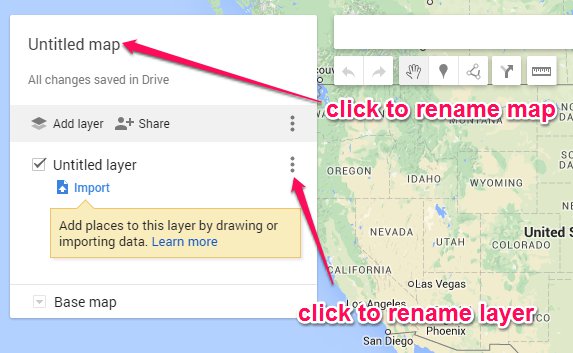 3) After renaming the map and layer, click the three dots on the newly renamed "layer" and choose to "open the data table. 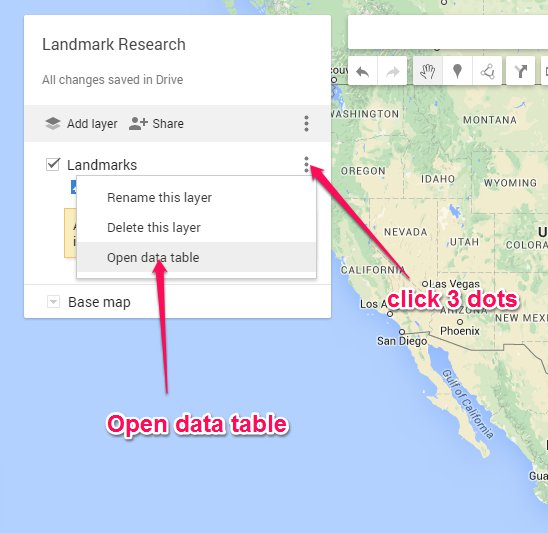 4) After opening the data table, you need to add a couple new columns. You can click the drop down arrow and choose to insert a column before or after. 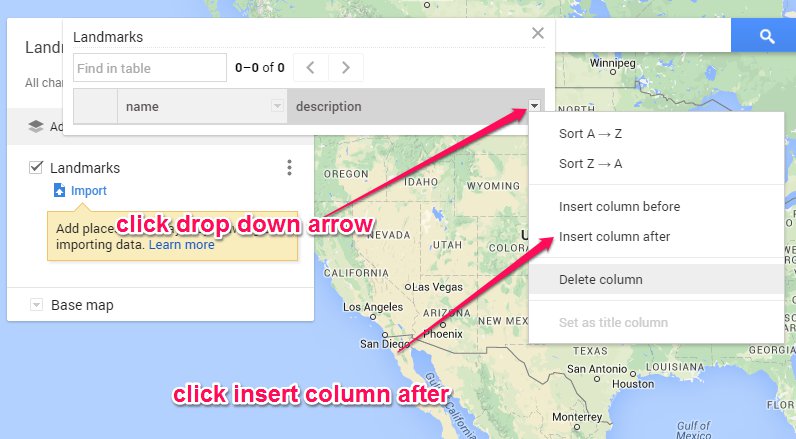 5) We added a Thinglink and YouTube column. We deleted the description column. 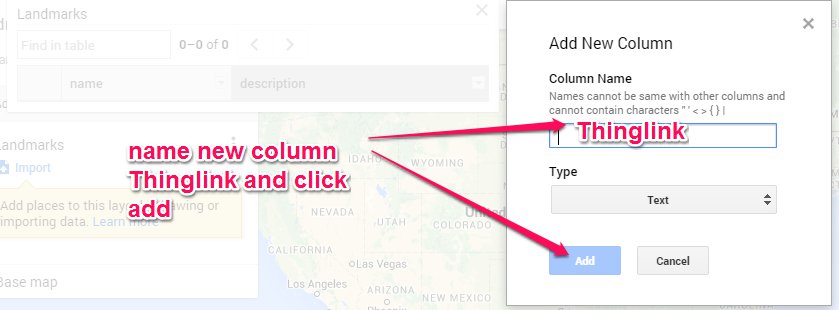 6) After adding the columns, you should be able to see the columns you will have being displayed in your "data table." 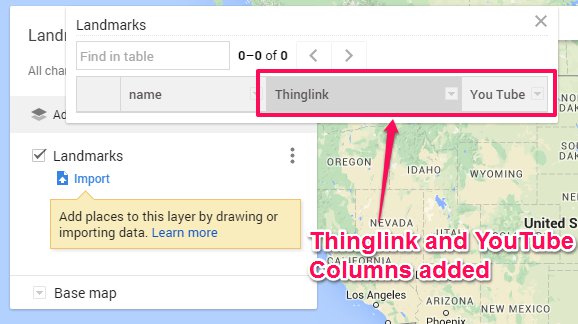 7) Once you have the data table all set up, you can share the map so your students can begin adding their landmark research. To do this, click the share button. 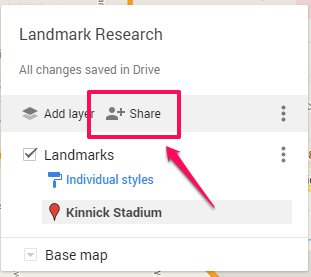 8) We set the link so that anyone who had the link could edit. The link that was provided was then shared with students. We shared it in Google Classroom so it was easy to access the map. After the map was finished, we went back in and set the sharing options to "view" only instead of editing. That made it so we could share the map with the world and not worry about someone being able to edit the map. 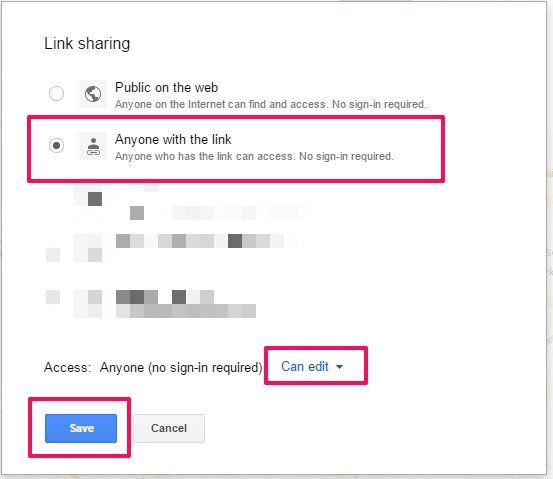 9) After sharing the map with students, they can click in the search bar at the top and search for their landmark. After their landmark is located, they can click on the green icon. This will allow them to click "add to map."  10) Once their landmark is added to the map, they will have the option to click a pencil on their landmark. This will allow them to edit the Thinglink and You Tube fields. Students can add in their links for both Thinglink and YouTube. Once done adding those URLs, they can click save. Their landmark is now added to the map. 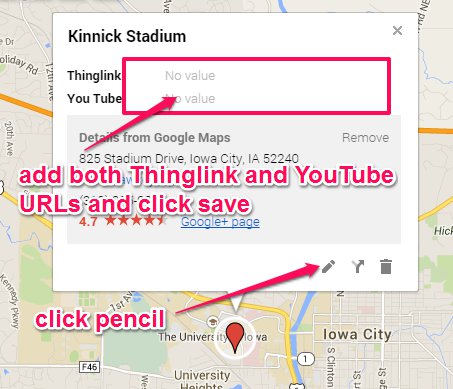 Changes This project was rushed a little faster than we would have liked. One of the 5th grade classes was piloting some Chromebooks so we had to finish this project before the Chromebooks went away. Looking back on this project, we would have liked to have students cite their sources and add a bibliography to either their Thinglink or their landmark on the Google Map. In addition, more time spent on finding images that students were allowed to use would have reinforced copyright laws. Lastly, after doing this project, we talked about doing some green screen movie making for their speeches. Having an image of their landmark as the background as they were doing their speech would have made their speech come to life even more. Share This:The Plan..... We had been studying how to turn data into pie charts or "percent circles." I had planned to have students take some data, add it into Google Sheets, create a pie chart, save their chart as an image, and create a Thinglink to add "tags" to the slices of the pie chart. The Data and Chart... Our community is home to The University of Iowa. With it being NCAA basketball season, we decided to use some statistics from theIowa men's basketball team. 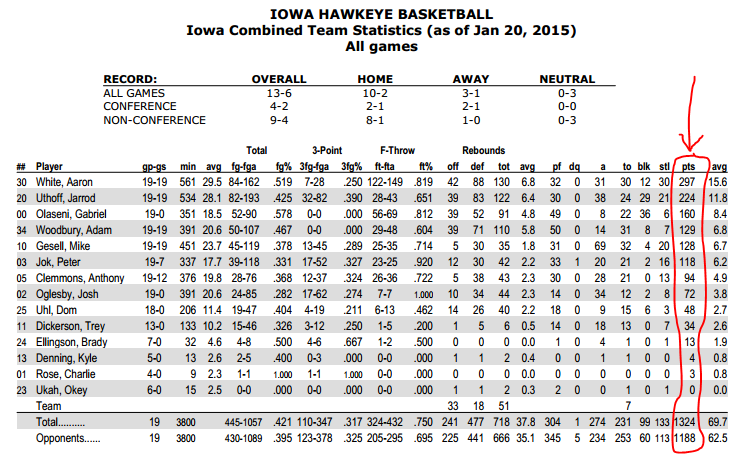 We started by looking at the total points scored by each player on the team. We took the data and put it into a Google Sheet. 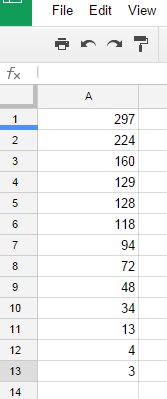 After the data was recorded in the Google Sheet, it was highlighted. After being highlighted, we clicked insert and chart. 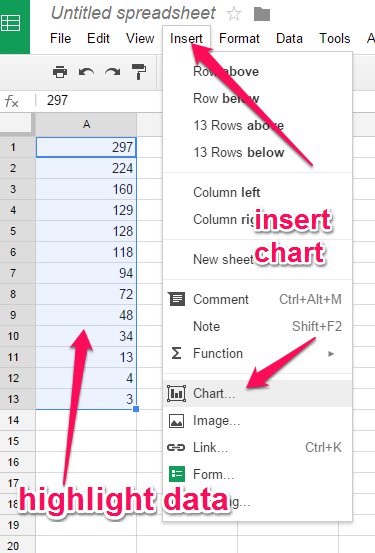 After selecting to insert chart, we selected "charts" and then we were able to choose "pie chart." 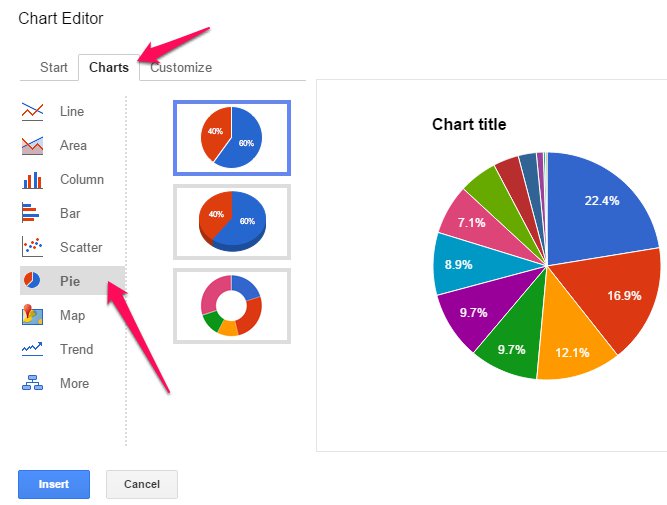 After the chart was chosen, we then clicked insert to get it into the Google Sheet. At this time, we took a screen shot of the pie chart. We saved the screen shot to our desktop for easy access. 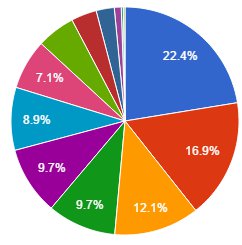 Thinglink... After our pie charts were saved to our desktops, we navigated to Thinglink. After signing into Thinglink, we clicked "create" to begin adding tags to our pie chart. 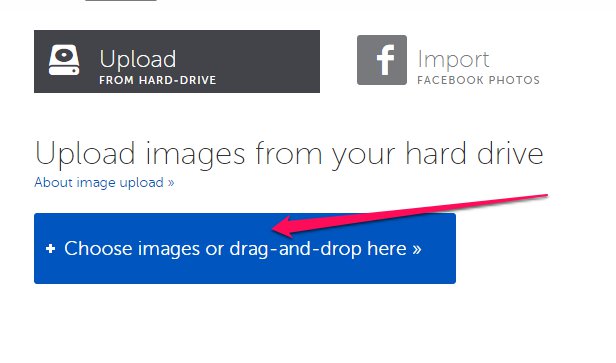 We chose to upload images. Students would select the image from their desktop. Once loaded in Thinglink, we gave our picture a title and added our first "tag." 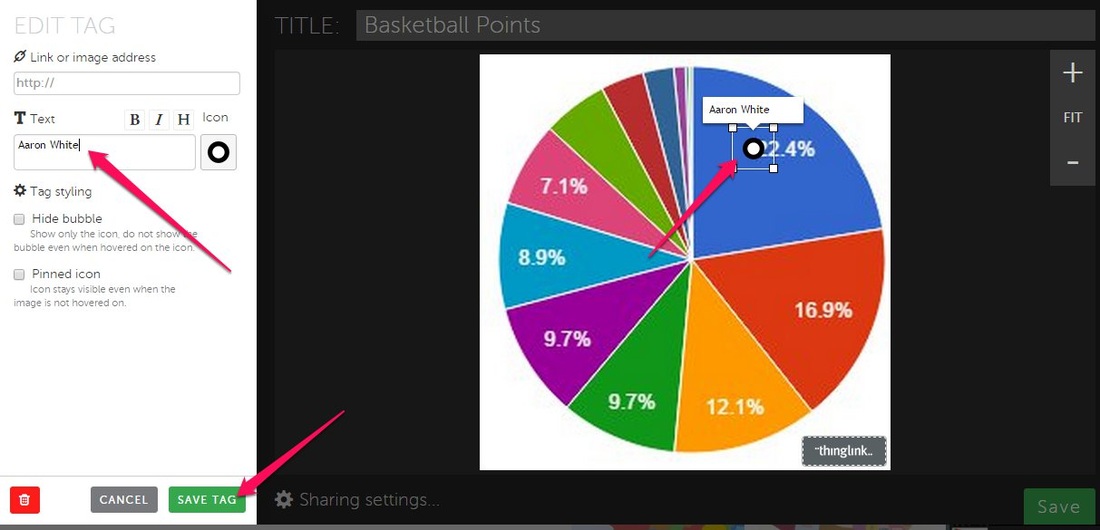 Students used the stats of the men's basketball team to correctly name the tags. Each tag was supposed to contain the name of the player who had scored that percent of the total points. This process was repeated for all slices in our pie chart. Upon completing their interactive image, they clicked share and copied the embed code. This embed code was then added to their Kidblog to share. The next step of this process was to look at more statistics from the men's basketball team. Take away... We could have done this same process using the provided data from the curriculum. However, to make this a more authentic experience, we chose to utilize some of the local information we had available. Students were able to make a connection with the data and knew almost all of the players. It was a fun way to practice pie charts in an authentic way. Share This: Recently we began studying about early colonies in social studies class. In an attempt to make the study more interactive and engaging, we utilized Google Maps to create our own maps. Not only did the students mark some of the colonies, but they were able to add their own information to each place marker they added to their maps. This idea was initiated while attending the ITEC conference in October. I attended a Google Map making session presented by Jim Sill. I didn't know how making Google Maps would apply to my own classroom, but I had heard great things about him and decided to attend. It was a game changer for sure. You can see an example of the final maps here. I will outline the steps of this process below. My students really enjoyed this activity. It really helped them connect with current day United States and where colonies were established hundreds of years ago. The Map Making process Step 1: You will need to visit maps.google.com We are a GAFE so all my students were logged into their Google Accounts when navigating to maps.google.com Step 2: Click into the map search bar and you will be given the option "My maps". 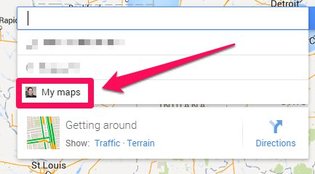 Step 3: Click create to begin creating your own map 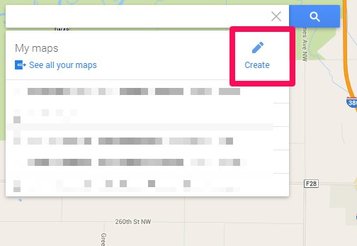 Step 4: Rename your map and rename your first layer according to your project. We renamed our first layer to "Early Settlements." 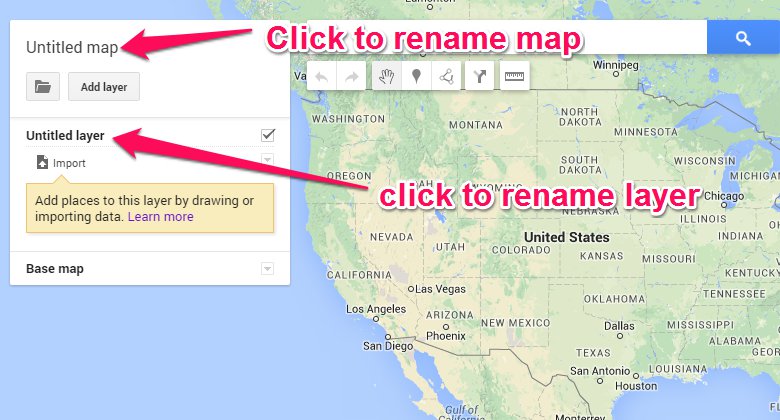 Step 5: Type the name of your first location you want to add to your map by typing its name in the Google Map search bar at the top of your map. You can then choose to add the location to your map. 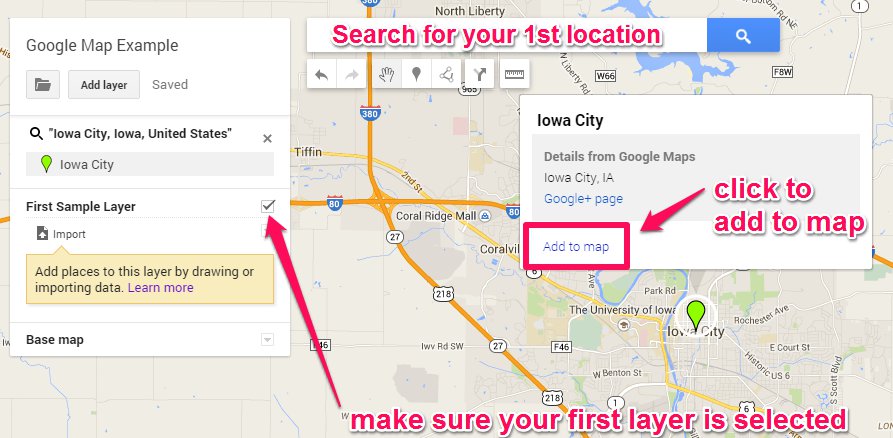 Step 6: After you have added one location to your first layer, you should now have a "data" option for your first layer. Select this "data" option to change your data fields. 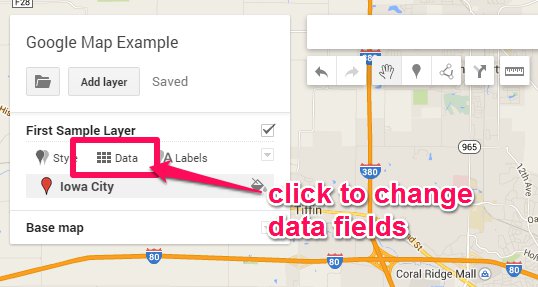 Step 7: Once you have clicked "data", a small insert will open that looks like a Google Sheet. You can then add/delete columns. You only need to do this once for this layer. Every time you add a new location for this layer, the data fields will apply to every location you add. 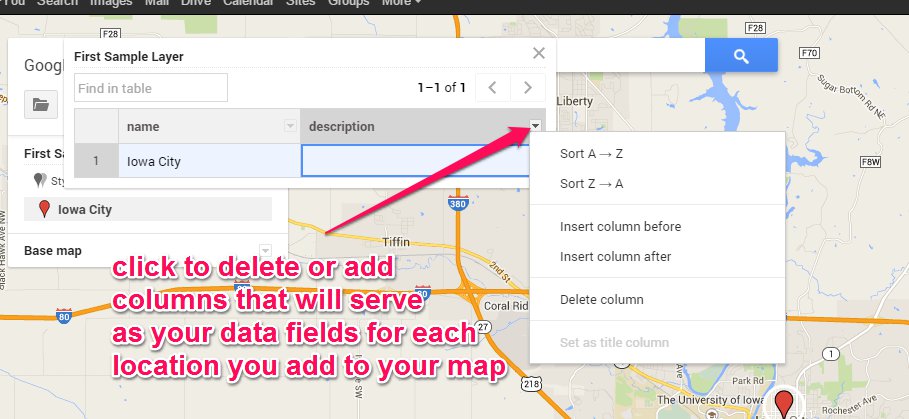 Step 8: After you have customized your "data" table, you can then add more locations to your chosen layer and customize the information for each location you add. 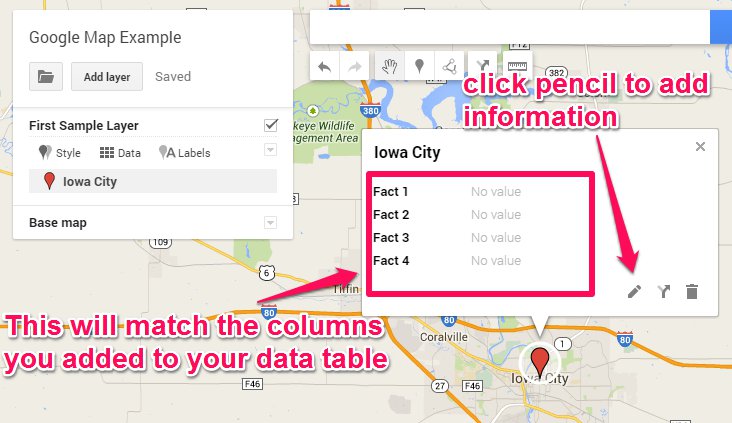 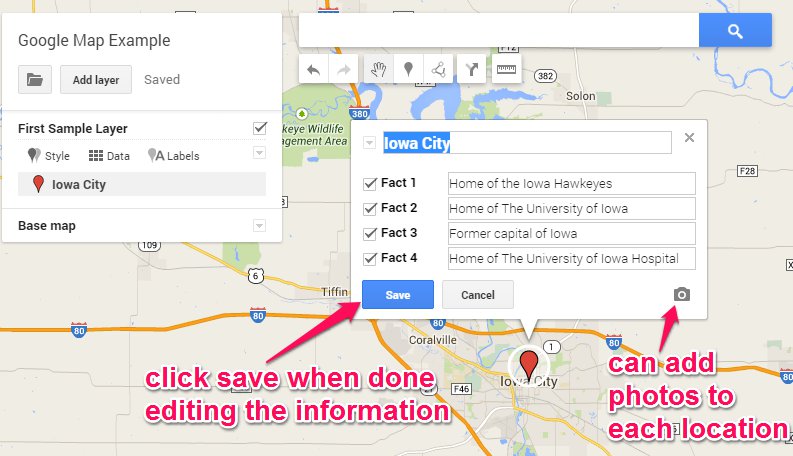 Step 9: You can continue to add more locations to your layer. You will be able to fill out information about each location you add. In addition, you can add more layers. However, when you add a new layer, your "data" table will need to be created again. Your data tables do not transfer from one layer to the next. Conclusion I was able to apply this Google Map making process to my social studies classroom. There are tons of other ways to integrate this across curricular areas. Check out Jim Sill's page on ways to integrate both Google Earth and Maps into your classroom. Share This: My first graders have been working on animal research this week. We had previously worked on animal research in small groups. This time around we went to individual animal research. Students got to pick their own animals and record all their information about their chosen animal. To accomplish this, we used Google Docs, Britannica School Elementary (available through our AEA), Symbaloo and Kidblog. Google Doc Set up We are not a GAFE school. I used my personal Google Account to set up the documents that each student would be working on for their research. I began by creating a new Document for each student. I saved it as their name.  After creating the document, I had to make the document "shared." I changed the privileges to anyone who had the link could edit the document. By allowing anyone with the link to edit, there was no log on necessary by my students to add content. 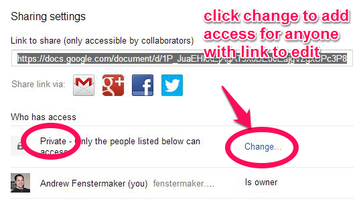 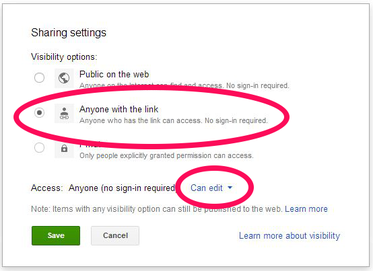 After you have changed the permissions, you can then copy the link. Anyone who has that link will be able to edit since you just changed the permissions. *This link will be important to add to Symbaloo.  Below is a visual of what I added to each document. The students then added the rest of the content. I provided them with the template to assist with organizing their text as they found information. 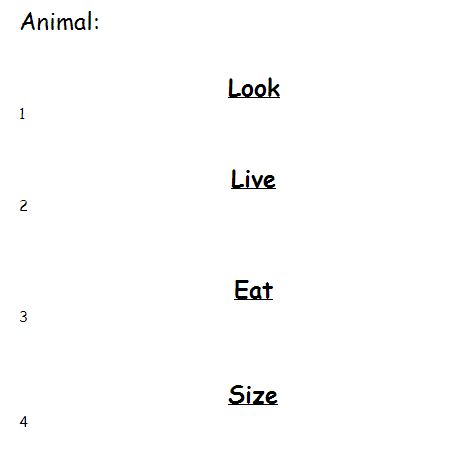 Symbaloo Set up We already use Symabloo for all of our links. This is a simple way for students to quickly access everything we use on the web. Below is a screen shot of the Symbaloo page. Each student had one icon that when clicked would open their Google Doc. 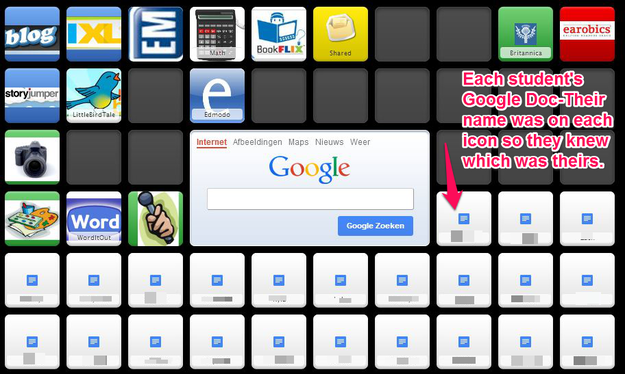 Below are the steps I used to add each icon to our Symbaloo page.
  This process would be repeated for each student. Since I have 23 first graders, I had to add a total of 23 individual icons that would provide a shortcut to get to their Google Doc. Britannica Below is a screen shot of what the Britannica page looked like for my kids. They chose the mammals link to choose their animal and find facts for their animal research.  After clicking on mammals, students got to find an animal. Once an animal was found, they would then click on that animal's name. 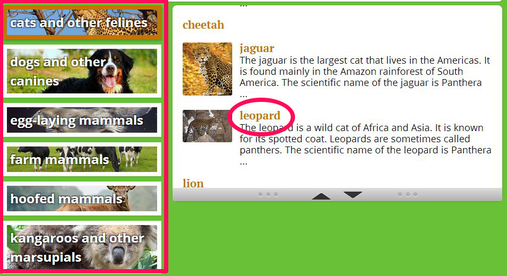 Once on the chosen animal, they could try their best to read the information. There is an option to have the text read aloud. Many students took advantage of this option to gather the facts about their animal. 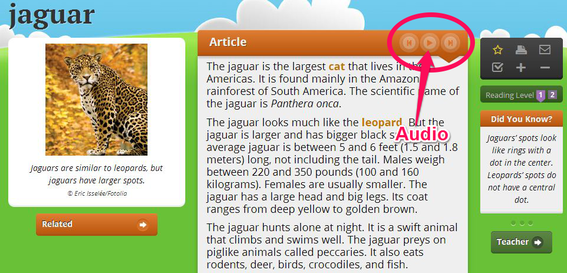 Kidblog After students finished their animal research, I was able to embed the Google Doc within their Kidblog. I did this part as it took some changes to the Google Doc to allow for embedding on their Kidblog. Below is an example of an embedded animal research project. 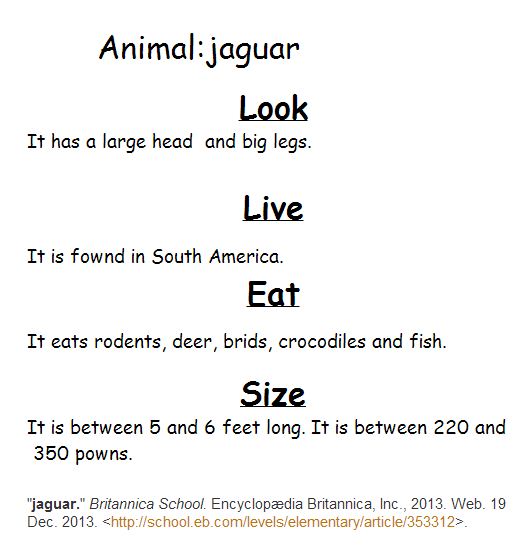 
If you are anything like me, you start your browser and as the day progresses you are soon inundated with multiple tabs. I have tried keyboard short cuts to toggle between tabs. Move to the next tab in Chrome CTRL + TAB Move to the previous tab in Chrome CTRL + SHIFT + TAB While I love keyboard shortcuts, moving quickly between tabs still seems to pose a challenge. This is where I find the Tab Cloud extension to be a workflow savior. See the pictures below for some more information about this extension. 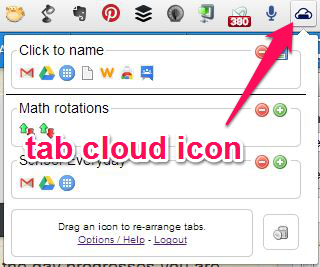
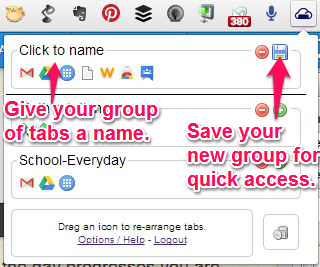
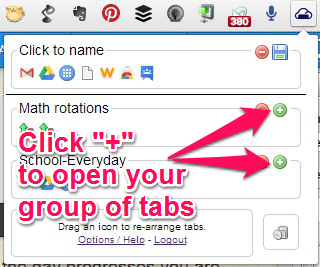
I have only started using this extension and love it. When I turn my computer on to start the school day, I click my "school-everyday" tab to open up my multiple tabs for the day. I also have a "math rotations" tab that quickly opens up timers to display our transitions as well as the time left in our groups.
One big challenge with my first graders is when they have to write. Some of my students do great at sounding out words and trying their best. Some of my students shut down when writing because they do not like spelling words wrong. In addition, due to some missing letter sounds and identification skills, sounding out can still be a huge challenge. We have tried two different apps to assist in this process. Moreover, we have two different scenarios for implementing these apps. Scenario 1--only one teacher With only one teacher in the classroom, sometimes it is difficult to assist students in editing their writing. This is where they can use the Google Search App or the Dragon Dictation app. When we are writing our sloppy copies, students are to underline words they are not sure how to spell. When they move onto editing, they can use either app to say the underlined word. Google Search and/or Dragon Dictation will turn their dictated word into text. Scenario 2--Reluctant writers For those students that are lacking some letter ID and sound skills, we use the Dragon Dictation app. Students are able to dictate a sentence at a time. The app will then change their dictation into text. *This may take some practice. Speaking slowly and close to the microphone helps with the accuracy in which the dictation is converted to text.  To start the school year we have an ice cream social night. This is always a couple nights before the first day of school. Students and parents come to meet their new teacher/classroom prior to the first day. This helps students alleviate some of the unknowns about the first day of school. In an effort to be more paperless in my classroom, I am integrating Google Forms into my ice cream social night. In the years past I have posted papers on a table for parents to fill out information such as email, volunteering, how kids get to and from school, etc. This year it will all be done by Google Forms. 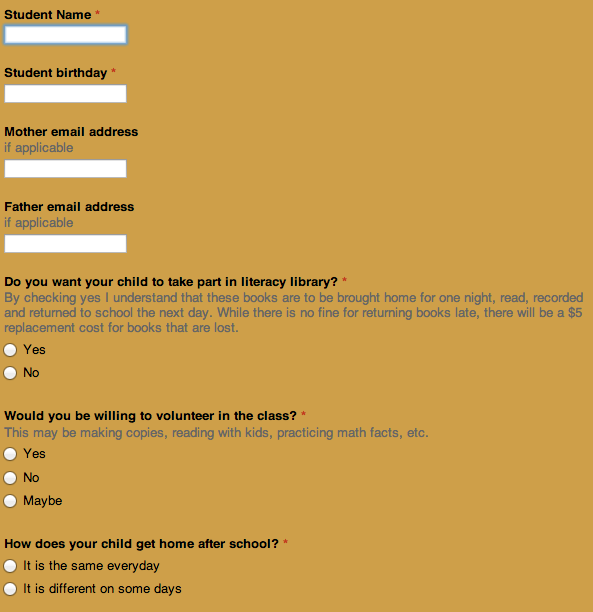
The last question on the form asks about getting home from school. In Google Forms you can set a rule based on which answer is chosen. If parents select the "It is the same everyday" option they will be taken to the page below. 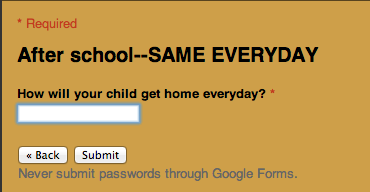
However, if a parent chooses the "It is different on some days" option, then they will be taken to the page below. 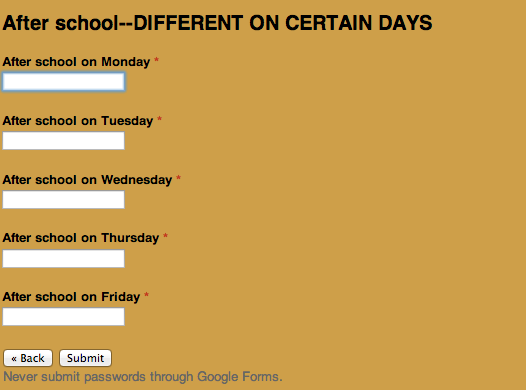
There is not a lot of information that I need parents to provide. Most of it is already filled out via an e-registration tool that my district used. However, this short Google Form will provide me with the necessary information without requiring paper and pencils.
 I will be presenting at iPad U which is an iPad professional development session hosted at the Grant Wood AEA in Iowa. This PD session will be keynoted by Kathy Schrock. This will be a two day session over integration of the iPad into the classroom. I am fortunate to have the opportunity to share how I utilized QR Codes and to assist in implementing a blended learning model in my daily math instruction. QR Codes were scanned to quickly direct students to videos. Upon completing the video, students took a quiz. After the quiz I used the Flubaroo script in Google Drive to instantly grade the results. This quickly highlighted which students would need some more support or extension. Furthermore, using this model I was able to free up more time to work one-on-one and in small groups more consistently and effectively. |
Andrew FenstermakerInstructional Technology Coordinator | Innovation Coach | Google Certified Innovator | Presenter | Blogger | Adjunct @UiowaEducation | Owner @kids_f_i_r_s_t 


|


 RSS Feed
